Most tools, models, and scripts that you create with ArcGIS have parameters. Input parameters are values with which the tool (or model or script) starts its work, and output parameters represent what the tool gives you after its work is finished.
A tool, model, or script without parameters is only good in one scenario. Consider the model you just built that used the Buffer, Intersect, and Clip tools. This model was hard-coded to use the us_cities, us_roads, and us_boundaries feature classes and output a feature class called suitable_land. In other words, if you wanted to run the model with other datasets, you would have to open ModelBuilder, double-click each element (US Cities, US Roads, US Boundaries, and Suitable Land), and change the paths that were written directly into the model. You would have to follow a similar process if you wanted to change the buffer distances, too, since those were hard-coded to 10 miles.
Let’s modify that model to use some parameters, so that you can easily run it with different datasets and buffer distances.
- If it's not open already, open the project C:\PSU\Geog485\Lesson1Practice.aprx in ArcGIS Pro.
- In the Catalog window, find the model you created earlier in the lesson, which should be under Toolboxes > Lesson1Practice.atbx > Find Suitable Land.
- Right-click the model Find Suitable Land and click Copy. Now, right-click the Lesson1Practice toolbox and click Paste. This creates a new copy of your model that you can work with to create model parameters. Using a copy of the model like this allows you to easily start over if you make a mistake.
- Rename the copy of your model Find Suitable Land With Parameters or something similar.
- In your Lesson 1 toolbox, right-click Find Suitable Land With Parameters and click Edit. You'll see the model appear in ModelBuilder.
- Right-click the element US Cities (should be a blue oval) and click Parameter. This means that whoever runs the model must specify the cities dataset to use before the model can run.
- You need a more general name for this parameter now, so right-click the US Cities element and click Rename. Change the name to just "Cities."
-
Even though you "parameterized" the cities, your model still defaults to using the C:\PSU\Geog485\Lesson1.gdb\USA\us_cities dataset. This isn't going to make much sense if you share your model or toolbox with other people because they may not have the same us_cities feature class, and even if they do, it probably won't be sitting at the same path on their machines.
To remove the default dataset, double-click the Cities element and delete the path, then click OK. Some of the elements in your model may turn gray. This signifies that a value has to be provided before the model can successfully run.
- Now you need to create a parameter for the distance of the buffer to be created around the cities. Right-click the element that you named "Buffer the cities" and click Create Variable > From Parameter > Distance [value or field].
- The previous step created a new element Distance [value or field]. Rename this element to "Cities buffer distance" and make it a model parameter. (Review the steps above if you're unsure about how to rename an element or make it a model parameter.) For this element, you can leave the default at 10 miles. Your model should look similar to this, although the title bar of your window may vary:
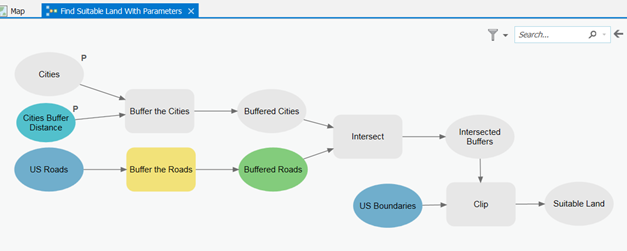 Figure 1.7 The "Find Suitable Land With Parameters" model following Step 10, above, and showing two parameters.
Click link to expand for a text description of Figure 1.7.A gray oval labeled Cities and a light blue oval labeled Cities Buffer Distance lead to a gray box labeled Buffer the cities, which leads to a gray oval labeled buffered cities.
A blue oval labeled US roads leads to a yellow box labeled Buffer the roads, which leads to a green oval labeled Buffered roads.
The gray oval labeled Buffered cities and the green oval labeled Buffered roads both lead to a gray box labeled Intersect. This gray box leads to a gray oval labeled Intersected buffers.
The gray oval labeled Intersected buffers and a blue oval labeled US Boundaries lead to a gray box labeled Clip.
The gray box labeled Clip leads to a gray oval labeled Suitable land.
- Repeating what you learned above, rename the US Roads element to "Roads," make it a model parameter, and remove the default value.
- Repeating what you learned above, make a parameter for the Roads buffer distance. Leave the default at 10 miles.
- Repeating what you learned above, rename the US Boundaries element to Boundaries, make it a model parameter, and remove the default value. Your model should look like this (notice the five parameters indicated by "P"s):
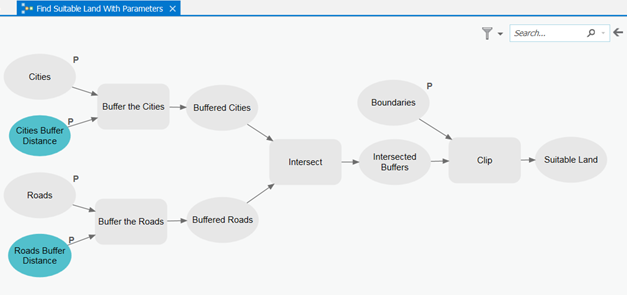 Figure 1.8 The "Find Suitable Land With Parameters" model following Step 13, above, and showing five parameters.
Click link to expand for a text description of Figure 1.8.A gray oval labeled Cities and a light blue oval labeled Cities buffer distance lead to a gray box labeled Buffer the cities which leads to a gray oval labeled Buffered cities.
A gray oval labeled Roads and a light blue oval labeled Roads buffer distance both lead to a gray box labeled Buffer the roads, which leads to a gray oval labeled Buffered roads.
The gray oval labeled Buffered cities and the gray oval labeled Buffered roads both lead to a gray box labeled Intersect. This gray box leads to a gray oval labeled Intersected buffers.
The gray oval labeled Intersected buffers and a white oval labeled Boundaries lead to a white box labeled Clip.
The gray box labeled Clip leads to a gray oval labeled Suitable land.
- Save and close your model.
-
Double-click your model Lesson 1 > Find Suitable Land With Parameters and examine the tool dialog. It should look similar to this:
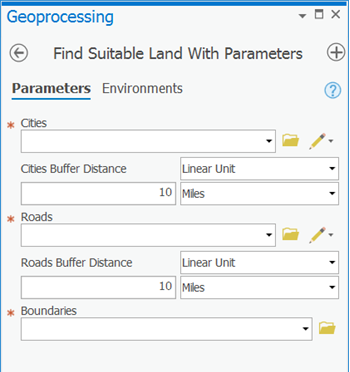 Figure 1.9 The model interface, or tool dialog, for the model "Find Suitable Land With Parameters."
People who run this model will be able to browse to any cities, roads, and boundaries datasets, and will be able to control the buffer distance. The red asterisks indicate parameters that must be supplied with valid values before the model can run.
- Test your model by supplying the us_cities, us_roads, and us_boundaries feature classes for the model parameters. If you like, you can try changing the buffer distance.
The above exercise demonstrated how you can expose values as parameters using ModelBuilder. You need to decide which values you want the user to be able to change and designate those as parameters. When you write Python scripts, you'll also need to identify and expose parameters in a similar way.