PyScripter is an easy IDE to install for ArcGIS Pro development. If you are using ArcGIS Pro version 2.2 or newer, you will first have to create and activate a clone of the ArcGIS default Python environment (see here for details on this issue). ArcGIS Pro 3.0 changed the way that Pro manages the environments and gives more control to the user. These steps below are written using Pro 3.1 as a reference. If you have an earlier version of Pro, these steps are similar in process but the output destination (step 4.1) will be set for you. To do this, follow these steps below and please let the instructor know if you run into any trouble.
- In the ArcGIS Pro Settings window (often the window that opens when you start Pro), click on Package Manager on the left side to open Pro's Python Package manager.
- Next to the Active Environment near the top right, click on the gear to open a window listing the Python environments.
- Find the environment named arcgispro-py3 (Default) and click on the symbol that looks like two pages or click on the ... to expand a menu to select clone.
- A window will pop up to allow you to name the new environment. The default destination path that Pro automatically sets is ok.
- The destination should be something like C:\Users\<username>\AppData\Local\ESRI\conda\envs\arcgispro-py3-clone, or C:\Program Files\ArcGIS\Pro\bin\Python\envs\arcgispro-py3-clone. Make a note of this path (you can highlight the path and ctrl+c to copy it to your clipboard) because you will need it for PyScripter.
- Wait while it clones the environment.
- If the cloning fails with an error message saying that a Python package couldn't be installed, you may need to run ArcPro as an Administrator (do a right-click -> Run as administrator on the ArcGIS Pro icon) and repeat the steps above (it's also helpful to mouseover that error box in Pro and see if it gives you any additional details).
- When the cloning is done, the new environment "arcgispro-py3-clone" (or whatever you choose to call it - but we'll be assuming it's called the default name) can be activated by clicking on the ... and selecting Activate.
- You may need to restart Pro to get this change to take effect, and you may see a message telling you to restart. If not, then click the ok button to get back to Pro.
Now perform the following steps to install PyScripter:
- Download the installer from PyScripter's soureceforge download page, or you can download the install exe from the course files (64bit version or 32bit version). If you have problems with one version, you can try the other version. Let the Instructor know if you have any problems during the installation.
- Follow the steps to install it, checking the additional shortcuts if you want those features. Create a desktop shortcut does what it says it does. A Quick Launch shortcut is placed in the Task Bar, and the Add 'Edit' with PyScripter' to File Explorer context menu adds the option to use PyScripter in the menu that appears when you right click on a file.
- Click the Install button and follow the prompts. Check the Launch PyScripter box and click Finish.
- Once PyScripter opens, we need to point it to the cloned environment we made. To do this, find the Python 3.x (64-bit) on the bottom bar. Your Python might be different, and that is ok for now. Click on the Python 3.x text and it will open a window listing all of the Python environments it found. If your clone is not listed, you need to click on the Add a new Python version button (gear with a plus) and navigate to where it was created. You can get this path by referring to the Package Manager in Pro. Once you get to the parent folder of the environment, select it and it will add it to the list of Unregistered Versions.
- Double click on the environment to activate it. If you get an Abort Error, click ok to close the prompt.
- Verify that your environment is active. It will have a large arrow next to it. Close the Python Versions window. Note that the below image is pointing to the default ArcGIS Pro Python environment. You can use this environment, but adding packages to it has the potential to break Pro. It is recommended that you use a cloned environment.
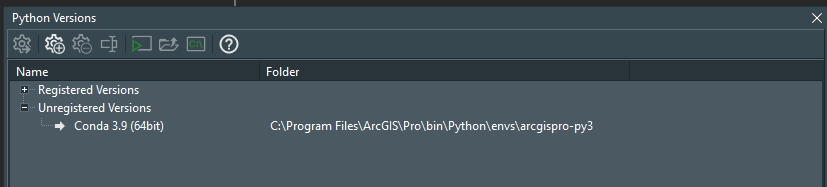 Figure 1.21 PyScripter setting ArcGIS Pro conda Python environment
 - It is a good idea to close the application and restart it to ensure that it saves your activated environment. If the settings revert back to the defaults, repeat the step 4 through 7 again and it should save.
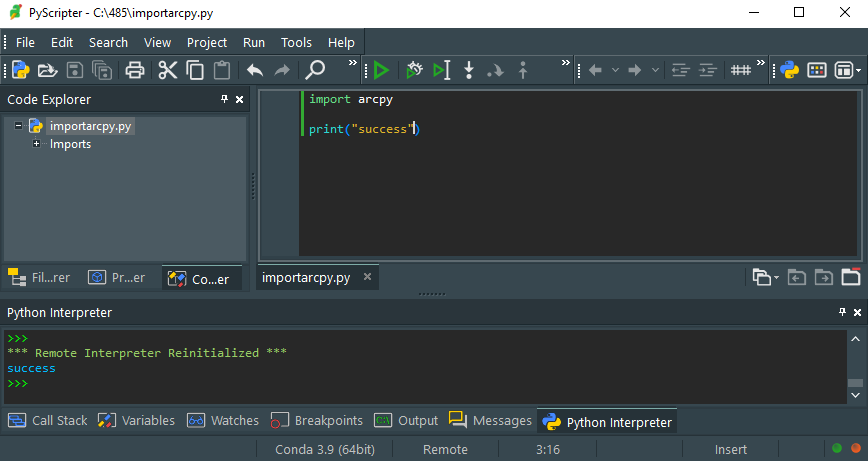 Figure 1.22 PyScripter Installation
If you are familiar with another IDE you're welcome to use it instead of PyScripter (just verify that it is using Python 3!) but we recommend that you still install PyScripter to be able to work through the following sections and the sections on debugging in Lesson 2.