Suppose you're working on a project for the Nebraska Department of Agriculture and you are tasked with making some maps of precipitation in the state. Members of the department want to see which parts of the state were relatively dry and wet in the past year, classified in zones. All you have is a series of weather station readings of cumulative rainfall for 2018 that you've obtained from within Nebraska and surrounding areas. This is a feature class of points called Precip2018Readings. It is in the Nebraska feature dataset in your Lesson1 geodatabase.
Precip2018Readings is a fictional dataset created for this project. The locations do not correspond to actual weather stations. However, the measurements are derived from real 2018 precipitation data created by the PRISM Climate Group at Oregon State University.
You need to do several tasks in order to get this data ready for mapping:
- Interpolate a precipitation surface from your points. This creates a raster dataset with estimated precipitation values for your entire area of interest. You've already planned for this, knowing that you are going to use inverse distance weighted (IDW) interpolation. Click the following link to learn how the IDW technique works. You've also selected your points to include some areas around Nebraska to avoid edge effects in the interpolation.
- Reclassify the interpolated surface into an ordinal classification of precipitation "zones" that delineate relatively dry, medium, and wet regions.
- Create vector polygons from the zones.
- Clip the zone polygons to the boundary of Nebraska.
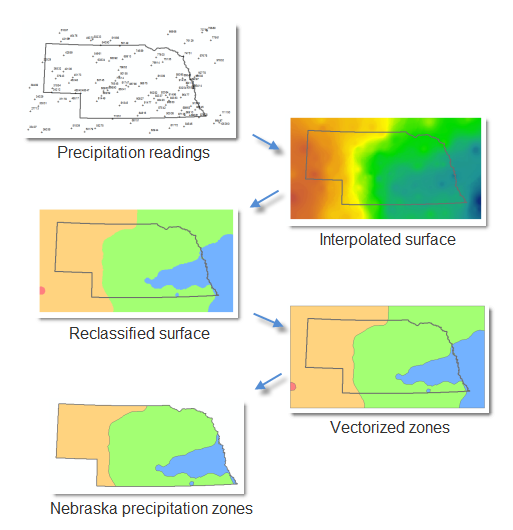 Figure 1.15 Mapping the data.
It's very possible that you'll want to repeat the above process in order to test different IDW interpolation parameters or make similar maps with other datasets (such as next year's precipitation data). Therefore, the above series of tasks is well-suited to ModelBuilder. Your job is to create a model that can complete the above series of steps without you having to manually open four different tools.
Model parameters
Your model should have these (and only these) parameters:
- Input precipitation readings- This is the location of your precipitation readings point data. This is a model parameter so that the model can be easily re-run with other datasets.
- Power- An IDW setting specifying how quickly influence of surrounding points decreases as you move away from the point to be interpolated.
- Search radius- An IDW setting determining how many surrounding points are included in the interpolation of a point. The search radius can be fixed at a certain distance, including whatever number of points happen to fall within, or its distance can vary in order for it to always include a minimum number of points. When you use ModelBuilder, you don't have to set up any of these choices; ModelBuilder does it for you when you set the Search Radius as a model parameter.
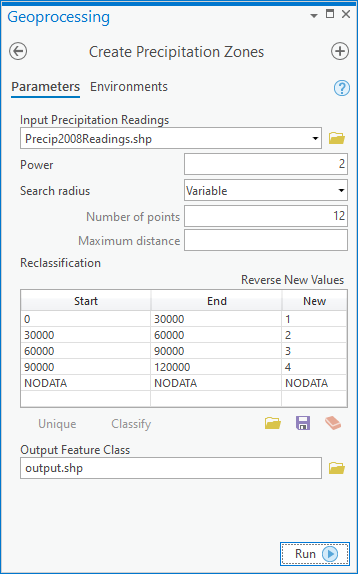
- Zone boundaries- This is a table allowing the user of the model to specify the zone boundaries. By default, the table should be configured as shown in Figure 1.16 below: Precipitation values of 0 - 30000 will result in a reclassification of 1 (to correspond with Zone 1), 30000 - 60000 will result in a classification of 2 (to correspond with Zone 2), and so on. The way to get this table is to make a variable from the Reclassification parameter of the Reclassify tool and set it as a model parameter.
- Output precipitation zones- This is the location where you want the output dataset of clipped vector zones to be placed on disk.
As you build your model, you will need to configure some settings that will not be exposed as parameters. These include the clip feature, which is the state of Nebraska StateBoundary feature class. There are many other settings such as "Z Value field" and "Input barrier polyline features" (for IDW) or "Reclass field" (for Reclassify) that should not be exposed as parameters. You should just set these values once when you build your model. If you ever ask someone else to run this model, you don't want them to be overwhelmed with choices stemming from every tool in the model; you should just expose the essential things they might want to change.
For this particular model, you should assume that any input dataset will conform to the same schema as your Precip2018Readings feature class. For example, an analyst should be able to submit similar datasets Precip2019Readings, Precip2020Readings, etc. for more recent years with the same fields, field names, and data types. However, he or she should not expect to provide any feature class with a different set of fields and field names, etc. As you might discover, handling all types of feature class schemas would make your model more complex than we want for this assignment.
Important: Given the scenario of wishing to re-run the model for other years of data, it would be a good idea to set default values for the exposed model parameters. Therefore, we are asking you to set default values for all parameters that are exposed as model parameters including the Power value, Search radius value, and Zone boundaries classification table. When you double-click the model to run it, the interface should look like the following:
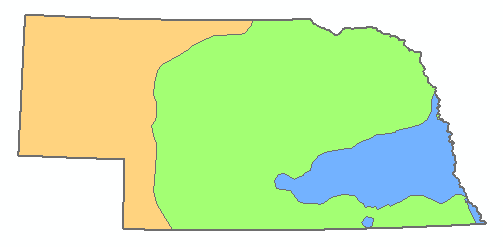
Running the model with the exact parameters listed above should result in the following (I have symbolized the zones in Pro with different colors to help distinguish them). This is one way you can check your work:
Once you are done, take a screenshot of the layout of your final model in ModelBuilder (similar to Figure 1.5 in Section 1.3.2) to include in your homework submission.
Tips
The following tips may help you as you build your model:
- Your model needs to include the following tools in this order: IDW (from the Spatial Analyst toolbox), Reclassify, Raster to Polygon, Clip (from the Analysis toolbox).
- An easy way to find the tools you need in Pro is to go to Analysis > Tools, then type the name of the tool you want in the search box. Be careful when multiple tools have the same name. You'll typically be using tools from the Spatial Analyst toolbox in this assignment.
- Once you drag and drop a tool onto the ModelBuilder canvas, double-click it and set all the parameters the way you want. These will be the default settings for your model.
- If there is a certain parameter for a tool that you want to expose as a model parameter, right-click the tool in the ModelBuilder canvas, then click Create Variable > From Parameter and choose the parameter. Once the oval appears for the variable, right-click it and click Parameter.