We are now moving on to example 2, a completely new example that focuses on the menu bar and status bar widgets as well as on defining user actions that can be associated with different input widgets and some other useful features of QT5 that are commonly used in GUI-based programs. Often GUI-based programs provide many ways in which the user can trigger a particular action, e.g. the action for saving the currently opened file can typically be performed by choosing the corresponding entry from the menu bar at the top, by a keyboard shortcut like CTRL+S for instance, and potentially also by a tool button in a toolbar and by some entry in a so-called context menu that shows up when you click the right mouse button. PyQT5 provides the QAction class for defining actions and these actions can then be associated with or added to different GUI elements that are supposed to trigger the action. For instance, in the following example we will create an action for exiting the program with the following four lines of code:
exitAction = QAction(app.style().standardIcon(QStyle.SP_DialogCancelButton’), '&Exit', mainWindow)

exitAction.setShortcut('Ctrl+Q')

exitAction.setStatusTip('Exit application')

exitAction.triggered.connect(app.quit)
The QAction object for our exit action is created in the first line and then stored in variable exitAction. The first two parameters given to QAction(…) are an icon that will be associated with that action and the name. For the icon we use the SP_DialogCancelButton icon from the set of icons that comes with QT5. Of course, it is possible to use your own set of icons but we want to keep things simple here. The & symbol in the name of the action (&Exit) signals that it should be possible to use ALT+E as a keyboard shortcut to trigger the action when using the application’s menu bar. The last parameter is the parent object which needs be another QT object, the one for the application’s main window in this case (more on this in a moment).
In the following two lines we define the keyboard shortcut (Ctrl+Q) that can be used at any moment to trigger the action and a message that should be shown in the status bar (the bar at the bottom of the application’s main window that is typically used for showing status messages) when hovering over a GUI element that would trigger this action. Finally, in the last line we connect the event that our exit action is triggered (by whatever GUI element) to the quit slot of our application. So this is the part where we specify what the action should actually do and as we have seen before, we can either connect the signal directly to a slot of another GUI element or to a function that we defined ourselves.
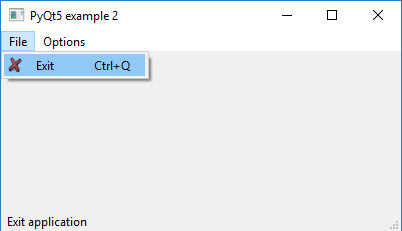
We already briefly mentioned the “main window” of the application. In example 1 above, we used the QWidget object for the main window and container of the other GUI elements. In example 2, we will use the QMainWindow widget instead which represents a typical application window with potentially a menu bar and tool bar at the top, a large central area in the middle to display the main content of the app, and potentially a small status bar at the bottom. The image below shows how the main window we are going to create in example 2 will look.
Once a QMainWindow object has been created and stored in variable mainWindow, its menu bar (an object of type QMenuBar that is created automatically) can be accessed via the menuBar() method, so with the expression mainWindow.menuBar(). A menu bar consists of one or more menus (= objects of the QMenu class) which in turn consist of several menu entries. The entries can be actions or submenus which again are QMenu objects. To add a new menu to a menu bar, you call its addMenu(…) method and provide the name of the menu, for instance ‘&File’. The method returns the newly created QMenu object as a result, so that you can use it to add menu entries to it. To add an action to a menu, you invoke a method called addAction(…) of the menu object, providing the action as a parameter. With that explanation, it should be relatively easy to follow the code below. We have highlighted the important parts related to creating the main window, setting up the menu bar, and adding the exit action to it.
import sys

from PyQt5.QtWidgets import QApplication, QMainWindow, QAction, QStyle

app = QApplication(sys.argv)

mainWindow = QMainWindow()
mainWindow.resize(400,200)
mainWindow.setWindowTitle("PyQt5 example 2")

fileMenu = mainWindow.menuBar().addMenu('&File')
optionsMenu = mainWindow.menuBar().addMenu('&Options')

exitAction = QAction(app.style().standardIcon(QStyle.SP_DialogCancelButton), '&Exit', mainWindow)
exitAction.setShortcut('Ctrl+Q')
exitAction.setStatusTip('Exit application')
exitAction.triggered.connect(app.quit)

fileMenu.addAction(exitAction)

mainWindow.statusBar().showMessage('Waiting for your commands...')

mainWindow.show()

sys.exit(app.exec_())
The QMainWindow is created very similarly to the QWidget we used in example 1, meaning we can set the title and initial size of the widget (lines 8 and 9). The two menus ‘File’ and ‘Options’ are added to the menu bar of our main window in lines 11 and 12, and the QMenu objects returned are stored in variables fileMenu and optionsMenu, respectively. In line 19, we add the exit action we created with the code already discussed earlier (lines 14 to 17) to the ‘File’ menu. The icon and name we provided when creating the action will be used for the entry in the menu bar and selecting the entry will trigger the action and result in the quit() method of application being called.
Please note that in line 21, we also added a command to show a message in the status bar at the bottom of the main window when the application is started. The status bar object is accessed via the statusBar() method of the QMainWindow, and then we directly call its showMessage(…) method specifying the text that should be displayed. We suggest that you run the program a few times, trying out the different ways to exit it via the menu entry (either by clicking the entry in the ‘File’ menu or using ALT+F followed by ALT+E) and the action's keyboard shortcut CTRL+Q that we defined.
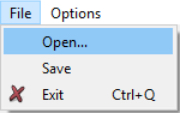
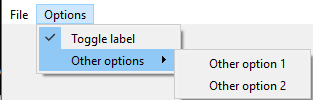
So far, our 'File' menu only has a single entry and the 'Options' menu is still completely empty. In the following, we are going to extend this example by adding ‘Open’ and ‘Save’ actions to the ‘File’ menu making it appear somewhat similar to what you often see in programs. We also add entries to the 'Options' menu, namely one with a checkbox next to it that we use for controlling whether the label displayed in our main window is shown or hidden, and one that is a QMenu object for a submenu with two additional entries. The two images below illustrate how our menu bar will look after these changes.
In addition to the changes to the menu bar, we will use the QFileDialog widget to display a dialog for selecting the file that should be opened and we use a QMessageBox widget to display a quick message to the user that the user has to confirm. Here is the code for the new version with main changes highlighted. Further explanation will follow below:
import sys

from PyQt5.QtWidgets import QApplication, QMainWindow, QAction, QStyle, QFileDialog, QMessageBox, QWidget, QGridLayout, QLabel, QMenu
from PyQt5.QtCore import Qt

def openFile():
     fileName, _ = QFileDialog.getOpenFileName(mainWindow, "Open file", "", "All files (*.*)")
     if fileName:
         mainWindow.statusBar().showMessage('User has picked file ' + fileName)
     else:
         mainWindow.statusBar().showMessage('User canceled the file dialog.')

def saveFile():
     QMessageBox.information(mainWindow, 'Important information', 'Save file has not been implemented yet, sorry!', QMessageBox.Ok)

def toggleLabel(state):
     if state:
         label.show()
     else:
         label.hide()

app = QApplication(sys.argv)

mainWindow = QMainWindow()
mainWindow.resize(400,200)
mainWindow.setWindowTitle("PyQt5 example 2")
mainWindow.setCentralWidget(QWidget())

layout = QGridLayout(mainWindow.centralWidget())

label = QLabel("Some text ...")
label.setAlignment(Qt.AlignCenter)
layout.addWidget(label,0,0)

fileMenu = mainWindow.menuBar().addMenu('&File')
optionsMenu = mainWindow.menuBar().addMenu('&Options')

openAction = QAction('&Open...', mainWindow)
openAction.triggered.connect(openFile)
fileMenu.addAction(openAction)

saveAction = QAction('&Save', mainWindow)
saveAction.triggered.connect(saveFile)
fileMenu.addAction(saveAction)

exitAction = QAction(app.style().standardIcon(QStyle.SP_DialogCancelButton), '&Exit', mainWindow)
exitAction.setShortcut('Ctrl+Q')
exitAction.setStatusTip('Exit application')
exitAction.triggered.connect(app.quit)
fileMenu.addAction(exitAction)

toggleLabelAction = QAction('&Toggle label', mainWindow, checkable=True)
toggleLabelAction.setChecked(True)
toggleLabelAction.triggered.connect(toggleLabel)
optionsMenu.addAction(toggleLabelAction)

otherOptionsSubmenu = QMenu('&Other options', mainWindow)
otherOption1Action = QAction('Other option &1', mainWindow, checkable=True)
otherOption2Action = QAction('Other option &2', mainWindow, checkable=True)

otherOptionsSubmenu.addAction(otherOption1Action)
otherOptionsSubmenu.addAction(otherOption2Action)
optionsMenu.addMenu(otherOptionsSubmenu)

mainWindow.statusBar().showMessage('Waiting for your commands...')

mainWindow.show()

sys.exit(app.exec_())
In addition to importing some more widgets and other PyQT classes that we need, we define three functions at the beginning, openFile(), saveFile(), and toggleLabel(…). These will serve as the event handler functions for some of the new actions/menu entries that we are adding, and we will discuss them in more detail later.
The next thing to note is that in lines 31 to 33 we are reintroducing our label object from the first example in the center of the main window. Since our window is based on QMainWindow, we first have to create a QWidget to fill the central area of the main window via its setCentralWidget(…) method (line 27), and then we add the needed layouts and QLabel object itself to this central widget exactly as in example 1 (lines 29 to 33).
In lines 38 and 42, we create new QAction objects for the two actions we want to add to the ‘File’ menu in variable fileMenu. To keep the code from getting too long, we don’t set up icons, keyboard shortcuts, and status bar tips for these like we did for the exit action, but these could be easily added. They are set up to call the openFile() and saveFile() functions we defined when they are triggered (lines 39 and 43), and both actions are added to fileMenu via the addAction(…) method in lines 40 and 44.
In lines 52 to 55, the action with the checkbox to toggle the label on and off is created and added to the ‘Options’ menu. The main difference to the other actions is that we use the additional keyword argument checkable=True when creating the action object in line 52, and then set the initial state to being checked in the following line. The "triggered" signal of the action is connected to the toggleLabel(…) function. Note how this function, in contrast to other event handler function we created before, has a parameter state that when called will be given the state of the action, meaning whether it is checked or unchecked, as a boolean. The code in the body of the function in lines 17 to 20 then simply checks whether this state is True for "checked" and if so, makes sure that the label is visible by calling its show() method. If state is False for "unchecked", it will call hide() instead and the label will become invisible.
In lines 57 to 63, we create a submenu for the ‘Options’ menu with two more checkable actions that we simply call ‘Other option 1’ and ‘Other option 2’. This is just for illustrating how to create a submenu in a menu bar, so we don’t bother with linking these actions to some actual functionality as we might in a real-world situation. The important part starts with line 57 where we create a QMenu object called ‘Other options’ that we then add the actions to in line 61 and 62. In line 63, we then add this new menu to our ‘Options’ menu in variable optionsMenu. Since we are not adding an action but a submenu here, we have to use the addMenu(…) method for this.
Now it is time to have a closer look at the openFile() and saveFile() functions that describe what should happen if the open or save actions are triggered. We are keeping things very simple in the saveFile() function, so let us start with that one: Since we are just creating a GUI framework here without real functionality, we only display a warning message to the user that no save file functionality has been implemented yet. We do this with the help of the QMessageBox widget that has the purpose of making, creating, and showing such message boxes as easily as possible. QMessageBox has several methods that can be invoked to display different kinds of messages such as simple information text or questions that require some user input. To just display some text and have an OK button that the user needs to click for confirmation, we use the information(…) method (line 14). We have to provide a parent QT object (mainWindow), a title, the information text, and the kind of buttons we want in the message box (QMessageBox.Ok) as parameters.
Finally, let’s look at the openFile() function in lines 6 to 11: here we illustrate what would typically happen when the action to open a file is triggered. Among other things, you typically want to provide a file browser dialog that allows the user to pick the file that should be opened. Such a dialog is much more complicated than a simple message box, so we cannot use QMessageBox for this, but fortunately QT provides the QFileDialog widget for such purposes. Like QMessageBox, QFileDialog has multiple methods that one can call depending on whether one needs a dialog for opening an existing file, selecting a folder, or saving a file under a name chosen by the user. We here use QFileDialog.getOpenFileName (…) and provide a parent object (mainWindow), a title for the dialog, and a string that specifies what files can be selected based on their file extension as parameters. For the last parameter, we use "*.*" meaning that the user can pick any file.
getOpenFileName (…) has a return value that indicates whether the user left the dialog via the Ok button or whether the user canceled the dialog. In the first case, the return value will be the name of the file selected, and in the second case it will be None. We capture this return value in variable fileName and then use an if-statement to distinguish both cases: In the first case, we use showMessage(…) of our status bar to display a message saying which file was selected. If the condition is False (so if fileName is None), we use the same message to inform that the dialog was canceled.
This second version of example 2 has already gotten quite long and the same applies for our explanation. You should take a moment to run the actual application and test out the different actions we implemented, the message box display, the open file dialog, toggling the label on and off via the entry under the ‘Options’ menu, and so on.