Let’s start by just producing a simple window that has a title and displays some simple text via a label widget as shown in the image below.
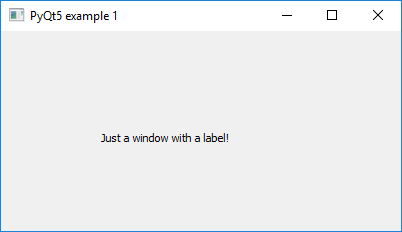
Thanks to PyQt5, the code for producing this window takes only a few lines:
import sys
from PyQt5.QtWidgets import QWidget, QApplication, QLabel

app = QApplication(sys.argv)

window = QWidget()
window.resize(400,200)
window.setWindowTitle("PyQt5 example 1")

label = QLabel("Just a window with a label!", window)
label.move(100,100)

window.show()

sys.exit(app.exec_())
Try out this example by typing or pasting the code into a new Python script and running it. You should get the same window as shown in the image above. Let’s briefly go through what is happening in the code:
- First of all, for each Python program that uses PyQT5, we need to create an object of the QApplication class that takes care of the needed initializations and manages things in the background. This happens in line 4 and we store the resulting QApplication object in variable app. At the very end of the program after setting up the different GUI elements, we use app.exec_() to call the exec_() method of the application object to run the application and process user input. The return value is used to exit the script by calling the sys.exit(…) function from the Python standard library. These are things that will look identical in pretty much any PyQT application.
- Most visible GUI elements (windows, button, text labels, input fields, etc.) in QT are derived in some way from the QWidget class and therefore called widgets. Widgets can be containers for other widgets, e.g. a window widget can contain a widget for a text label as in this example here. We are importing the different widgets we need here together with the QApplication class from the PyQt5.Widgets module in line 2. For our window, we directly use a QWidget object that we create in line 6 and store in variable window. In the following two lines, we invoke the resize(…) and setWindowTitle(…) methods to set the size of the window in terms of pixel width and height and to set the title shown at the top to “PyQt5 example 1”. After creating the other GUI elements, we call the show() method of the widget in line 13 to make the window appear on the screen.
- The content of the window is very simple in this case and consists of a single QLabel widget that we create in line 10 providing the text it should display as a parameter. We then use a fixed coordinate to display the label widget at pixel position 100,100 within the local reference frame of the containing QWidget. These coordinates are measured from the top left corner of the widget’s content area.
That’s all that’s needed! You will see that even if you resize the window, the label will always remain at the same fixed position.
If you have trouble running this script (e.g., you get a "Kernel died, restarting" error), try this version of the code (modified lines highlighted):
import sys
from PyQt5.QtWidgets import QWidget, QApplication, QLabel
from PyQt5.QtCore import Qt, QCoreApplication

app = QCoreApplication.instance()
if app is None:
    app = QApplication(sys.argv)

app.aboutToQuit.connect(app.deleteLater)

window = QWidget()
window.resize(400,200)
window.setWindowTitle("PyQt5 example 1")

label = QLabel("Just a window with a label!", window)
label.move(100,100)

window.show()

sys.exit(app.exec_())
This version of the code checks to see if there's already a QApplication object left existing in the current process -- only one of these objects is allowed. If an object exists, it's used; else, a new one is created. Line 9 then ensures that the application is deleted upon quitting.
As we already pointed out in Section 2.4.2, using absolute coordinates has a lot of disadvantages and rarely happens when building GUIs. So let’s adapt the example code to use relative layouts and alignment properties to keep the label always nicely centered in the middle of the window. Here is the code with the main changes highlighted:
import sys
from PyQt5.QtWidgets import QWidget, QApplication, QLabel, QGridLayout
from PyQt5.QtCore import Qt

app = QApplication(sys.argv)

window = QWidget()
window.resize(400,200)
window.setWindowTitle("PyQt5 example 1")

layout = QGridLayout(window)

label = QLabel("Just a window with a label (now perfectly centered!)")
label.setAlignment(Qt.AlignCenter)
layout.addWidget(label,0,0)

window.show()

sys.exit(app.exec_())
Try out this modified version and see whether you notice the change. Here is an explanation:
- For this simple example, different layouts would have worked, but we here use a QGridLayout for the window content that allows for arranging the child elements in a table–like way with the rows and columns being resized automatically to arrange everything in an optimal way given the available space. The grid layout object is created in line 11 and stored in variable layout. By providing window as the parameter, it is directly applied to manage the child elements of our window widget.
- The cells in the grid are accessed via their row and column indices starting from zero. In this example, we only have a single cell that will span the entire window. We add the label widget to this cell by calling the addWidget(…) method of the grid layout in variable layout and providing the coordinates 0,0 of the top left cell.
- Without any further changes, the label would now appear vertically centered in the window because that is the default policy for the cells in a grid layout, but horizontally adjusted to the left. To also make the label appear horizontally centered, we use its setAlignment(…) method with the constant Qt.AlignCenter that is defined in the PyQt5.QtCore module which we are also importing at the beginning.
If you tried out the modified example, you will have noticed that the label now always remains in the center independent of how you resize the window. That is the result of the grid layout manager working in the background to rearrange the child elements whenever the size is changed.
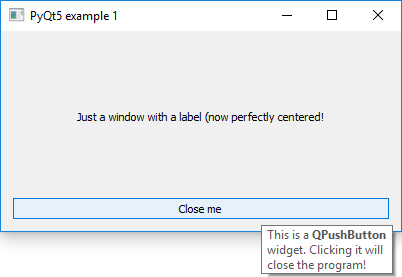
As a further extension of this example, let us make things a bit more interesting and bring in some interactions by adding a button that can be used to close the application as an alternative to using the close icon at the top. The widget needed to implement such a button is called QPushButton. We will add the button to cell 1,0 which is the cell in row 1 and column 0, so below the cell containing the label. That means that the grid layout will now consist of one column and two rows. Here is the modified code with the main changes highlighted:
import sys
from PyQt5.QtWidgets import QWidget, QApplication, QLabel, QGridLayout, QPushButton
from PyQt5.QtCore import Qt

app = QApplication(sys.argv)

window = QWidget()
window.resize(400,200)
window.setWindowTitle("PyQt5 example 1")

layout = QGridLayout(window)

label = QLabel("Just a window with a label (now perfectly centered!)")
label.setAlignment(Qt.AlignCenter)
layout.addWidget(label,0,0)

button = QPushButton("Close me")
button.setToolTip('This is a QPushButton widget. Clicking it will close the program!')
layout.addWidget(button,1,0)

button.clicked.connect(app.quit)

window.show()

sys.exit(app.exec_())
Please note how the push button widget is created in line 17 providing the text it will display as a parameter. It is then added to the layout in line 19. In addition, we use the setToolTip(…) method to specify the text that should be displayed if you hover over the button with the mouse. This method can be used for pretty much any widget to provide some help text for the user. The interesting part happens in line 21: Here we specify what should actually happen when the button is pressed by, in QT terminology, “connecting a signal (button.clicked) of the button to a slot (app.quit) of the application object”. So if the button is clicked causing a “clicked” event, the method quit(…) of the application object is called and the program is terminated as a result. Give this example a try and test out the tooltip and button functionality. The produced window should look like in the image below:
As you probably noticed, the button right now only takes up a fixed small amount of space in the vertical dimension, while most of the vertical space is taken by the cell containing the label which remains centered in this area. Horizontally, the button is expanded to always cover the entire available space. This is the result of the interplay between the layout policies of the containing grid layout and the button object itself. By default, the vertical policy of the button is set to always take up a fixed amount of space but the horizontal policy allows for expanding the button. Since the default of the grid layout is to expand the contained objects to cover the entire cell space, we get this very wide button.
In the last version of this first example, we are therefore going to change things so that the button is not horizontally expanded anymore by adding a QHBoxLayout to the bottom cell of the grid layout. This is supposed to illustrate how different widgets and layouts can be nested to realize more complex arrangements of GUI elements. In addition, we change the code to not close the application anymore when the button is clicked but instead call our own function that counts how often the button has been clicked and displays the result with the help of our label widget. A screenshot of this new version and the modified code with the main changes highlighted are shown below.
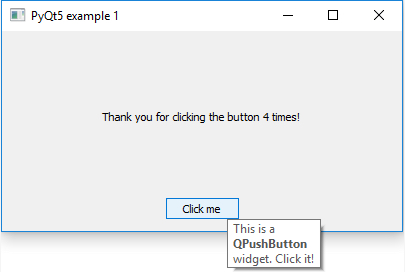
Source code:
import sys

from PyQt5.QtWidgets import QWidget, QApplication, QLabel, QGridLayout, QPushButton, QHBoxLayout
from PyQt5.QtCore import Qt

def buttonClickedHandler(c):
     global counter
     counter += 1
     label.setText('Thank you for clicking the button ' + str(counter) + ' times!')

app = QApplication(sys.argv)

window = QWidget()
window.resize(400,200)
window.setWindowTitle("PyQt5 example 1")

layout = QGridLayout(window)

label = QLabel("Just a window with a label (now perfectly centered!)")
label.setAlignment(Qt.AlignCenter)
layout.addWidget(label,0,0)

button = QPushButton("Click me")
button.setToolTip('This is a QPushButton widget. Click it!')

horLayout = QHBoxLayout()
horLayout.addStretch(1)
horLayout.addWidget(button)
horLayout.addStretch(1)
layout.addLayout(horLayout,1,0)

button.clicked.connect(buttonClickedHandler)

counter = 0

window.show()

sys.exit(app.exec_())
In addition to the highlighted changes, there are a few very minor changes to the text displayed on the button and its tooltip. Let us first look at the changes made to implement the counting when the button is pressed. Instead of directly connecting the button.clicked signal to the slot of another QT element, we are connecting it to our own function buttonClickedHandler(…) in line 32. In addition, we create a global variable counter for counting how often the button has been clicked. When it is clicked, the buttonClickedHandler(…) function defined in lines 6 to 9 will be called, which first increases the value of the global counter variable by one and then uses the setText(…) method of our label object to display a message which includes the number of button presses taken from variable counter. Very simple!
Now regarding the changes to the layout to avoid that the button is expanded horizontally: In principle, the same thing could have been achieved by modifying the horizontal layout policy of the button. Instead, we add a new layout manager object of type QHBoxLayout to the bottom cell of the grid layout that allows for arranging multiple widgets in horizontal order. This kind of layout would also be a good choice if, for instance, we wanted to have several buttons at the bottom instead of just one, all next to each other. In line 26, we create the layout object and store it in variable horLayout. Later in line 30, we add the layout to the bottom cell of the grid layout instead of adding the button directly. This is done using the addLayout(…) method rather than addWidget(…).
In between these two steps, we add the button to the new horizontal layout in horLayout in line 28. In addition, we add horizontal stretch objects to the layout before and after the button in lines 27 and 29. We can think of these objects as springs that try to take up as much space as possible without compressing other objects more than these allow. The number given to the addStretch(…) method is a weight factor that determines how multiple stretch objects split up available space between them. Since we use 1 for both calls of addStretch(…), the button will appear horizontally centered and just take up as much space as needed to display its text. If you want to have the button either centered to the left or to the right, you would have to comment out line 27 or line 29, respectively. What do you think would happen if you change the weight number in line 27 to 2, while keeping the one in line 29 as 1? Give it a try!