We are now leaving the world of menu bars behind and moving on to a third and final example of manually creating PyQT5 based programs which has the purpose of showing you the most common widgets used for getting input from the user as well as the following things:
- how to build own dialog boxes from these widgets, similar to the open file dialog for example,
- how to arrange widgets in more complex ways,
- and how to use the created dialog boxes from the main code.
We will keep the actual functionality we have to implement in this example to a minimum and mainly connect signals sent by the different widgets to slots of other widgets. As a result, the dialog box will operate in a somewhat weird way and we, hence, call this example “The world’s weirdest dialog box”. It still serves the purpose of illustrating the different event types and how to react to them.
To understand the example, it is important to know that dialog boxes can be invoked in two different ways, modally and modelessly (also referred to as non-modal). Modal means that when the method for displaying the dialog to the user is called, it will only return from the call once the user closes the dialog (e.g. by pressing an Ok or Cancel button). That means the user cannot interact with any other parts of the program's GUI, only the dialog box. When a dialog is invoked in the modeless approach, the method for displaying the dialog will return immediately and the dialog will essentially be displayed in addition to the other windows of the program that still can be interacted with.
The QDialog widget that we will use to build our own dialog box in this example, therefore, has two methods: exec_() for displaying the dialog modally, and show() for displaying it in the modeless way. In contrast to show(), exec_() has a return value that indicates whether the dialog was canceled or has been closed normally, e.g. by pressing an Ok button. You may wonder how our program would be informed about the fact that the dialog has been closed, and in which way, in the modeless option using show(). This happens via the signals accepted and rejected that the dialog will produce in this case and that we can connect to in the usual way. You will see an example of that later on but we first start with a modal version of our dialog box.
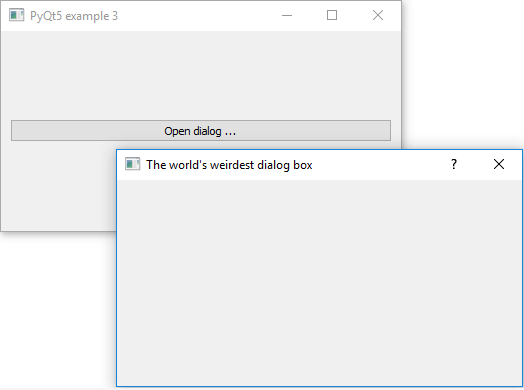
The final version of example 3 will be even longer than that of example 2. We, therefore, added some comments to structure the code into different parts, e.g. for setting up the application and GUI, for defining the functions that realize the main functionality, for wiring things up by connecting signals to slots or functions, and so on. In case you run into any issues while going through the following steps to produce the final code for the example, the final script file can be downloaded here. In the first skeleton of the code shown below, some of the sections introduced by the comments are still empty but we will fill them while we move along. This first version only illustrates how to create an empty QDialog object for our dialog box and show it (modally) when a button located on the main window is clicked. The most important parts of the code are again highlighted.
# imports

import sys
from PyQt5.QtWidgets import QApplication, QMainWindow, QPushButton, QGridLayout, QWidget, QDialog

# set up app and GUI

app = QApplication(sys.argv)

mainWindow = QMainWindow()
mainWindow.resize(400,200)
mainWindow.setWindowTitle("PyQt5 example 3")
mainWindow.setCentralWidget(QWidget())

layout = QGridLayout(mainWindow.centralWidget())

button = QPushButton("Open dialog ...")
layout.addWidget(button,0,0)

dialogBox = QDialog()
dialogBox.setWindowTitle("The world's weirdest dialog box")

# functions for interactions

# functions for modal version

# functions for modeless version

# connect signals and other initializations

button.clicked.connect(dialogBox.exec_) # invoke dialog modal version

# run the program

mainWindow.show()

sys.exit(app.exec_())
The QDialog widget is created in line 21 and it is stored in variable dialogBox. We can now add content (meaning other widgets) to it in a similar way as we did with QWidget objects in previous examples using the addWidget(…) and addLayout(…) methods. In lines 17 and 18, we create a simple push button and add it to our main window. In line 31, we connect the "clicked" signal of this button with the exec_() method of our (still empty) dialog box. As a result, when the button is pressed, exec_() will be called and the dialog box will be displayed on top of the main window in a modal way blocking the rest of the GUI. Run the application now and see whether the dialog shows up as expected when the button is clicked.
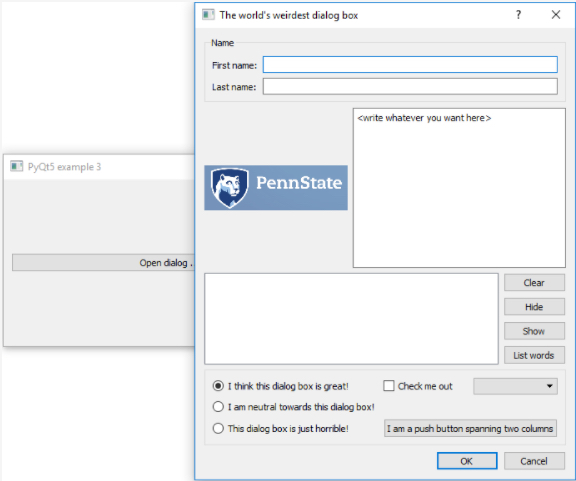
We are now going to add the widgets to our dialog box in variable dialogBox. The result should look as in the image below:
Please follow the steps below to create this new version of example 3:
Step 1. Replace all the lines with import statements under the comment “# imports” and before the comment “# set up app and GUI” with the following lines.
import sys, random

from PyQt5.QtWidgets import QApplication, QMainWindow, QPushButton, QGridLayout, QWidget, QDialog, \
   QVBoxLayout, QGroupBox, QLabel, QLineEdit, QTextEdit, QHBoxLayout, QListView, QRadioButton, \
   QCheckBox, QComboBox, QDialogButtonBox
from PyQt5.QtCore import Qt, QVariant
from PyQt5.QtGui import QPixmap, QStandardItemModel, QStandardItem
As you can see, we need to import quite a few more widget classes. In addition, using some of these will require additional auxiliary classes from the PyQt5.QtCore and PyQt5.QtGui modules.
Step 2. Keep the code that is currently under the comment “# set up app and GUI” as this will not change. But then add the following code directly after it, still before the “# functions for interactions” comment.
mainVerticalLayout = QVBoxLayout(dialogBox)

nameGroupBox = QGroupBox("Name") # row 1 of vertical layout
mainVerticalLayout.addWidget(nameGroupBox)
nameGridLayout = QGridLayout(nameGroupBox)
firstNameLabel = QLabel("First name:")
nameGridLayout.addWidget(firstNameLabel, 0, 0)
lastNameLabel = QLabel("Last name:")
nameGridLayout.addWidget(lastNameLabel, 1, 0)
firstNameLineEdit = QLineEdit()
nameGridLayout.addWidget(firstNameLineEdit, 0, 1)
lastNameLineEdit = QLineEdit()
nameGridLayout.addWidget(lastNameLineEdit, 1, 1)

imageHorizontalLayout = QHBoxLayout() # row 2
mainVerticalLayout.addLayout(imageHorizontalLayout)
imageLabel = QLabel()
imageLabel.setPixmap(QPixmap("psu.PNG").scaledToWidth(172))
imageHorizontalLayout.addWidget(imageLabel)
textEdit = QTextEdit()
textEdit.setText("<write whatever you want here>")
imageHorizontalLayout.addWidget(textEdit)

listGridLayout = QGridLayout() # row 3
mainVerticalLayout.addLayout(listGridLayout)
listView = QListView()
listGridLayout.addWidget(listView, 0, 0, 4, 1)
clearPushButton = QPushButton("Clear")
listGridLayout.addWidget(clearPushButton, 0, 1)
hidePushButton = QPushButton("Hide")
listGridLayout.addWidget(hidePushButton, 1, 1)
showPushButton = QPushButton("Show")
listGridLayout.addWidget(showPushButton, 2, 1)
listWordsPushButton = QPushButton("List words")
listGridLayout.addWidget(listWordsPushButton, 3, 1)

widgetGroupBox = QGroupBox() # row 4
mainVerticalLayout.addWidget(widgetGroupBox)
widgetGridLayout = QGridLayout(widgetGroupBox)
greatRadioButton = QRadioButton("I think this dialog box is great!")
greatRadioButton.setChecked(True)
widgetGridLayout.addWidget(greatRadioButton, 0, 0)
neutralRadioButton = QRadioButton("I am neutral towards this dialog box!")
widgetGridLayout.addWidget(neutralRadioButton, 1, 0)
horribleRadioButton = QRadioButton("This dialog box is just horrible!")
widgetGridLayout.addWidget(horribleRadioButton, 2, 0)
checkBox = QCheckBox("Check me out")
widgetGridLayout.addWidget(checkBox, 0, 1)
comboBox = QComboBox()
widgetGridLayout.addWidget(comboBox, 0, 2)
widgetPushButton = QPushButton("I am a push button spanning two columns")
widgetGridLayout.addWidget(widgetPushButton, 2, 1, 1, 2)

buttonBox = QDialogButtonBox() # row 5
buttonBox.setStandardButtons(QDialogButtonBox.Cancel | QDialogButtonBox.Ok)
mainVerticalLayout.addWidget(buttonBox)
This is the code for creating all the different widgets in our dialog box. You should be getting used to reading this kind of code, so we will just explain the most important points here:
- The overall organization of the dialog box is illustrated in the previous figure. The widgets are organized into five rows. This happens with a QVBoxLayout that arranges items vertically, each item below the previous one. The layout is created in line 1 and by using dialogBox as the parameter of QVBoxLayout(…), we are directly adding it to our dialog box. Each of the five following blocks of code create one of the rows in this vertical layout.
- The first block from line 3 to 13 is formed by a single QGroupBox item which in turn contains two QLabel and two QEditLine widgets. QEditLine widgets are used for allowing the user to enter a single line of text. The labels are just for describing what should be entered into the respective line edit widget. To make everything look tidy, we use a QGridLayout as in Example 1 or the miles-to-kilometers converter to arrange these items into two columns with the first one containing the labels and the second one containing the line edit widgets.
- The second row created in lines 15 to 22 is formed by two widgets, a QLabel that we will use to display an image of the PSU logo and a QTextEdit widget that allows for entering multi-line text. The label doesn’t have any text assigned. Instead, we use the method setPixmap(…) to assign it an image that will be displayed instead of text. You will need to download the Penn State logo here and place it in the same folder as the script to be able to run the program. To have these elements placed neatly next to each other, we use a QHBoxLayout as in Example 1 for this row and add the two widgets to it.
- Row 3 (lines 24 to 35) contains a QListView widget on the left and four QPushButtons arranged vertically on the right. The list view is intended for displaying a list of items, one per row, and potentially allowing the user to select one or multiple of these rows/items. We use another grid layout to arrange the items in this row. The grid has two columns and three rows (because of the four buttons) and what is new here is that we are setting up the list view widget to span all four rows. This happens in line 27 by providing two additional parameters to addWidget(…): 4 for the number of rows the widget should span and 1 for the number of columns.
- For row 4 in lines 37 to 52, we again use a group box and a grid layout (3 rows x 4 columns) to arrange the widgets inside the group box, and we add a diverse collection of different widgets to it: The first column is filled by three QRadioButtons. Radio buttons allow for picking one of several choices and it is used here in our dialog box to state your opinion on this dialog box ranging from great over neutral to horrible. The radio buttons inside the same group box are automatically linked so that when you select one, all others will be deselected. In addition, we also add a QCheckBox that can be checked and unchecked and a QComboBox for selecting one item from multiple choices. Finally we have another QPushButton, this time one that spans columns 2 and 3 (see line 52).
- The last row (lines 54 to 56) contains an “Ok” and a “Cancel” button. These are standard elements for a dialog box, so QT provides some easy way to set these up in the form of the QDialogButtonBox widget. We just have to tell the widget which buttons we want via the setStandardButtons(…) method in line 55.
At this point, you can run the script and it should produce the GUI as shown in the previous figure. You can already type things into the different edit fields and use the checkbox and radio buttons. The other elements still need to be connected to some functionality to serve a purpose, which is what we will do next.
Step 3. The next things we are going to add are two functions to put some content into the QListView widget in the third row and the QComboBox widget in the fourth row. Since we want to illustrate how different GUI elements can be connected to play together, we will use the list view to display a list of the words from the text that has been entered into the QTextEdit widget in the second row (variable textEdit). The combo box we will simply fill with a set of randomly generated numbers between 1 and 9. Then we will wire up these widgets as well as the push buttons from the third row and the QDialogButtonBox buttons from the fifth row.
The following code needs to be placed directly under the comment “# functions for interactions”, before the comment “# functions for modal version”.
def populateListView():
     words = textEdit.toPlainText().split()
     m = QStandardItemModel()
     for w in words:
         item = QStandardItem(w)
         item.setFlags(Qt.ItemIsUserCheckable | Qt.ItemIsEnabled)
         item.setData(QVariant(Qt.Checked), Qt.CheckStateRole)
         m.appendRow(item)
     listView.setModel(m)

def populateComboBoxWithRandomNumbers():
     comboBox.clear()
     for i in range(5):
         comboBox.addItem(str(random.randrange(10)))
The function populateListView() calls the method toPlainText() of the QTextEdit widget. The QTextEdit widget can contain rich text with styling but this method only gives us the plain text without styling markups as a string. We then use the string method split() to split this string into a list of strings at each space or other whitespace symbol. The resulting list of words is stored in variable words. The QListView is one of the widgets that needs a model behind it meaning some object that stores the actual list data to be displayed. Since we just need a list of simple string objects here, we use the QStandardItemModel class available for such cases and fill it with QStandardItem objects we create, one for each word in our words list (lines 3 to 8). The model created in this way is then given to the setModel() method of the list view, which will then display these items. In lines 6 and 7 we are setting up the list items to have a check box that is originally checked but can be unchecked by the user to only select a subset of the items.
Populating the combo box with items the user can pick from is much simpler because we can directly add string items to it with the addItem(…) method (line 14). In the populateComboBoxWithRandomNumbers() function, we first clear the current content, then use a for-loop that creates the random numbers and adds them as string items to the combo box.
In addition, you now need to place the following lines of code directly under the comment “# connect signals and other initializations”, before the line that is already there for opening the dialog when the button on the main window is clicked:
radioButtons = [ greatRadioButton, neutralRadioButton, horribleRadioButton ]

populateComboBoxWithRandomNumbers()

buttonBox.accepted.connect(dialogBox.accept)
buttonBox.rejected.connect(dialogBox.reject)
clearPushButton.clicked.connect(textEdit.clear)
hidePushButton.clicked.connect(textEdit.hide)
showPushButton.clicked.connect(textEdit.show)
listWordsPushButton.clicked.connect(populateListView)
The first line will only play a role later on, so we ignore it for the moment. In line 3, we call the populateComboBoxWithRandomNumbers() function to initialize the combo box so that it contains a list of numbers immediately when the dialog box is opened for the first time. Next we wire up the “Ok” and “Cancel” buttons for exiting the dialog (lines 5 and 6). This is not done via the "clicked" signals of the button themselves but via the "accepted" and "rejected" signals of the button box that contains them. We connect these signals to the accept() and reject() methods of our dialog box, and these will take care of producing the corresponding return values or trigger the corresponding signals depending on whether we called the dialog box modally or modeless.
Finally, we connect the four push buttons from the third row (lines 7 to 10). The first three are used to invoke different methods of the text edit widget above them: The first clears the text area, the second hides the widget, and the third shows it again. The fourth button is set up to invoke our populateListView() function, so this is the button that needs to be clicked for a list of words to show up in the list view widget. Go ahead and run the script now. Enter a few lines of text into the text edit field and then click the “List words” button and observe the list of words that can now be selected via the little checkboxes. Then try out the other buttons and the combo box.
Step 4. At this point, we still have a few widgets in our dialog box that do not do anything. Let’s make things really weird by adding the following commands to the “# connect signals and other initializations” section directly following the lines you just added and still before the line for opening the dialog when the button on the main window is clicked.
widgetPushButton.pressed.connect(populateComboBoxWithRandomNumbers)
firstNameLineEdit.textChanged.connect(checkBox.toggle)
lastNameLineEdit.editingFinished.connect(comboBox.showPopup)
Take a brief moment to read these commands and try to understand the functionality they are adding. Do you understand what is happening here? The first line is for finally giving some functionality to the large push button labeled “I am a push button spanning two row”. We connect this button to our function for populating the combo box with random numbers. So every time you click the button, the combo box will show a different selection of random numbers to pick from. Please note that we are not connecting the "clicked" signal here as we did with the other push buttons. Instead, we connect the "pressed" signal. What is the difference? Well, the "clicked" signal will only be sent out when the mouse button is released, while "pressed" is immediately sent when you press down the mouse button. When you run the dialog again, check out whether you notice the difference.
In the second and third line, we do something that you would usually never do in a dialog box: We connect the "textChanged" signal of the line edit widget for entering your first name at the top to the "toggle" slot of our checkbox widget in the fourth row. This signal is emitted whenever the text in the field is changed, e.g. every time you press a key while editing this input field. So if you type in your first name, you will see the checkbox constantly toggle between its checked and unchecked states. We then connect the "editingFinished" signal of the line edit widget for the last name to the "showPopup" slot of our combo box for opening the drop down list with the different choices. The difference between "textChanged" and "editingFinished" is that "editingFinished" will only be emitted when you press TAB or the widget loses focus in another way, for instance when you click on a different widget. So if you enter your last name and press TAB, you will see the drop down list of the combo box appearing. Give this and the other weird things we just implemented a try by running the script!
Step 5. It’s probably best if we stop wiring up our dialog box at this point, but feel free to keep experimenting with the different signals and connecting them to different slots later on after we have completed this example. We now want to focus on what typically happens if the dialog box is closed. Right now, nothing will happen because we have been connecting the push button on our main window directly to the exec_() method, so there is no own code yet that would be executed when returning from this method. Typically, you will have your own function that calls exec_() and that contains some additional code depending on whether the user closed the dialog via the “Ok” or “Cancel” button and the state or content of the different widgets. For this purpose, please first add the following function at the end of the “# functions for interactions” section, directly before “# functions for modal version”:
def printResults():
     for rb in radioButtons:
         if rb.isChecked():
             print("Selected opinion: " + rb.text())
     print("Combo box has current value " + comboBox.currentText())
     print("Checkbox is " + ("checked" if checkBox.isChecked() else "unchecked"))
Then under "#functions for modal version" insert the following code:
def openDialogModal():
     result = dialogBox.exec_()
     if result == QDialog.Accepted:
         printResults()
     else:
         print("Exited dialog via cancel button or closing window")
Finally, change the line in which we set up the main window button to open the dialog from
button.clicked.connect(dialogBox.exec_()) # invoke dialog modal version
to
button.clicked.connect(openDialogModal) # invoke dialog modal version
It should be clear that this last change means that instead of opening the dialog box directly, we are now calling our own function openDialogModal() when the button on the main window is clicked. Looking at the code of that function, the first thing that will happen then is that we call dialogBox.exec_() to open the dialog box, but here we also capture its return value in variable result. When the dialog box is closed, this return value will tell us whether the user accepted the dialog (the user clicked ok) or whether the user rejected the dialog (the user clicked cancel or closed the dialog in another way). The return value is a number but instead of bothering with how accepted and rejected are encoded, we compare result to the corresponding constants QDialog.Accepted and QDialog.Rejected defined in the QDialog class. When the return value is equal to QDialog.Accepted, we call the printResults() function we defined, else we just print out a message to the console saying that the dialog was canceled.
The printResults() function illustrates how you can check the content or state of some of the widgets, once the dialog has been closed. Even though the dialog is not visible anymore, the widgets still exist and we just have to call certain methods to access the information about the widgets.
We first look at the three radio buttons to figure out which of the three is selected and print out the corresponding text. At the beginning of the section “#connect signals and other initializations” in the code, we created a list of the three buttons in variable radioButtons. So we can just loop through this list and use the isChecked() method which gives us back a boolean value. If it is True, we get the label of the radio button via its text() method and print out a message about the user’s opinion on our dialog box.
Next, we print out the item currently selected for our combo box: This is retrieved via the combo box’s currentText() method. The state of the check box widget can again be accessed via a method called isChecked(). The other widgets provide similar methods but the general idea should have gotten clear. You already saw the toPlainText() method of QTextEdit being used, and QLineEdit has a method called text() to retrieve the text the user entered into the widget. We will leave adding additional output for these and the other widgets as an “exercise for the reader”. Please run the script and open/close the dialog a few times after using the widgets in different ways and observe the output produced when dialog is closed.
Change to modeless version. The last thing we are going to do in this section is coming back to the concept of modal and modeless dialog boxes and showing what a modeless version of our dialog box would look like. Please add the following three functions to the section “# functions for modeless version”:
def openDialogModeless():
     dialogBox.show()
     print("We are already back from calling dialogBox.show()")

def dialogAccepted():
     printResults()

def dialogRejected():
     print("Exited dialog via cancel button or closing window")
Now comment out the line
button.clicked.connect(openDialogModal) # invoke dialog modal version
by placing a # in front of it and then insert the following lines below it:
dialogBox.accepted.connect(dialogAccepted) # invoke dialog modeless version
dialogBox.rejected.connect(dialogRejected)
button.clicked.connect(openDialogModeless)
We suggest you try out this new version immediately and observe the change. Note how the main window still can be interacted with after the dialog box has been opened. Also note the message in the console “We are already back from calling dialogBox.show()” appearing directly after the dialog window has appeared. Looking at the code, instead of calling openDialogModal(), we are now calling openDialogModeless(). This function uses dialogBox.show() to open a modeless version of our dialog rather than dialogBox.exec_() for the modal version. The message is produced by the print statement directly after this call, illustrating that indeed we return immediately from the function call, not just when the dialog box is closed.
As a result, we need the two other functions to react when the dialog box has been closed. We connect the function dialogAccepted() to the "accepted" signal of dialogBox that is emitted when the dialog box is closed via the “Ok” button. The function simply calls printResults() and, hence, essentially corresponds to the if-case in function openDialogModal(). Similarly, the dialogRejected() function corresponds to the else-case of openDialogModal() and is connected to the "rejected" signal emitted when the dialog is canceled.
As you can see, the change from modal to modeless is straightforward and involves changing from working with a return value to working with functions for the "accepted" and "rejected" signals. Which version to use is mainly a question of whether the dialog box is supposed to get important information from the user before being able to continue, or whether the dialog is a way for the user to provide input or change parameters at any time while the program is executed.
One interesting observation if you revisit the code from the three examples in this section, in particular examples 2 and 3, is that while the script code can become rather long, most of this code is for creating the different widgets and arranging them in a nice way. Compared to that, there is not much code needed for wiring up the widgets and implementing the actual functionality. Admittedly, our toy examples didn’t have a lot of functionality included, but it still should be obvious that a lot of time and effort could be saved by using visual tools for producing the GUI layouts in an intuitive way and then automatically turning them into Python code. This is exactly what the next section will be about.