As we said at the beginning of this section, this section is provided for interest only. Please feel free to skip over it and you can loop back to it at the end of the lesson if you have free time or after the end of the class. Be warned: installing the required extensions and using them is a little complicated - but this is an advanced class, so don't let this deter you.
We are going to need to download some software called QCacheGrind which reads a tree type file (like a family tree). Unfortunately, QcacheGrind doesn’t natively support the profile files we are going to be creating so we will also need a converter (pyprof2calltree), written in Python. Our workflow is going to be :
- Download & install QCacheGrind (we only need to do this once)
- Use pip (a Python package manager) to install our converter (we only need to do this once, too)
- Run our function and line profiling and save the output to files
- Convert those output profile files using our converter
- Open the converted files in QCacheGrind
- ...
- Conquer Python (okay maybe not, but at least have a better understanding of our code’s performance)
Installing QCacheGrind
Download QCacheGrind and unzip it to a folder. QcacheGrind can be run by double-clicking on the qcachegrind executable in the folder you’ve just unzipped it to. Don’t do that just yet though, we’ll come back to it once we’ve done the other steps in our workflow and when we have some profile files to visualize.
Installing the Converter - pyprof2calltree
Now we’re going to install our converter using the Python Preferred Installer Program, pip. If you would like to learn more about pip, the Python 3 Help (Key Terms) has a full explanation. You will also learn more about Python packet managers in the next lesson. Pip is included by default with the Python installation you have but we have to access it from the Python Command Prompt.
As we mentioned in Section 1.6.5.2, there should be a shortcut within the ArcGIS program group on the start menu called "Python Command Prompt" on your PC that opens a command window running within the conda environment indicating that this is Python 3 (py3). You actually may have several shortcuts with rather similar sounding names, e.g. if you have both ArcGIS Pro and ArcGIS Desktop installed, and it is important that you pick the right one from ArcGIS Pro using Python 3.
In the event that there isn’t a shortcut, you can start Python from a standard Windows command prompt by typing :
"%PROGRAMFILES%\ArcGIS\Pro\bin\Python\Scripts\propy"
The instructions above mirror Esri's help for running Python.
Open your Python command prompt and you should be in the folder C:\Users\<username>\AppData\Local\ESRI\conda\envs\arcgispro-py3-clone\ or C:\Program Files\ArcGIS\Pro\bin\Python\envs\arcgispro-py3\ depending on your version of ArcGIS Pro. This is the default folder when the command prompt opens (which you can see at the prompt). Then type (and hit Enter) :
Scripts\pip install pyprof2calltree
Pip will then download from a repository of hosted Python packages the converter that we need and then install it. You should see a message saying “Successfully installed pyprof2calltree-1.4.3“ although your version number may be higher and that’s ok. If you receive an error message about permissions during the pyprof2calltree installation, close out of Python command prompt and reopen the program with administrative privileges (usually right-clicking on the program and selecting "Run as administrator," in Windows 10, you might need to "Open File Location" and then right-click to "Run as administrator").
After running commands in Python command prompt, you will probably also see an information message stating:
“You are using pip version 9.0.3, however version 10.0.1 is available. You should consider upgrading via the `python –m pip install –upgrade pip‘ command.“
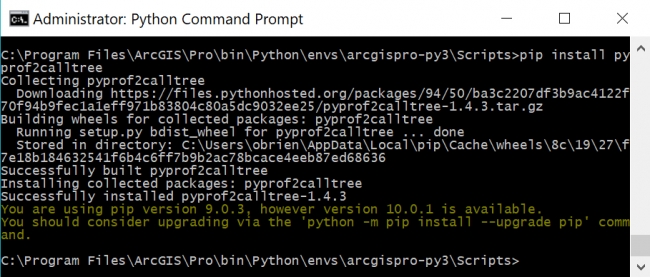
You can ignore this message, we’re going to leave pip at its current version as that is what came with the ArcGIS Pro Python distribution and we know that it works.