The plugin builder 3 plugin should already be installed in your QGIS version. If not, please go back to Section 4.4.1 and follow the installation instructions there. Now run the plugin by going Plugins -> Plugin Builder in the main menu.
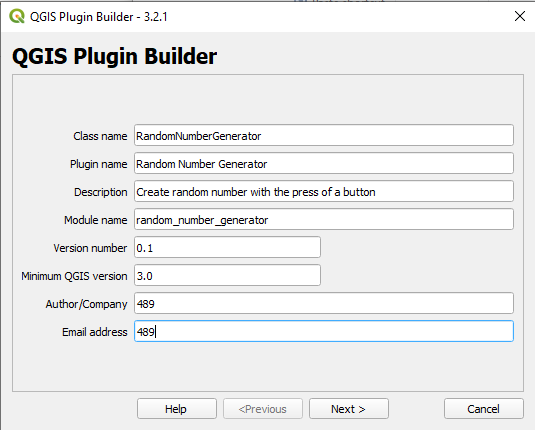
To create a template for your plugin, you have to work through the dialog boxes of Plugin Builder and fill out the information there. Clicking the “Help” button will open a local .html page with detailed information on the purpose and meaning of the different fields. We fill out the first page as shown in the figure below. Here is a brief overview:
- Class name: this is the name of the main class for our plugin. It needs to be a valid Python class name.
- Plugin name: this is the name of the plugin in readable form. In contrast to the class name, it can contain spaces and other special characters.
- Description: a short description of what the plugin is for.
- Module name: the name of the .py file that will contain the main class for your plugin. Typically, the class name written with underscores rather than in CamelCase is used here.
- Version number & Minimum QGIS version: these are used to specify a version number for your plugin and the minimum QGIS version required to run it.
- Author/Company & Email address: here you provide information about the author of the plugin that will be used to create the copyright information at the beginning of the different files. We have no intentation of publishing this plugin, so we just use “489” here.
On the next page, you can enter a longer description of your plugin. Since this is just a toy example, we don’t bother with this here and leave the text as it is.
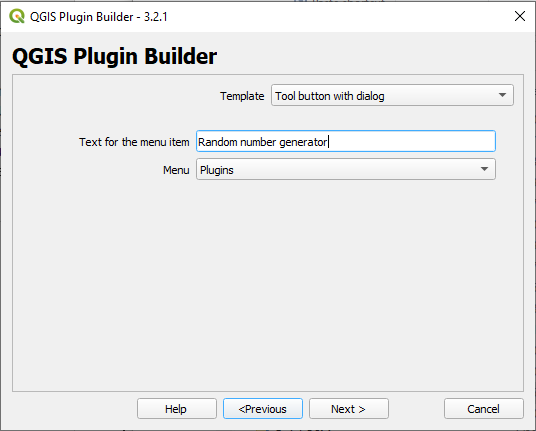
On the next page, you can choose between different kinds of templates for your plugin, e.g. a simple dialog box or a dock widget, meaning an actual panel that can be docked and moved inside the QGIS GUI like the other panels, e.g. the Layers panel. We here will go with the dialog option. In the next section, we will then use the dock widget option. With the “Text for the menu item” option, we specify which text should show up in the menu for our plugin in the main menu bar. With the “Menu” option we pick in which menu of the menu bar this entry should be located. We will fill out this page as shown below:
The checkboxes on the next page allow for determining which files Plugin Builder is going to create. It’s ok to leave all options checked.
The next page is specifying information that is relevant if you plan to publish your plugin, e.g. on Github. Since we are not planning this, we just leave the page unchanged.
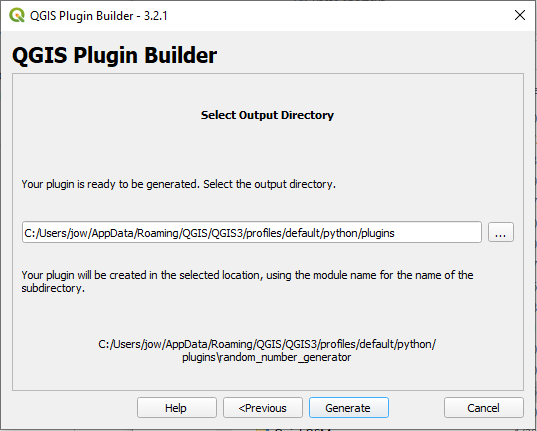
On the last page, we can determine in which folder the new folder with the files for our plugin will be created. By default this is the default plugin folder of our QGIS installation, meaning the plugin will immediately be listed in QGIS when we start it next. If, instead of the path, you just see a dot (.), please browse to the plugins folder yourself, replacing the part directly after "C:/Users/" with your Windows user name. It is possible that the “AppData” folder in your user’s home directory is not visible in which case you will have to change your settings to show hidden files.
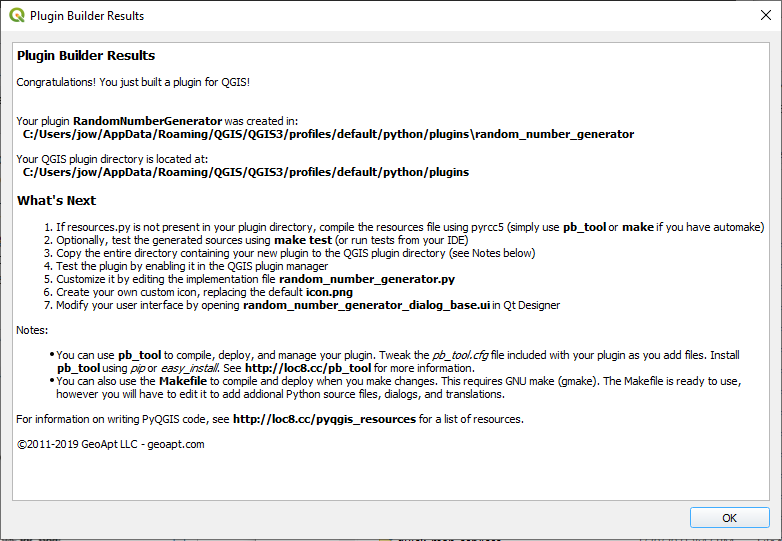
We now click the “Generate” button and Plugin Builder will then create the folder and different files for our plugin. It's possible that you will get a warning message that about Plugin Builder not being able to compile the resources.qrc file; that's ok, we will take care of that in a moment. Plugin Builder will now show us a summary page like in the figure below with some valuable information about where the plugin has been created and what the next steps should be. Even though we won’t be following these exactly, it’s a good idea to take a screenshot of this information or note down where the folder for our plugin is located. You may also want to add the plugins folder under “Quick access” in your Windows File Explorer since we will need to access it quite a lot in the remainder of this lesson.
If we now open the new folder “random_number_generator” in the QGIS default plugin folder, you will see the following file structure:
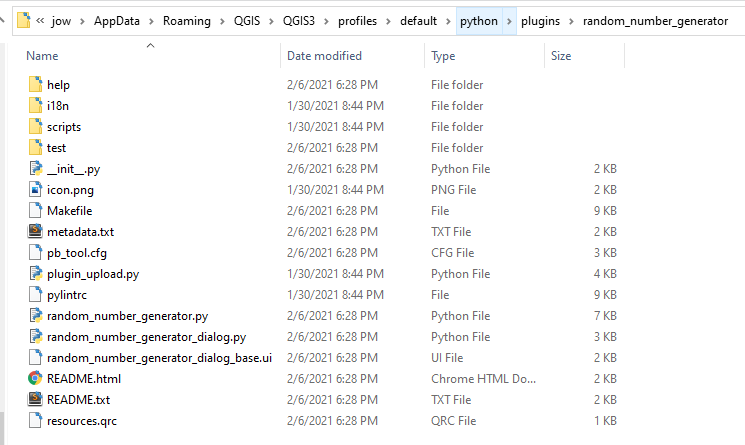
In this introduction to QGIS plugin development, we won’t go into the details of features like internationalization and test code generation, so you can ignore the different subfolders and also some of the files in the main folder. The important files are:
- random_number_generator.py: this file defines the main class RandomNumberGenerator for our plugin. If you look at the code that Plugin Builder 3 generated for this class, you will see that this class has to define a number of methods to interact with QGIS and its plugin interface. One central method is the method run() that in this case here shows our dialog box stored in instance variable self.dlg. If we wanted some code to be executed only if the dialog box is accepted (e.g. closed with the Ok button), then we would put that code here after the “if result:” line.
- random_number_generator_dialog.py: this is the class that defines the main GUI widget for our plugin derived from QDialog. We will talk about this class in more detail in a moment because this is the class that we are going to modify to implement what needs to happen when the user interacts with the GUI of our plugin.
- random_number_generator_dialog_base.ui: this is the class in which the GUI for our dialog box is defined. We will modify it in QT Designer in a moment to adapt the GUI for our purposes.
- __init__.py: A file with this name needs to be contained in the main folder of each plugin and it lets QGIS know about the plugin. QGIS calls the classFactory(…) function defined in this file to create an object of the main class of the plugin (class RandomNumberGenerator in this case).
- metadata.txt: this file contains most of the info about our plugin that we entered into Plugin Builder.
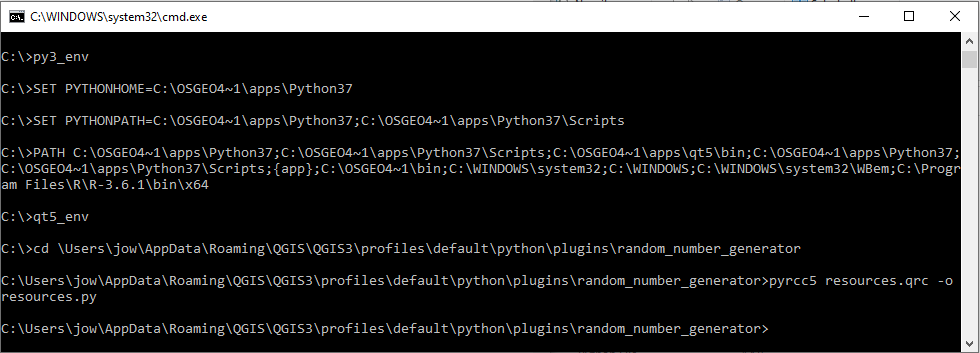
When you now restart QGIS and open the plugin manager under Plugins -> Manage and Install Plugins… , the Random Number Generator plugin should appear in the list of installed plugins but it still needs to be activated. However, if we try to activate it now, we will get an error message that no module called “randomnumbergenerator.resources” can be found. This is a file that we have to generate ourselves by compiling the file called resources.qrc located in our plugin folder with the pyrcc5 tool. The resources file contains information about all additional GUI related resources needed for our plugin, like additional icons for example.
Usually, you would edit the .qrc file first, e.g. in QT Designer, and then compile it. But we don’t need any additional resources for this project, so we just compile it directly with the following command in the OSGeo4W shell after first moving to our plugin folder with the cd command. (The screenshot below contains some commands that were needed in earlier versions of OSGeo4W; you will most likely only need the cd and pyrcc5 commands shown at the bottom.)
pyrcc5 resources.qrc –o resources.py
After running this command, we can now activate the plugin by clicking on the checkbox:
There will now be a submenu called “Random Number Generator” with an entry with the same name in the Plugins menu:

In addition, a toolbar with a single button has been added for our plugin to the toolbar section at the top. Since we didn’t make any changes, the default button  is used. Either clicking the menu entry or the button will open the dialog box for our plugin:
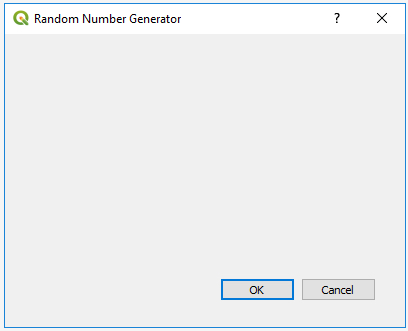
Currently, the dialog box only contains the default elements, namely two buttons for accepting and rejecting the dialog. We are now going to change the GUI of the dialog box and add the random number generation functionality.