The file random_number_generator_dialog.py defines the class RandomNumberGeneratorDialog derived from QDialog. This is the widget class for our dialog box. The GUI itself is defined in the .ui file random_number_generator_dialog_base.ui. In contrast to first compiling the .ui file into a Python .py file and then using the Python code resulting from this to set up the GUI, this class uses the previously briefly mentioned approach of directly reading in the .ui file. That means to change the GUI, all we have to do is modify the .ui file in QT Designer, no compilation needed.
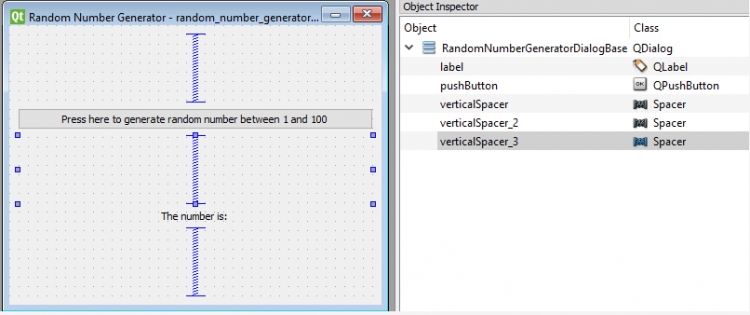
We open random_number_generator_dialog_base.ui with QT Designer and make the following small changes:
- We delete the button box with the Ok and cancel buttons.
- The layout of the dialog box is changed to a vertical layout.
- We add a push button and a label to the dialog box with vertical spacers in between.
- The button text is set to “Press here to generate random number between 1 and 100”.
- The label text is set to “The number is:” and its horizontal alignment property is changed to be horizontally centered.
The image below shows the produced layout in QT Designer.
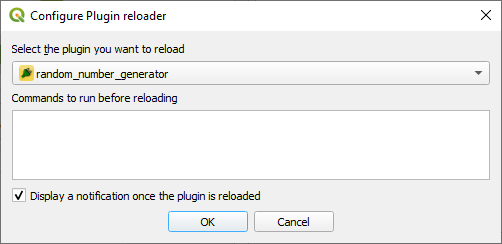
After saving the form, we want to see if we now get the new version of the GUI in QGIS as well. However, for this to happen, the plugin needs to be reloaded. For this, we use the Plugin Reloader plugin that we also installed at the beginning of the lesson. We pick the Plugins -> Plugin Reloader -> Configure option. Then we pick our random_number_generator plugin from the list and press OK.
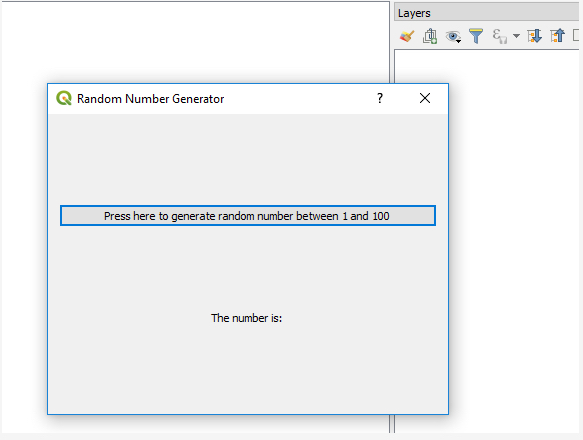
Now we just have to go Plugins -> Plugin Reloader -> Reload: random_number_generator, whenever we want to reload the plugin after making some changes. After doing so and starting our plugin again, it should show up like this in QGIS:
Now we just have to implement the functionality for our plugin, which for this toy example is extremely simple. We just need to write some code for rolling a random number between 1 and 100 and updating the text of the label accordingly when the button is pressed. We implement this in the definition of our class RandomNumberGeneratorDialog in file random_number_generator_dialog.py. The changes we make are the following:
- In the line where the os module is imported, we also import the random module from the Python standard library.
- We add a new method to the class definition with the event handler code:
def generateNewNumber(self): r = random.randint(1,100) self.label.setText("The number is: " + str(r)) - Finally, we connect the button to this new method by adding the following line at the end of the __init__() method:
self.pushButton.clicked.connect(self.generateNewNumber)
Below is the entire code part of random_number_generator_dialog.py after making these changes:
import os, random

from PyQt5 import uic
from PyQt5 import QtWidgets

FORM_CLASS, _ = uic.loadUiType(os.path.join( os.path.dirname(__file__), 'random_number_generator_dialog_base.ui'))

class RandomNumberGeneratorDialog(QtWidgets.QDialog, FORM_CLASS):
    def __init__(self, parent=None):
        """Constructor."""
        super(RandomNumberGeneratorDialog, self).__init__(parent)
        # Set up the user interface from Designer.
        # After setupUI you can access any designer object by doing
        # self.<objectname>, and you can use autoconnect slots - see
        # http://qt-project.org/doc/qt-4.8/designer-using-a-ui-file.html
        # #widgets-and-dialogs-with-auto-connect
        self.setupUi(self)

        self.pushButton.clicked.connect(self.generateNewNumber)

    def generateNewNumber(self):
        r = random.randint(1,100)
        self.label.setText("The number is: " + str(r))
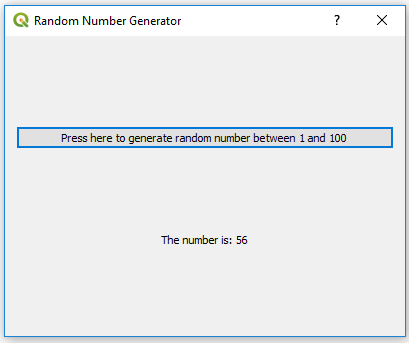
Now the only thing we have to do is reload the plugin again in QGIS, and when we then start the plugin one more time, the button should work and allow us to create random numbers. Please note that the dialog box is opened non-modally from our main plugin class so that you can keep the dialog box open in the background while still interacting with the rest of the QGIS GUI.
In this small example, all code changes needed were about wiring up the GUI of the dialog box. In such cases, modifying the file with the class definition for the main widget can be sufficient. In the next section, we will implement a plugin that is significantly more complex and interacts with QGIS in more sophisticated ways, e.g., by adding new layers to the currently open project and continuously updating the content of these layers. However, the general approach is the same in that we are mainly going to modify the .ui file and the file with the main widget class from the template files created by Plugin Builder 3. If you want to learn more about QGIS plugin development and the role the other files play, the official documentation is a good starting point.