First Game in Unity: Roll-the-ball
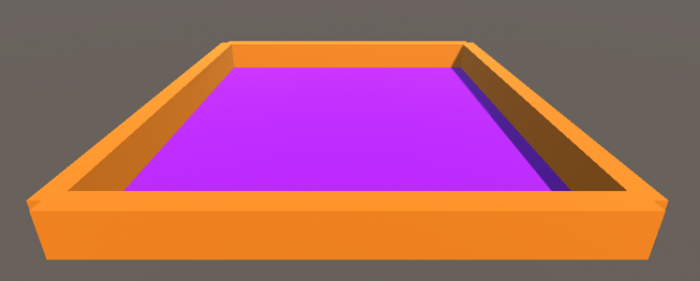
The objective of this section is to get you familiar with the basics of C# programming in unity and the different awesome components (e.g. physics) offered by Unity. By the end of this section, you will be able to create a simple “Roll the ball” game as shown below:
Video: Roll the ball game (00:16) This video is not narrated.
The objective of the game is to roll a ball inside a box and collect all the available coins. The coins should simulate a rotation animation, capturing the attention of the player. Each time the ball hits a coin one point should be awarded to the player, a “cashier” sound effect played, and then that coin should disappear from the scene (i.e. collected).
The following steps will help you to first conceptualize what needs to be implemented and how it should be done, and second, guide you on how to utilize the Unity3D game engine to realize the needed game objects, mechanics, and functionalities.
- Close your unity editor and open the Unity Hub. Create a new project (you should already know the steps from the previous sections). Name your project “Roll the ball” and make sure the template is set to “3D”.
-
Before beginning the programming of the game behaviors described above, we need to set up the play area (i.e. the box) in which we will be moving the ball. To achieve this, we will use the default empty scene that comes with every new unity project. The scene should be already open and ready. To add the floor, in the Unity editor, go to the GameObject menu on top, then 3D Object -> Plane. This will add a plane to the scene. Make sure the Position and Rotation Parameters of the Transform component in the Inspector menu (Red box in the figure below) are all set to zero:
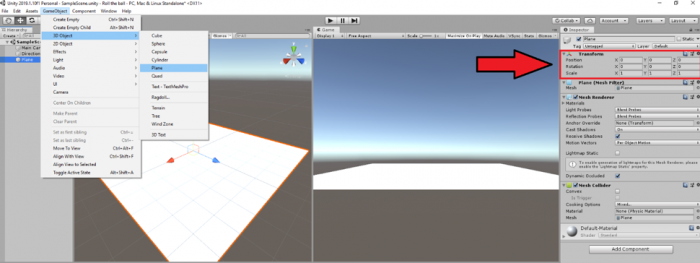 Credit: Unity
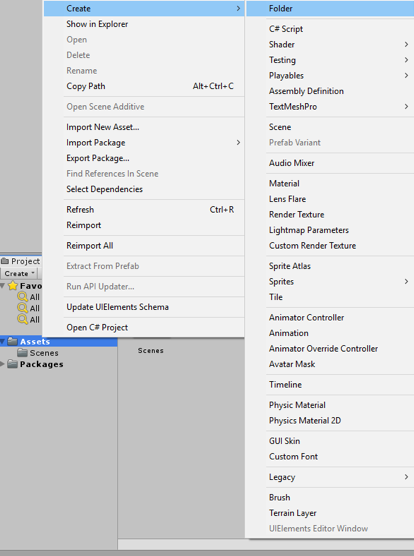
Next, we need to add some color to our plane GameObject. To do this, in the project folder structure, right click on “Assets” and go to Create -> Folder. Rename this folder to “Materials”.
 Credit: Unity
Now right-click on the newly created materials folder and go to Create -> Material. Rename this material to “PlaneMat”.
 Credit: Unity
Select the newly created “PlaneMat” and change its color from the Inspector panel on the right by clicking on the color picker next to the “Albedo”. Select a color of your liking.
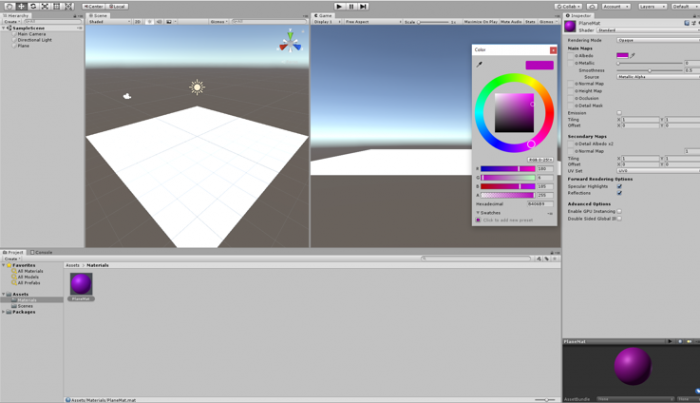 Credit: Unity
Drag the “PlaneMat” onto the Plane GameObject in the scene. The Plane should now have color.
Next, we need to add four walls to the sides of the Plane so the Ball wouldn’t fall off. To do this, go to the GameObject menu on top, then 3D Object -> Cube. While the newly added Cube game object is selected set its transform parameters in the Inspector menu as depicted below:
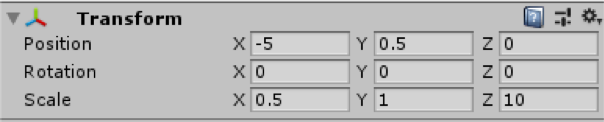 Credit: Unity
Doing so will result in a wall placed on the right side of the plane. To have the proper view of the play area when running the scene or inspecting the scene output in the “Game” tab, set the position and rotation parameters of the “Main Camera” game object as shown below:
 Credit: Unity
Create a new material with a color of your choice inside the materials folder and name it “WallMat”. Drag this material onto the Cube game object that acts as the wall.
To add more meaning to our scene, rename the Plane and Cube game object to “Floor” and “Wall”, by right clicking on each and then selecting “Rename”.
Select the “Wall” game object, hold down the Ctrl button and press D (you can also right click on the wall gameobject and click on duplicate). if done correctly your “Wall” object should be duplicated and labeled “Wall (1)”. Change the X value of the position parameter of “Wall (1)” from -5 to 5. Using this simple process, a new wall is added to the left side of the plane.
Repeat the same procedure to add walls to the up and down sides of the planer. Simply duplicate the “Wall” object twice more and change its parameters as shown below:
 Credit: Unity
At this stage, we should have the play area ready as this:
 Credit: Unity
Video: Roll the ball 1: A Summary of what we have done so far (Step 2) (03:19) This video is not narrated.
-
Next, we need to add a ball to our scene and make it controlled by the player and roll around the play area. To add a ball to the scene, go to GameObject -> 3D Object -> Sphere. Change the name of this game object to “Ball”. Set its transform parameters as shown below. And add a material (Create “BallMat”) with a color to it.
 Credit: Unity
If we play (
 ) the scene, you will realize that the ball will float in the air instead of dropping on the plane. The reason for this is that the ball game object does not have any physics attached to it yet. To fix this, select the ball game object, and in the Inspector panel, click on “add component”, search for “Rigidbody” and hit enter.
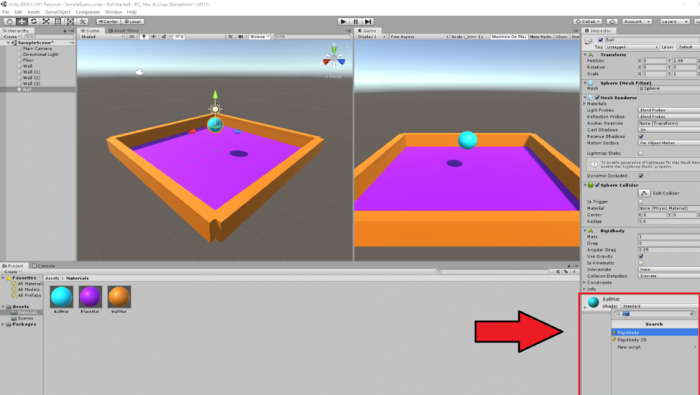 Credit: Unity
Doing so will add a Rigidbody component to the ball game object. You may notice that the “use gravity” parameter of this component is checked by default, which will add gravity to this game object, and therefore it will drop onto the plane. Press play and see the result.
-
Rolling the ball: To enable the player to control the movement of the ball, we will use the arrow keys (the up, down, left, and right keys) on the keyboard. The idea is that by pressing the up arrow key we will make the ball roll forward, the down arrow key, backward, and the left and right arrow keys, to the sides. To achieve this, we will need to do a little bit of C# programming using the physics engine of Unity.
Create a new folder in the project panel called “Scripts”. Right-click on this folder, select Create -> C# Script. Rename this script to “BallMovement” (Make sure you use the same exact spelling for the script name -case sensitive- if you are planning to copy the source code!). Drag this script onto the Ball game object. Double click on the script to open it in Visual Studio (this could take a while, and you might be asked to log in. You can either create an account or explore different options provided to you). Our simple ball movement script should look like this (Please read the comments in the code for further explanation). Either type or copy (make sure the name of the class i.e. “BallMovement” is spelled exactly as you have name named the script file) the following code into your script (note, the lines in green are comments are not executed by the engine, they are just extra explanation for you to understand the logic behind the code. Therefore, if you decide to type the following source code into your script, you do not need to write the lines in green):
using System.Collections; using System.Collections.Generic; using UnityEngine; public class BallMovement : MonoBehaviour { // we need to define a variable that controls for the speed with which the ball rolls // the declaration of variables is done here // the type of the variable is float and its label Speed. The float type means that the value of Speed can be with precision points e.g. 15.5 public float Speed; // FixedUpdate is called several times per frame which will create the illusion of smooth movement void FixedUpdate() { // we need to take the input from the arrow keys pressed by the player. By default in unity, the left and right arrow keys are labeled as "Horizontal" and the up and down arrow keys as "Vertical" // we will define two variables where the value of each will be set "several times per frame" if the player presses the HorizontalMovement (i.e. the left or right key) and/or the VerticalMovement (i.e. the up or down key) float HorizontalMovement = Input.GetAxis("Horizontal"); float VerticalMovement = Input.GetAxis("Vertical"); // since we are dealing with three dimensional space, we will need to define a 3D vector based on which the ball should move. As such, we define a Vector3 called MoveBall that takes three parameters of X,Y,Z // movement on the X axis will be our HorizontalMovement (i.e. the left or right key) and on the Z axis the VerticalMovement (i.e. the up or down key). As we do not want to move the ball in the Y axis in the 3D space (i.e. up and down in the 3D space), the Y value will be set to 0 Vector3 MoveBall = new Vector3(HorizontalMovement,0,VerticalMovement); //lastly, we will need to access the physics component of our ball game object (i.e. the Rigidbody) and add a force to it based on the values of the vector we just defined. We will multiple this force value with our Speed variable to be able to control the Speed of the force as we wish. gameObject.transform.GetComponent
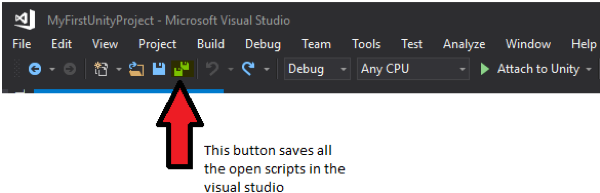
<Rigidbody>().AddForce(MoveBall * Speed); } } Once you are done populating your script with the source code above, make sure you hit save. It is absolutely important to remember that every time we modify a script, we save it so that Unity updates the editor based on the changes we have made.
 Credit: Unity
If we go back to unity and select the ball game object, we will see that in the inspector panel under the “Ball Movement” script, there is now a “Speed” variable that we can set. Change its value to 25 and hit play. Use the arrow keys to roll the ball inside the play area.
Video: Roll the ball 2: A Summary of what we have learned so far (Steps 3 and 4) (02:11) This video is not narrated.
-
Adding coins to the scene: download the unity package file roll the ball assets. Double click on this file, and it will open an “Import Unity Package” window inside unity. Click on import. Doing this will add two new folders in your assets hierarchy. One is called “Coin” which contains the model we will be using for the collectibles in our game. The other is called “Sounds” which will be covered in the next steps.
Go to the “Coin” Folder and select the Coin model. Drag this model into your scene and place it somewhere inside the play area. Change its transform parameters as follows:
 Credit: Unity
We will now add a rotation effect to this coin to catch the attention of the player. To do this, create a new script inside the “Scripts” Folder called “CoinRotation”. Drag this script onto the coin game object. Double click on the script to open it in visual studio. Our simple coin rotation script will look like this (Please read the comments in the code for further explanation):
using System.Collections;
using System.Collections.Generic;
using UnityEngine;

public class CoinRotation : MonoBehaviour
{
    // we need to define a variable that controls for the speed with which the coin rotates
    public float RotationSpeed;


    void FixedUpdate()
    {
        // We need to instruct this object to constantly rotate around its own Y axis (i.e. up)
        // this is done by accessing the transform component of this gameobject and using the built-in RotateAround unity function
        // this function takes three parameters. first one indicates the point in the 3D space where the rotation should happen. Since we want the coin to rotate around itself, we will pass the position of the coin itself as this parameter
        // the second parameter indicates around which axis should the game object rotate. we will set this to the up axis so the coin rotates around the Y
        // the third parameter indicates the speed with which the coin should rotate. for this we will use our RotationSpeed variable
        gameObject.transform.RotateAround(gameObject.transform.position, transform.up, RotationSpeed);

    }
}
If we go back to unity and select the coin game object, we will see that that in the inspector panel under the “Coin Rotation” script, there is now a “Rotation Speed” variable that we can set. Change its value to 15 and hit play. The coin should be continuously rotating around its Y-axis.
Use the arrow keys to roll the ball inside the play area and hit the coin. You will notice that the ball will go right through the coin. The reason for this is that there is no collision happening between these two game objects. The ball game object has a Sphere collider attached to it by default, but the coin game object does not have a collider. Select the coin game object, in the Inspector panel select add component, search for “Box collider”, and hit enter.
Play the scene and try to hit the coin with the ball again. You will notice that this time, the two objects will collide. We would need to have colliders on both objects to be able to determine when they “hit” each other. We need this to be able to collect the coins (i.e. remove the coin from the scene when the ball hits it). You may have noticed that during the collision, the coin will momentarily block the movement of the ball until it slides to either side of the coin and keeps rolling based on the force behind it. We do not want the player to experience this effect. In contrast, we want the game to be able to detect exactly when the two objects are colliding, but we do not want them to block each other in any way. The collision system of Unity can help us in achieving this goal using “Trigger”. If you select the coin game object, you will notice that under the “Box Collider” component that we just added, there is a parameter called “Is Trigger”. Enable this parameter by clicking on the CheckBox next to it. If we hit play, we can see that although we have colliders attached to both objects, the ball will not be blocked by the coin anymore.
 Credit: Unity
 -
Coin collection: create a new script called “CoinCollection” and attach it to the Coin game object. Open the script in visual studio and modify the code based on the instructions below:
using System.Collections;
using System.Collections.Generic;
using UnityEngine;

public class CoinCollection : MonoBehaviour
{

    // this is the default unity function that will be called whenever two objects collide and one has the Trigger parameter enabled
    // the argument "other" refers to the object that hits the game object this script is attached to.
    private void OnTriggerEnter(Collider other)
    {
        // In this case the we want to check if the "other" is the "Ball"
       // Make sure your ball gameobject is named “Ball”, otherwise you will receive an error!
        if (other.name == "Ball")
        {
            // if this condition is correct and indeed the Ball game object has hit this game object where the script is attached (i.e. the coin), we will remove this game object
            Destroy(this.gameObject);
        }
    }
}
Duplicate the coin game object several times and spread the coins across the play area. Play the scene and hit the coins. You will see that as soon as the ball hits a coin, that particular coin will be “destroyed”.
Video: Roll the ball 3: A summary of what we have learned so far (Steps 5 and 6) (03:41) This video is not narrated.
-
Point system: Before destroying a coin upon collision with the ball, we want to reward the player with a point for managing to collect it. To implement this functionality, create an empty gameobject by going to GameObject -> “Create Empty”. Rename this empty game object to “Point System”. Create new script called “PointSystem” and attach it to the “Point System” game object. Open the script and modify the code based on the instructions below:
using System.Collections;
using System.Collections.Generic;
using UnityEngine;

public class PointSystem : MonoBehaviour
{
    // we need to have a variable that holds the value of the points we aggregate
    public int Points;

    // we need to defined a GUIStyle profile for our graphical user interface (GUI) that shows the value of points to change its font size, shape, etc.
    public GUIStyle PointStyle;

    // this is the default unity graphical user interface (GUI) function. It will render GUI elements on the screen on a specific 2D coordinate
    private void OnGUI()
    {
        // a GUI label to show the value of the aggregated points, place at the X=10, Y=10 coordinates, with width and height of 100, the next argument is the content that the label shows which is in this case
        // a numerical value. we need to convert the numerical value to a string (text) to be able to show it on the label. The last argument indicates which GUIStyle profile should be used for this label
        GUI.Label(new Rect(10,10,100,100),Points.ToString(),PointStyle);
    }
}
The script described above is responsible for holding the value of the points the player aggregates and visualizing it on the screen. To increase the points however, we will add a line to the script responsible for detecting when the ball hits a coin. For this go back to the “CoinCollection” script and modify it based on the instructions below:
using System.Collections; using System.Collections.Generic; using UnityEngine; public class CoinCollection : MonoBehaviour { // this is the default unity function that will called whenever two objects collide and one has the Trigger parameter enabled // the argument "other" refers to the object that hits the game object this script is attached to. private void OnTriggerEnter(Collider other) { // In this case the we want to check if the "other" is the "Ball" if (other.name == "Ball") { //if this condition is correct and indeed the Ball game object has hit us, access the Point System game object, then the PointSystem script attached to it, and increase the Points variable by 1 GameObject.Find("Point System").GetComponent<PointSystem>
().Points += 1; // we will remove this game object where the script is attached to (i.e. the coin) Destroy(this.gameObject); } } } Next, select the “Point System” game object. On the inspector panel on the right, in the “PointSystem” Script attached to it expand the “Point Style” GUIStyle and change it as instructed below:
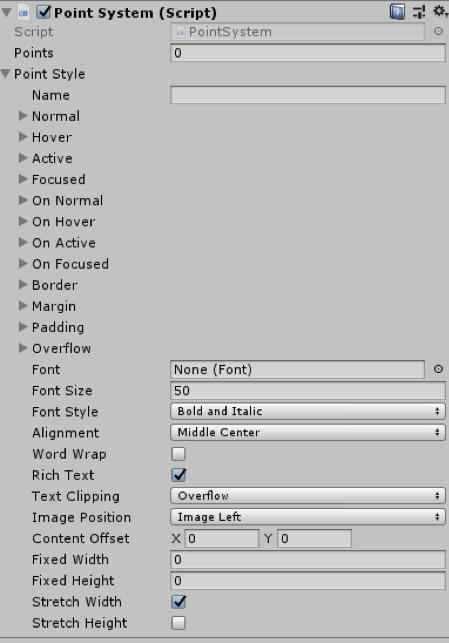 Credit: Unity
Press play and start aggregating points!
-
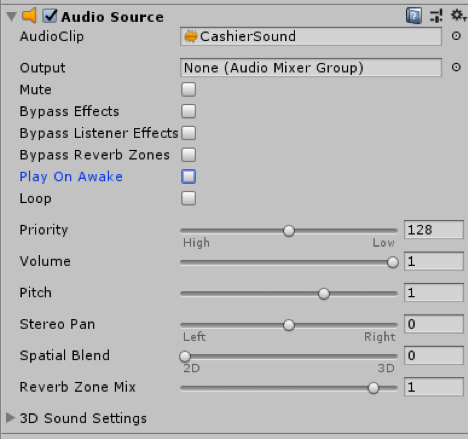
Collection sound: another feature we need to add to our game is a sound effect. We want to play a “cashier” sound effect each time the ball hits a coin. To achieve this. Create a new empty game object and rename to “Sound Management”. Select this newly created game object and click on “Add Component”, search for “Audio Source” and hit enter.
Navigate to the “Sounds” folder in your project hierarchy and drag the “CashierSound” clip to the “AudioClip” field in the “AudioSource” component we just added to our audio management game object. Uncheck the “Play On Awake” parameter of the “AudioSource” component so the sound clip does not play as soon as we start the scene.
 Credit: Unity
Next, we need to instruct the game to play the audio clip whenever we collect a coin. To achieve this, modify the “CoinCollection” script based on the instructions below:
using System.Collections; using System.Collections.Generic; using UnityEngine; public class CoinCollection : MonoBehaviour { // this is the default unity function that will called whenever two objects collide and one has the Trigger parameter enabled // the argument "other" refers to the object that hits the game object this script is attached to. private void OnTriggerEnter(Collider other) { // In this case the we want to check if the "other" is the "Ball" if (other.name == "Ball") { //if this condition is correct and indeed the Ball game object has hit us, access the Point System game object, then the PointSystem script attached to it, and increase the Points variable by 1 GameObject.Find("Point System").GetComponent
<PointSystem>().Points += 1; // access the audio management game object, then the AudioSource component, and play GameObject.Find("Sound Management").GetComponent <AudioSource>().Play(); // we will remove this game object where the script is attached to (i.e. the coin) Destroy(this.gameObject); } } } Video: Roll the ball 4: A summary of what we have learned so far (steps 7 and 8) (03:13)
Hit play and enjoy your creation!
Note
It is NOT the goal of this course to teach you C# programming. However, without basic knowledge of C# you will not be able to create a rich virtual experience. The provided scripts to you in this exercise are fully commented for your convenience. Please take the time to study them, as they will prove to be rather useful in the next session.