11.1 The atmospheric boundary layer is your home.
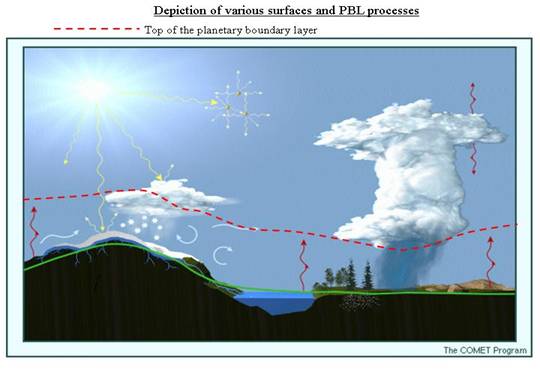
The atmospheric boundary layer (ABL) is the tropospheric layer that is directly influenced by the presence of Earth’s surface and responds to surface forcings in an hour or less. It is also called the planetary boundary layer or just the boundary layer. The atmospheric boundary layer is typically 1 km deep during the day and ~100 m deep during the night. Above the boundary layer is the free atmosphere. We live in the atmospheric boundary layer.

The surface forms a boundary for the atmosphere and is actually responsible for the existence of the planetary boundary layer.
The surface influences the atmosphere in four main ways:
- sensible heat flux
- moisture flux
- momentum flux, also called frictional or turbulent drag (see section 10.10)
- radiation
The water vapor that is in the air came from the evaporation of liquid water or sublimation of ice in or on the surface. Once that water vapor is in the atmosphere, it can condense, thus providing energy that heats the air and creates buoyant energy, as you learned in Lesson 3.
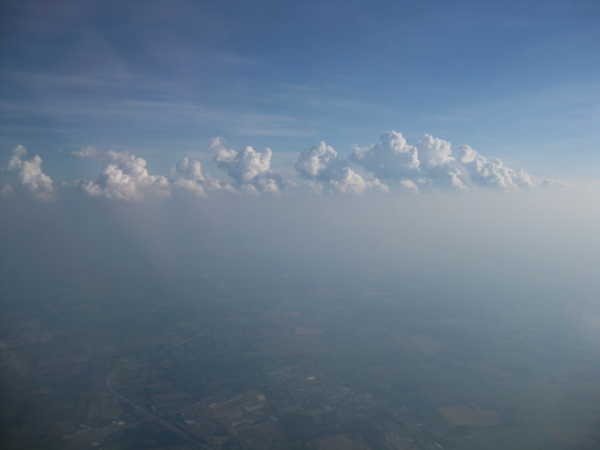
The picture below was taken on a sunny summer day over Maryland. What do you see? Starting at the bottom, you can barely make out the buildings and the roads because the air is so uniformly hazy. The haze extends all the way up to the lower parts of the fair weather cumulus clouds, which seem to be bobbing on top of the haze, like Styrofoam peanuts bobbing on top of a pool of water. Above the clouds, it’s blue sky with some thin cirrostratus clouds. This haze layer is the atmospheric boundary layer and the fair weather cumulus clouds mark its top.

Where did the haze come from? How did the clouds form? How did the haze get to be so uniform? Why are the fair weather cumulus clouds bobbing on top with blue sky above? You already know answers to the first two questions. The haze is small particles that came from the surface or were made in the atmosphere by gas-to-particle conversion and then swelled in the hot humid air. The clouds come from moist air containing aerosol that rises and cools until its supersaturation is sufficient to form cloud drops. The condensation releases energy, creating buoyancy, and the clouds rise until they reach their level of neutral buoyancy (LNB). You will learn in this lesson why the haze is so uniform (turbulent mixing) and why the clouds bob on top (a stable layer with increasing potential temperature above the boundary layer).
There are three basic ways that air can be moved: the mean wind, waves, and turbulence. You have already learned about the mean wind and its causes, but mostly we have dealt with the wind in the free troposphere. In the boundary layer, transport of moisture, heat, and momentum are dominated by the mean wind in the horizontal and by turbulence in the vertical. Turbulence is a much more persistent part of boundary layer flow than it is of flow in the free atmosphere.
For any variable over time or space, we can split that variable into two values—the mean and the perturbation. We will see more about this later.
Turbulent transport consists of swirling motions called eddies. These eddies occur in a range of sizes, and they can have different intensities, meaning wind velocities. We can plot the turbulent intensity as a function of size of the eddies to get a turbulence spectrum. To get an idea about the behavior of eddies and clouds, watch the following short video of cloud formation.
Extra Credit Reminder!
Here is your last chance to earn one point of extra credit via Picture of the Week!
- You take a picture of some atmospheric phenomenon—a cloud, wind-blown dust, precipitation, haze, winds blowing different directions—anything that strikes you as interesting.
- Add a short description of the processes that you think are causing your observation. A Word file is a good format for submission.
- Use your name as the name of the file. Upload it to the Picture of the Week Dropbox in this week's lesson module. To be eligible for the week, your picture must be submitted by 23:59 UT on Sunday of this week.
- I will be the sole judge of the weekly winners. A student can win up to three times.
- This is your last chance to enter!