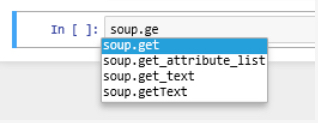
Let’s close this brief introduction to Jupyter with a few more things that are good to know when starting to write longer and more complex notebooks. Like normal development environments, Juypter has an autocomplete feature that helps with the code writing and can save a lot of typing: while editing code in a code cell, you can press the TAB key and Jupyter will either automatically complement the name or keyword you are writing or provide you with a dropdown list of choices that you can pick from. For instance, type in soup.ge and then press TAB and you get the list of options, as shown in Figure 3.13 including the get_text() function that we used in our code.
Another useful keyboard command to remember is SHIFT+TAB. When you place the cursor on a variable name or function call and press this key combination, a window will open up showing helpful information like the type of the variable and its current content or the parameters of the function as in Figure 3.14. This is of great help if you are unsure about the different parameters of a function, their order or names. Try out what you get when you use this key combination for different parts of the code in this notebook.

As in all programming, it may occasionally happen that something goes completely wrong and the execution of the code in a cell won’t terminate in the expected time or not at all. If that happens, the first thing to try is to use the “Interrupt Kernel” button located to the right of the “Execute cell” button. This should stop the execution of the current cell and you can then modify the code and try to run the cell again. However, sometimes even that won’t help because the kernel has become unresponsive. In that case, the only thing you can do is restart the kernel using the “Restart Kernel” button to the right of the “Interrupt Kernel” button. Unfortunately, that means that you will have to start the execution of the code in your notebook from the beginning because all imports and variable assignments will be lost after the restart.
Once you have finished your notebook, you may want to publish or share it. There are many options by wich to do so. In the File menu, there exists the “Download as…” option for obtaining versions of your notebook in different formats. The .ipynb format, as we mentioned, is the native format in which Jupyter saves the notebooks. If you make the .ipynb file available to someone who has access to Juypter, that person can open the notebook and run it or modify the content. The .py option allows for exporting content as a Python script, so that the code can be run outside of Jupyter. If you want a version of your notebook that others can read even without access to Jupyter, there are several options like exporting the notebook as HTML, as Latex, or as PDF. Some of these options require additional software tools to be installed on your computer and there are some limitations. For instance, if you export your notebook as HTML to add it to your personal web page, interactive widgets such as the interactive web map you will see later in Section 3.10 will not be included.
To close this section, we want to again refer to the links we provided at the beginning of Section 3.6.2 if you want to keep reading about Jupyter and learn tricks that we weren't able to cover in this brief introduction. In the remainder of this lesson, please use Jupyter to try out the code examples by entering them into a Jupyter notebook and running the code there to get some more practice with Jupyter.