Walkthrough: From SketchUp Model to Unity
In this walkthrough, we will see how we can import a 3D model from a SketchUp into Unity. Although the Unity Asset Store contains a large repository of free 3D models that you can use in your projects, depending on the requirements, it might be needed to import custom models into Unity. As you have already gained some experience in modeling 3D objects in SketchUp, it will be useful to see how you can import your model directly into Unity and add behaviors to it. In this walkthrough, we will import a SketchUp model of the “Walker” building into Unity, extract its materials and textures, and add it to a scene. Then, we will add a first-person controller prefab from the standard assets of unity which will enable us to walk around our scene.
You should still have the Unity project “MyFirstUnityProject” from the beginning of the previous lesson. Open your Unity Hub and open the “MyFirstUnityProject” (if you do not have this project anymore, follow the instructions from the previous lesson on how to create it. Make sure you also import the first package you used in the previous lesson – download here). We will use this project to perform this walkthrough. Download the following Walker Laboratory SketchUp file and once the download is completed, navigate to the location where it is downloaded (by default it should be in your User\[your username]\Downloads).
In the Unity editor, create a new folder in your project folder structure and rename it to “Walker Building”. Drag and drop your downloaded SketchUp file into this folder. Create a new scene in the same folder, by right-clicking on the folder from the folder structure panel -> create -> Scene. Name this scene “WalkerScene”. Open this scene and drag your WalkerLabaratory SketchUp model into the scene. Reset its position and rotation values to zero. Change the position of the Main Camera in the scene so the building is within its view. Change the X rotation of the directional light to adjust the lighting/show of your scene.
You may have noticed that the Building object we have imported looks rather dull and is missing lots of textures and materials. To fix this problem, we need to extract all the materials and textures from the prefab of the model so that Unity knows how to map them. Select the prefab of the model you have imported into your folder. You can see that in the inspector menu it is detected that this is a SketchUp model, but all the materials for the individual components of this model are missing (labeled as none).
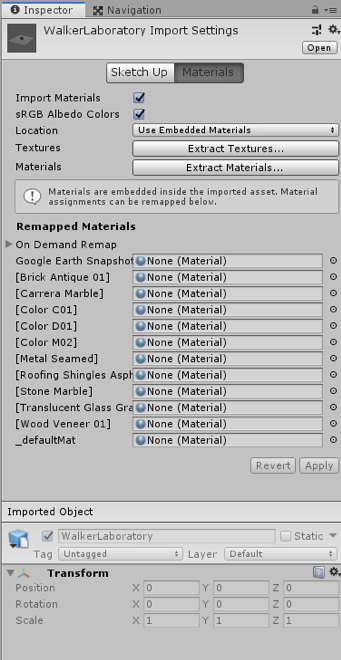
To fix this, click on the “Extract Textures …” button in the inspector panel. Create a new folder in the pop-up window and rename it to “Textures”, and then click on “Select Folder”. Do the same for Materials by clicking on the “Extract Materials …” and creating a new folder called “materials”. Once done, the model should have all the materials and textures added to it.
Unity SketchUp (01:39) This video is not narrated.
To add a first-person controller, we will use the default FPSController prefab on unity. This is the same prefab that you have used in the first part of the previous lesson. Navigate to the “Standard Assets” folder -> “Characters” -> “FirstPersonCharacter” -> “Prefabs”. Drag and drop the FPSController prefab into your scene. Place the FPSController somewhere on the plane (you can start with X=0 and Z=0 for position and then move the FPSController along these axes) and make sure the Y value of its position parameter is set to 1. Rotate the FPSController GameObject so it faces the building. If you play the scene now, you will notice that the FPSController will fall through the plane. This is because we have not yet attached colliders to our objects. The FPSController prefab already has a collider so all we need to do is to add colliders to the plane and all the children of the Walker GameObject.
To achieve this, you have two options. You should either select all the child objects of the building prefab that has a “Mesh renderer” component attached to it and add a “Mesh collider” to that object manually. Since these objects have meshes, the physics engine of Unity will use the shape of the mesh to create a collider with the same shape around that object. Or you can select the Walker prefab from your project folder and check the “Generate Colliders” parameter in the inspector menu under SketchUp option, and then press “Apply”. Press play, and you should be able to navigate on this plane using the WASD keys on your keyboard and look around using your mouse.
Unity SketchUp 2: 01:22 This video is not narrated.
Once you are done experimenting with your new creation, disable the FPSController GameObject by clicking on it once, and then unchecking it from the inspector panel.

In the next walkthrough, we will cover animating a camera and for this, we need to use the static Main Camera in our scene.