Tasks and Deliverables
Part 1: Participate in a Discussion
Please reflect on your 3D spatial analysis experience, using ArcGIS Pro; anything you learned or any problems that you faced while doing your assignment as well as anything that you explored on your own and added to your 3D spatial analysis experience.
Part 2: Assignments
The homework assignment for this lesson is to apply the techniques you learned in this lecture to the historic campus scene that you already saw in the previous lesson (it should be already in your “MyFirstUnityProject” project under the “Historic Campus” folder). You are supposed to create a nice camera animation and produce a stand-alone windows application as well as a 360° movie. The video should be uploaded to your YouTube channel and shared together with your Windows application with the rest of the class by posting the links and a short description on the forums. Finally, you are supposed to provide constructive feedback on a video created by one of your classmates and submit a write-up reflecting on this assignment.
The assignment has several tasks and deliverables with different submissions deadlines, all in week 10, as detailed below. Successful delivery of the tasks 1-6 is sufficient to earn 90% on this assignment. The remaining 10% is reserved for efforts that go "above & beyond" by improving the historic campus model, e.g. in ways suggested below, before creating the video and stand-alone Windows application.
Task 1: Create camera animation
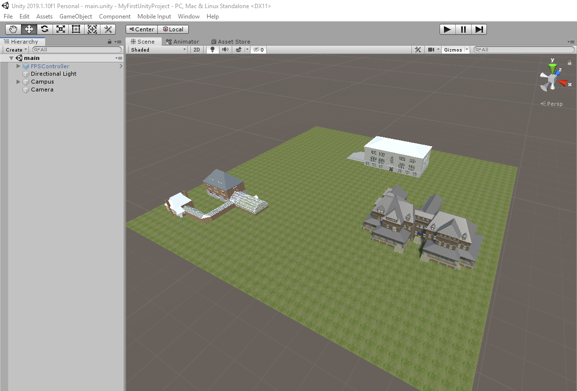
For this assignment, you will use the historic campus scene from Lesson 8. We suggest you start with a fresh download of the Unity project: Historic Campus. The campus models have already been imported and placed in a scene (main) and things should look like in the screenshot below when opening the project in Unity. You are now supposed to create a ~1.5min camera flight over the scene using what you learned about animating the camera in this lesson. But before you start with the camera flight, you may want to think about what you want to do for "above & beyond" efforts (see details below) as this may have an effect on the camera trajectory you want to create (e.g. in case you are going to add additional models to the scene).
Task 2: Produce a stand-alone Windows application
Produce a stand-alone Windows application showing your camera animation as you learned in this lesson. Please note that if you put in work for above & beyond points, this needs to be done before creating the Windows application so that these efforts are included.
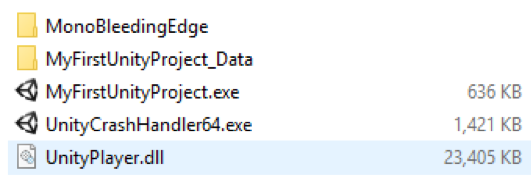
Deliverable 1: Create a .zip file containing all the files and folders of your built.
Upload the application to the PSU Box Comunity Folder and include the link to your application when posting on the Lesson 8 Video Discussion (see Task 4).
Task 3: Produce 360° video
Produce a 360° video showing your camera animation as you learned in this lesson. Don't forget to adapt the meta information before uploading the video to your personal YouTube channel. Please note that if you put in work for above & beyond points that should be visible in the video, this needs to be done before creating the video so that these efforts are included.
Deliverable 2: Upload the 360° video to your YouTube channel and share it via a link. Include the link when posting on the Lesson 8 Video Discussion (see Task 4).
Task 4: Share stand-alone application & video
Deliverable 3: Create a post on the Lesson 8 Video Discussion including the links for your Windows stand-alone application & 360° video. Add a one-paragraph description of what you did to improve the model for above & beyond points, if anything. If your above & beyond efforts are only visible/audible in either the 360° video or the stand-alone application, please make this clear as well.
Task 5: Constructive feedback on other student's video
Watch a video posted by one of your classmates and write down 1-2 paragraphs in which you provide constructive feedback. If possible, please pick a video that has not yet received any feedback. Comment on the technical and aesthetic quality of the video and, if applicable, the extensions made to the model. Make suggestions on how the work can be improved or extended. If the description mentions that some additional effort is only included in the Windows stand-alone application, you can feel free to ignore that part.
Deliverable 4: Post your feedback as a reply to the respective video post on Lesson 8 Video Discussion.
Task 6: Reflection Paper
Create a ~700 words write-up reflecting on what you learned in this assignment, what problems you ran into, if and how you were able to resolve these, etc. Please also include a complete description of things you did for above & beyond efforts. Provide some final assessment of your experience with Unity.
Deliverable 5: Submit your write-up to the Lesson 8 Assignment.
Above & beyond:
This part of the assignment is for allowing you to let your creativity run free to extend or improve the historical campus scene and/or explore some features of Unity development on your own based on one of the many tutorials available on the web. What you do is up to you; the following are just two suggestions for directions in which you can think:
- Add additional models to the historical campus scene: You can extend the scene by adding additional objects. This could be your own building model from Lesson 3, some free assets you find by browsing the Unity Asset Store (view How to use the Asset Store for instructions), or some other free 3D models available on the web. The purpose of this assignment is to demonstrate your Unity skills to us, so realism is not important here. But what you add should generally fit the historic campus scene (additional buildings, other tree or plant models, models of people, etc. but no spaceships, robots, or the likes). If you want to include your own building model but the building is already there, feel free to import it and place your model at a different location in the scene. Please don't go overboard with the number of objects you add; a very few to show that you are able to import models and place them in the scene is all that it takes.
- Add some background music, other sound effects, or commentary: Adding sounds and background music to a scene in Unity is not complicated but you should only try to include this into the Windows stand-alone application with the standard camera object because recording sound won't work with the 360° video recording. The first four minutes of this Beginner Unity Tutorial will give you a basic understanding of what needs to happen: The audio file (.mp3, .wav, etc.) you want to use needs to put into the Assets folder of your project. The main camera object needs to have an AudioListener component and this component needs to activated (checkbox at the top left). Then you can attach an AudioSource component either to the camera itself or any other GameObject in the scene. Attaching it to the camera itself works fine for background music or commentary while attaching it to objects in the scene works best for 3D sound that should get louder when the camera approaches a particular object or location in the scene. Finally, the audio track needs to be dragged from the Assets window onto the AudioClip property of the AudioSource component.
If you are looking for some relaxing background music, you can browse freesound for a suitable track that is freely available. Alternatively, or in addition to using music, you can record your own commentary describing either the scene or what you did for this assignment and have this played during the camera flight. If you experience any problems with adding sound, feel free to help each other out in Lesson 8 Discussion.
Helpful advice:
We highly recommend that, while working on the different tasks for this assignment, you frequently create backup copies of your Unity project folder so that you can go back to a previous version of your project if something should go wrong.
For the camera animation, we recommend using many intermediate keyframes unless the camera is just moving in a straight line. In particular, try to not have a rotation of more than 90° between two successive keyframes in the animation.
| Criteria | Full Credit | Half Credit | No Credit | Possible Points |
|---|---|---|---|---|
| Camera flight has the correct length, is smooth and aesthetically pleasing. | 3 pts | 1.5 pts | 0 pts | 3 pts |
| Windows stand-alone application is shared via Box and shows the camera flight. | 3 pts | 1.5 pts | 0 pts | 3 pts |
| Video is shared via YouTube and shows the camera flight. | 3 pts | 1.5 pts | 0 pts | 3 pts |
| Video has been correctly created and uploaded as a 360° video allowing to look around while the camera is moving over the scene. |
3 pts | 1.5 pts | 0 pts | 3 pts |
| Above & Beyond: The number of points varies depending on how much effort was required (e.g. placing an additional 3rd-party 3D model in the scene will give fewer points than placing a self-made model or adding background music to the scene). | 3 pts | 1.5 pts | 0 pts | 3 pts |
| Total Points: 15 |
| Criteria | Full Credit | Half Credit | No Credit | Possible Points |
|---|---|---|---|---|
| Paper clearly communicates what you learned in this assignment, what problems you ran into, if and how you were able to resolve these, etc. Paper also includes a complete description of things you did for above & beyond efforts and a final assessment of your experience with Unity. | 5 pts | 2.5 pts | 0 pts | 5 pts |
| Write-up is of the correct length and is well and thoughtfully written. | 5 pts | 2.5 pts | 0 pts | 5 pts |
| The document is grammatically correct, typo-free, and cited where necessary. | 2 pts | 1.0 pts | 0 pts | 2 pts |
| Total Points: 12 |