Animations and State Change in Unity
Animations are one of the main methods to bring some life into a 3D scene in Unity and make it dynamic. Objects in the scene may be permanently going through the same looped animation (think of the leaves of trees moving in the wind) or they may be in a particular animation state that can change, potentially triggered by some external event (think of a human avatar that can switch from a walking animation to a running animation and that may have many other animations associated with).
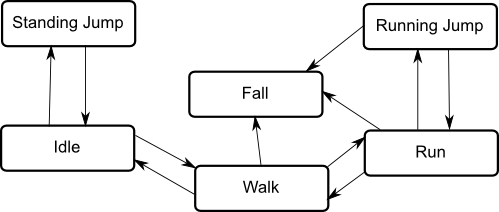
The theoretical concept behind this idea is the notion of a State Machine: Each GameObject is always in one of a pre-defined set of states (state for walking, state for running, etc.), potentially associated with a particular animation. The transition from one state to another is triggered by some event which, for instance, can be some user input, a collision with another object, or simply a certain amount of time passed. The states with possible transitions between them form the object's state graph as shown in the image below. The state graph together with a pointer to the object's current state when the project is running constitute the object's state machine.
In this course, we will use animations only to animate the main camera to create a camera flight over the scene. Other uses for animations for 3D/VR applications could be making objects like plants more realistic, creating movable objects like doors, or populating the environments with dynamic entities like people or cars. Our camera flight will only need a single animation and, hence, state. So we won't have to deal with complex state graphs and the transitions between states. Nevertheless, please watch at least the first 90 seconds of the following video to get a bit of an understanding of the Unity's Animator component and controller and what happens under the surface when working with Animation State Machine. Don't worry if some of the details don't get completely clear.
The Animator Component (03:45)
In order to animate the properties of game objects in Unity we use the Animator Component. Animator components have a number of properties which may differ depending on what you are animating. For example, a 3D humanoid character will require different settings than a 2D sprite. Here we have a scene with a model in it. The model has an animator component attached. The first property of the animator component stores a reference to an animator controller asset. Animator controllers are Unity generated assets that contain one or more state machines which determine which animation is being played while the scene is running. These state machines can be on multiple layers and use parameters of various types. To affect when they transition between states and blend. For example you can set the parameters of an animator controller from your scripts to tell it if the character is running, jumping or shooting a gun. It will then play and blend the animation automatically. The avatar is an asset that Unity creates when importing a 3D humanoid. It contains a definition of the skeletal rig the character has. When adding a character of this type to your scene the avatar field will automatically be filled in with an asset created for that character. Try to think of the avatar as the glue that binds the model to be animated to the animator. For generic objects without skeletal rigging an avatar is not required. The Apply Root Motion field determines whether the animation can affect the transform of the game object and is generally used with 3D humanoids. Root Motion is the core movement within an animation clip. For example imagine the difference between an animation of a character running on the spot verses one that is animated running a few paces forward. In the latter example we can use the motion of the character moving forward to drive the character around in our game. Looping that clip to give us realistic continuous motion. However, if you simply have animations that run on the spot you would uncheck Apply Root Motion and instead move the character via script. It is also possible to override this property entirely. This is done by creating a script with a call to the onAnimatorMove function and attaching it to your game object. See the documentation link below for more information on this. Animate Physics can be either checked or unchecked. When it is checked it means that the animations will be executed in time with the physics engine. Generally this is advised if what ever you are animating has a rigidbody. The Culling Mode of an animator effects whether or not the animations are being played while they're not being rendered. Always Animate means that the animations will play even while not being rendered. Based On Renderers means that the animation will only play while being rendered. Meaning that when the character is obscured from view animation will cease to save performance. With either option the root motion is applied as it would normally. That is if a character was being made to walk with root motion applied then they would continue to move even while not being rendered so that the character would end up in the correct place when they became visible again. Subtitles by the Amara.org community
The main tool for creating an animation in Unity is the Animation View. It's a very powerful but also slightly complex tool so that we will only get to know its basic features here. For details, please see the documentation available here. The Animation View is for creating and editing animation clips as well as previewing them. Please watch the following short video to familiarize yourself with the idea of creating a camera animation clip in Unity using the Animation View. You do not have to try out what is shown in the video yourself; we will be doing this in the walkthrough in the next section (the walkthrough will slightly deviate from what is shown in the video though).
The Animation View (06:20)
The animation view allows you to create and modify animation clips directly inside Unity. It is designed to act as a powerful and straightforward alternative to external 3D animation programmes. For instance, if we wanted to have a camera fly around a scene to give a player an overview of a level we can create that animation for it in Unity. Here we have a scene with a camera in the corner. We would like to create an animation for that camera which will allow it to move from one side of the scene to the other. Since we want to make an animation for the camera we will want to ensure that it is selected in the Hierarchy view. We can then open the Animation view by clicking Window - Animation. Like any other view this is moveable resizable and dockable. There are many different buttons and options visible when you first open the Animation view. First and foremost is the animation drop-down. Here is where we can select our different animations to edit. Since we don't currently have any animations this drop-down is blank except for the ability to create a new animation. When you create a new animation you will be prompted for a name and a location to save the animation file. We will create an animation called CameraFlyThu and place it in the Animations folder. The Add Curve button allows us to choose which components of our object, or any child objects, we wish to modify with our animation. Each component can be expanded to view more options. To add a curve click the + sign next to the item you wish to add. Since we want our camera to fly around the scene we will add the transform's position and rotation. The timeline is where you will be able to establish the timing of your animation. The timeline is measured in frames and seconds. The red scrubber allows you to choose what frame you wish to modify. Next is the Record and Play buttons. When the record button is pressed changes made to the chosen object in the Scene view will be added automatically to the animation at the currently selected frame. The play button will allow you to preview your animation. The left and right arrows allow you to navigate through the keyframes of the animation. Next are the buttons which allow you to add keyframes and events to the currently selected frame. The Sample property determines how many frames make up one second of animation. Reducing this number makes our animations slower. At the bottom are two buttons that allow you to transition between dope sheet mode, which we are currently on, and curve view mode. With the record button pressed it can be very easy to rough out the animation that we want. Simply select the frame we want to modify and rotation in the scene view. and then set the desired camera position You will notice that a keyframe has been added to the timeline with the appropriate values. Properties that are currently being animated are highlighted in red in the Inspector. We can continue doing this for the various phases of our fly through animation. To preview the animation click the play icon next to the record icon in the animator view. If we were satisfied with our animation we could be done now. If we wanted to fine tune our animation however we would want to look at the curves mode. To enter the curves mode select the Curves button at the bottom of the animation view. Here we can see the various curves of our animation by selecting the corresponding component on the left. Again we can select a frame using the red red scrubber on the timeline. To modify a value on a curve click and drag a keyframe to the new desired value. To create a new keyframe click the Create Keyframe button, or double click on the curve. Right-clicking on a keyframe will pull up some of it's options. the most notable of these options is the ability to choose Free Smooth. This will create two handles are the keyframe which you can use to smooth the curve to your liking. Another way to control our curves is to choose the Broken option. This allows you to control each side of the keyframe indecently. In this example we will want to add a little variance to the exposition of the transform. Doing so will give us more of a weightless feel to our animation. Again we can do so by creating keyframes on the exposition curve and changing our values manually. The animations created in Unity have the same Inspector settings as animations made in external programmes. We can see these by selecting our clip in the Project view. Since we want our camera to fly across the screen only once, we best uncheck are Loop Time property. It is interesting to note that an animator is in charge of animation playback for generic objects the same as it is for humanoids. Unity has automatically added the animator to our camera and created an animator controller, a state machine and added it to this component The clip we just created is added to the state machine as the default clip that would be played at runtime. This means we can go on to record other clips and use the animator to decide when to play them. In this manner, once our animation clip is completed we can run our scene to see it in action. Subtitles by the Amara.org community
The Unity web page has more videos related to animations available, dealing for instance with importing animations created in other software, creating animations for a humanoid avatar, etc. You won't need to know about these more advanced topics for this course, but if this a topic of interest to you, feel free to check these out.