Attribute Domains
In Geography 484: GIS Database Development, you were introduced to attribute domains; however, it is possible to go through that course without having actually implemented them. So we will go over Coded Value Domains and Range Domains in the following section. Some of the material will be review for some of you, but even if you did work with attribute domains in Geography 484, you are apt to be exposed to functionality associated with them that was not covered in that course.
Follow this link to download the data for this part of the lesson: AttributeDomains.zip
The zip archive contains two Esri File Geodatabases:
- AttributeDomainExercise.gdb
- AttributeDomainProject.gdb
A. Coded Value and Range Domains
A coded value domain allows you to choose from a list of values that are allowed in a field. A range domain allows you to specify a valid range for values in a numeric field. Both types of attribute domain thus provide means of enforcing data integrity.
- Create a new ArcGIS Pro project, then open the Catalog View (View > Catalog View) and browse to the Benchmarks feature class found in the AttributeDomainExercise.gdb file geodatabase. With the Benchmarks feature class selected, you should see the Details panel appear on the right side of the view. Click the Table tab to get a preview of the attribute table associated with the feature class. Take note of the Data Type of the ELEVATION field and of the BENCHSPOT field. Close the Feature Class Properties window.
The point features in the feature class represent locations of elevation benchmarks and spot elevations. The BENCHSPOT field is meant to hold an s for a spot elevation or a b for a benchmark location. A quick perusal of the values in that field shows that there are some errors. In addition, the elevation in this region ranges from about 1000 feet to about 1900 feet above sea level. We can see that there are some values in the ELEVATION field that violate that range. Our summer intern was not very meticulous.
Hover the mouse over the ELEVATION and BENCHSPOT field headings and take note of their data types.
Let's create and impose a coded value domain that will limit the possible entries in the BENCHSPOT field to s and b. And let's create and impose a range domain on the ELEVATION field that will allow us to verify that the values in that field are within the correct elevation range.
First, we will create a coded value domain named BenchSpotElev. - Browse back to the folder containing the AttributeDomainExercise.gdb file geodatabase, then right-click on the geodatabase and select Domains.
- In the first open slot under Domain Name, type BenchSpotElev. Then in the corresponding Description slot, enter a brief description of your choice.
- We know that the values in the existing BENCHSPOT field are Text type; so under the Field Type heading, select Text.
- We are dealing with a Text field, so under the Domain Type heading Coded Value Domain is really the only logical choice.
- Now in the panel to the right of the domain list, you should see a table with headings Code and Description. This is where we must enter our desired Code values (s and b) and their respective descriptions (spot elevation and benchmark).
Your Domains view should look like the image below. - If all is as it should be, hit the Save button; this is important to do before we move on.
Note: If you have a set of codes and associated descriptions in tabular form already, you can avoid the trouble of re-entering that information as outlined above by using the Table to Domain tool. And if you are looking to automate the domain pieces of a workflow through either Model Builder or Python scripting, you may want to check out the other tools in the Domains toolset.
 Figure 5.1: The Domains view, showing configuration of the BenchSpotElev coded value domain.
 - Do not close the Domains view. We still need to create our Range domain for elevation. In a new empty row, assign a Domain Name of ElevationRange and enter something appropriate for the Description.
- Change the Field Type to Long and set the Domain Type to Range. Do you know why we need to set the Domain type to Long?
- Now, in the panel to the right, you will see spaces in which to enter the Minimum value and the Maximum value that we wish to use to constrain the entries in the ELEVATION field in the attribute table of our Benchmarks feature class. For Minimum, enter 1000, and for Maximum enter 1900.
- Your range domain settings should look like the image below. Make sure they do, and hit the Save button.
 Figure 5.2: The Domains view showing configuration of the ElevationRange range domain.
 - Close the Domains view.
Now we need to apply the two new attribute domains to the BENCHSPOT and the ELEVATION fields. - Right-click on the Benchmarks feature class, and select Design > Fields.
- In the row for the ELEVATION field, access the dropdown list under the Domain heading and select the ElevationRange domain you just created.
 Figure 5.3: Assigning the ElevationRange domain to the ELEVATION field
 - Click the Save button. Do not close the Fields view.
- Now perform the same operation to assign the BenchSpotElev domain to the BENCHSPOT field.
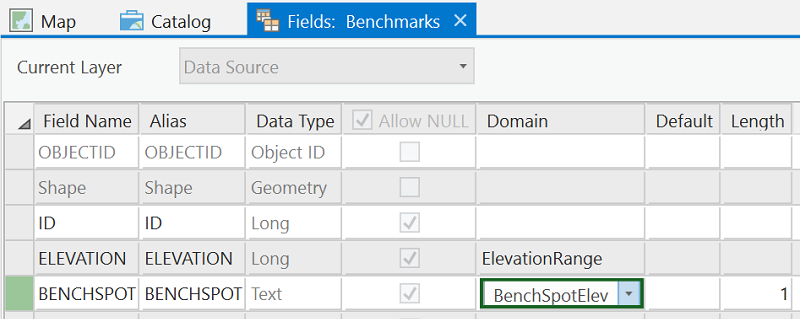 Figure 5.4: Assigning the BenchSpotElev domain to the BENCHSPOT field
 - Again, click the Save button.
And now you can close the Fields view.
Now, let's add the data to a map and see how the attribute domains help us control attribute data integrity. Before doing so, first a word about differences in attribute validation between ArcMap and ArcGIS Pro. In ArcMap, the default behavior is to allow values to be assigned to a field that are outside its domain. For example, you could enter an ELEVATION value greater than 1900, even after applying the ElevationRange domain. If that seems counter-intuitive to you, I would agree. However, ArcMap provides a Validate Features tool, which flags such invalid features so that you can correct them if you wish. And you also have the option of turning on automatic record validation, which will cause a warning to appear immediately if you attempt to enter a value outside a field's domain.
ArcGIS Pro, on the other hand, does not allow entries outside of a field's domain. I would say that's a sensible change. However, in a situation like this one, in which a domain has been applied after a feature class has already been populated with data, ArcMap's Validate Features tool provides a means to identify problematic values in the existing data, whereas ArcGIS Pro has no analogous tool.
- Add the Benchmarks feature class to the map and open its attribute table. You will probably notice immediately that the contents of the BENCHSPOT field appear different. While the code values that are a function of having assigned a coded value domain to a field are what are stored in the database, the description values are what display by default in the open attribute table. You can toggle this behavior off if you wish, clicking on the "hamburger" icon in the upper right of the table view and unchecking the Show domain and subtype descriptions option.
- Try changing one of the ELEVATION values to something greater than 1900 and note that it immediately reverts to the maximum allowed value (1900) per the domain we imposed.
- Click on a BENCHSPOT cell and note that you are limited to the two options defined in the BenchSpotElev domain (or Null).
- Next, click the Switch button to switch from no features selected to all features selected.
- Under the Edit tab, click the Attributes button. This will open a panel in which all of the benchmark features are listed by their ID value in the top of the panel and the full set of attributes for the currently highlighted feature is listed in the bottom of the panel.
- Click on ID 108 and note that its ELEVATION value is highlighted in red because that value is outside the field's domain. Click on ID 119 and note that both its ELEVATION and BENCHSPOT values are highlighted in red for the same reason.
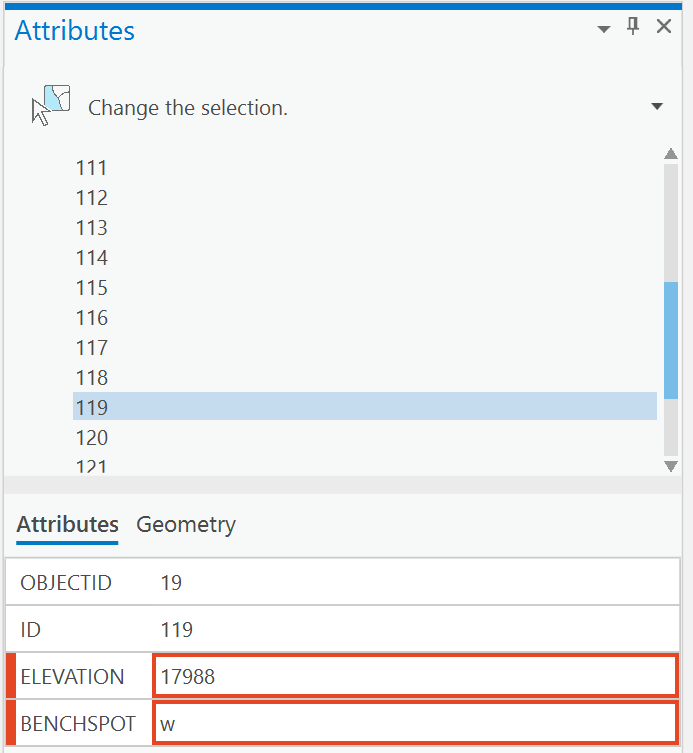 Figure 5.5: Attributes panel in ArcGIS Pro, showing attribute values violating attribute domain rules that are in place.
Clicking on features one at a time looking for attributes highlighted in red is not a particularly exciting prospect, especially if you're dealing with a lot more than the 25 features we have in this exercise. Better options would be to:
a. Use the Validate Features tool in ArcMap to isolate the problematic records, or
b. Use the Select By Attributes tool to find them (e.g., BENCHSPOT NOT IN ('b', 's') and ELEVATION < 1000 OR ELEVATION > 1900).
In any case, this problem of fixing invalid attribute values can be avoided if you apply domains when you first create the feature class!
B. Split and Merge Policies
Additional behaviors that can accompany attribute domains allow us to define what values get assigned to the field when a feature is split into two or when two features are merged into one. According to the Esri documentation, "...merge policies are not evaluated when merging features in the Editor. However, developers can take advantage of merge policies when writing their own merge implementations." The scope of this lesson does not include developer-level exercises, so we will visit only the use of split policies.
- In ArcGIS Pro's Catalog View, navigate to the AttributeDomainExercise.gdb file geodatabase and Preview the Roads feature class. We will be working with the SurfaceType field and the Length_Feet field.
Note that the Length_Feet field is a Float type field, and the SurfaceType field is a Text type field.
Let's create a coded value domain to use with the SurfaceType field and a range domain to use with Length_Feet field. - Right-click on the AttributeDomainExercise.gdb file geodatabase, and open its Domains view (Design > Domains).
- Click in the cell beneath your ElevationRange domain name, and name a new domain LengthFeet, and describe it as Length range in feet.
- Set the Field Type to Float (do you recall why?), and set the Domain Type to Range.
- Now, from the dropdown list under the Split policy heading, choose Geometry Ratio. This setting will make it so that the resulting values (in feet) in the Length_Feet field are in the same ratio as that of the lengths (the geometry) of the two new line features that resulted from the split operation.
Take note of the other two choices in the Split policy picklist. The Default Value is taken from the Default Value property that can be assigned to the field. We will see this below in the context of the coded value domain for the SurfaceType field. In this case, it would not make much sense to assign a default length to road segments, nor would it make sense to use the other choice, Duplicate, to assign the same length to each segment.
We will not interact with the Merge policy setting since we cannot take advantage of it, as mentioned above. But go ahead and look at the choices given if you are curious. - Let's define the Minimum value as 10 and the Maximum value as 264000. We are arbitrarily deciding that when we split a line feature representing a road that no road segment can be shorter than 10 feet or longer than 50 miles (264,000 feet).
- Check to be sure your settings are correct, and hit the Save button, but do not close the Domains view.
 Figure 5.6: Defining a domain with a Split Policy setting.
 - Next, let's set up a domain for the road surface type values. Name it RoadSurface and describe it as Road surface material.
- Set the Field Type to Text. Note that this will force the Domain Type to be set to Coded Value Domain. But you knew that would be the case, right?
- Then set the Split policy to Default. As mentioned above, the default value is specified later in the properties of the SurfaceType field.
(The only Merge policy setting for a coded value domain is Default.) - Now, because this is a coded value domain, we need to enter the Code values and the corresponding Description values. Recall that we learned in the previous section that the codes are stored in the database (and the descriptions appear in the open table). As you noted when you previewed the data in the SurfaceType field of the Roads feature class, the existing data values are grass, gravel, asphalt, concrete and cobblestone. We will go ahead and retain those as the code values and set the description values to match. A "code" does not have to be a numeral or a single character (like the s and b used for the Benchmarks above). So go ahead and enter the five surface type category names in the right-hand panel as shown in the figure below. Take care to spell the code entries correctly. A misspelling would result in the existing values in the SurfaceType field not taking part in the domain.
- Hit the Save button when certain you have entered the correct settings -- the RoadSurface domain settings should look like this:
 Figure 5.7: RoadSurface domain settings, with the Split Policy set to Default.
 - Close the Domains view.
Now, let's assign the two new domains to the respective fields in the Roads feature class attribute table. - Still in Catalog View, right-click on the Roads feature class and select Design > Fields to open the Fields view.
- You've done this before. Under the Domain heading, click on the Length_Feet cell and select LengthFeet from the dropdown list.
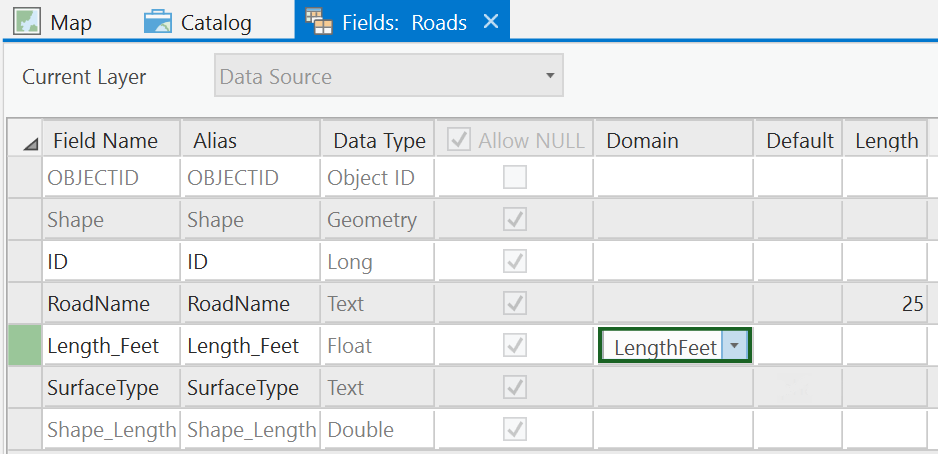 Figure 5.8: Assigning the LengthFeet domain to the Length_Feet field.
 - Hit Save.
- Next, assign the RoadSurface domain to the SurfaceType field. Note that the BenchSpotElev domain also appears in the picklist. Why, do you suppose?
- Also, under the Default heading, type asphalt. Recall that above we set the Split policy for the RoadSurface domain to Default Value. We are now specifying that default value; it needs to be one of the Code values that is part of the RoadSurface domain. Spell it correctly.
We can say that we know that most of the future work on the road system in this area will be done by the State, so the "asphalt" surface type is most apt to be involved; hence, we can set it as the default.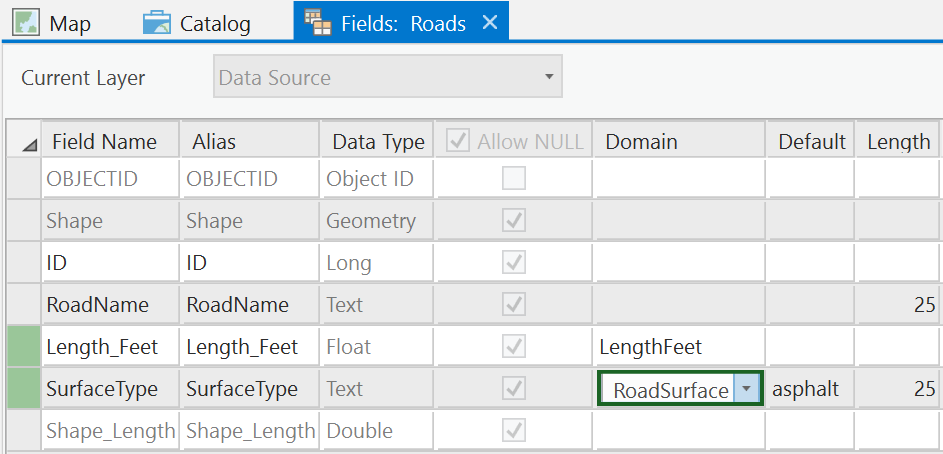 Figure 5.9: Assigning the RoadSurface domain to the SurfaceType field, and setting the Default value to 'asphalt', and the Length to 25.
 - Hit Save, then close the Fields view.
Now, let's see the behavior imposed on the data by two domains when we perform some edits. - Add the Roads feature class to the map.
- Open the Roads feature class attribute table.
- Select the U.S. Hwy 62 feature; you can click on it in the attribute table. Note the Length_Feet value (23128.34), and the SurfaceType value (concrete).
- Under the Edit tab, select the Split Tool and arbitrarily choose a point on the selected line feature and perform a split.
What happens? If you performed the split successfully, you should now see two separate U.S. Hwy 62 line features on the map and two U.S. Hwy 62 records in the attribute table.
What happened to the SurfaceType value for both of the features that are now the U.S. Hwy 62? Are they still "concrete"? Why not?
What are the Length_Feet values for the two features? Do they add up to 23128.34?
You can use the Undo tool in the upper right of the application window to revert to pre-split status if you want to compare the before and after. - Experiment with editing some of the other features if you wish.
- Save your project if you want, and quit ArcGIS Pro.
C. Project - Attribute Domains
For the homework deliverable for this part of the lesson, I am going to have you create two attribute domains to be assigned to existing fields in a feature class attribute table.
The data you will use is found in the AttributeDomainsProject.gdb file geodatabase. That geodatabase contains a single feature class named BuildingFootprints.
- Create an attribute domain and assign it to the Bldg_Type field (alias Building Type). The three allowed values for the field include C (commercial), R (residential), and P (public). NULL values are also allowed when the building category is not known.
- The Bldg_Story field (alias Building Stories) should contain values no larger than 7. Create and assign an attribute domain that will allow you to verify that values in that field do not violate that stipulation.
- Using either the Validate Features tool in ArcMap or your own queries in ArcGIS Pro, make and submit a screen capture showing features that have values outside the two domains. The image should show the selected offending records in the attribute table along with the query you used to select them.
- Submit your AttributeDomainsProject.gdb file geodatabase to the Lesson 5 drop box.
Following are some instructions on how to zip up both your image file and your AttributeDomainsProject.gdb file geodatabase.
In Lesson 5, we are dealing with File Geodatabases. Your AttributeDomainsProject.gdb geodatabase is a folder even though it has the .gdb extension on the name. To compress your file geodatabase along with your screen captured image in order to submit them, do the following:- In a Windows Explorer or a (My) Computer window, select both the geodatabase folder and your Word document file. The assumption is that the geodatabase and the image file are in the same folder making it possible to select them both.
- Then right-click on one of them and choose Send To | Compressed (zipped) Folder.
That will create a .zip file in the same folder. You need to turn in this .zip file. If, for some reason, you do not have the option to compress from within the Windows operating system, you can download a free application called 7-Zip. It works well. - Name your .zip file appropriately, something like: <your name>_Lesson5Domains.zip.
D. Summary
Because attribute domains are stored in the geodatabase, they can be used by any dataset: feature class, table, subtype (covered in the next part of the lesson), within the geodatabase.
You can now move on to the Subtypes part of the lesson.