
In this activity, we are going to download a dataset that you will use in Lesson 9. You need to complete this task now so that you are ready to jump in and get started on the Lesson 9 Term Project on the first day of Lesson 9. You will be asked to provide a screenshot of your successfully downloaded file as proof.
Directions
Caution
- This activity requires you to pay close attention to detail and follow the instructions completely. Failure to do so can result in extreme frustration.
- The following steps require you to have a C:\temp folder and to unzip files. If you are unsure how to do either of those, watch the Downloading the Term Project Files video in the Term Project Module before getting started.
1. Installing the sample routing project files on your own computer
- Verify your computer has a "C:\temp folder", If not create one.
- Copy the file titled "SAMPLE_ROUTING_PROJECT.zip" to your Desktop or to your Downloads folder on your PC/Laptop. The file is located in the "Term Project Materials" folder.
- To download the file to your own computer, right-click the location link and select "Save Target As" or "Save Link As" from the pop-up menu.
- Once the zipped file is downloaded to your computer, double-click on the downloaded zip file to decompress it to your C:\temp folder. You should end up with a folder called C:\temp\SAMPLE_ROUTING_PROJECT.
Note
THE "SAMPLE_ROUTING_PROJECT" FOLDER SHOULD BE UNZIPPED TO THE C:\temp folder. The siting model may not execute if saved to some other location.
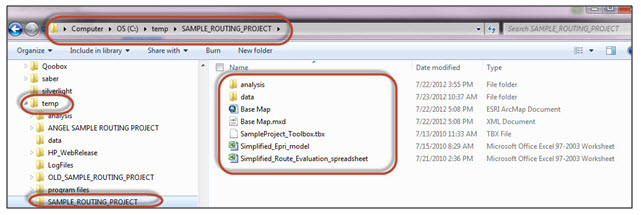
- Verify that the "SAMPLE_ROUTING_PROJECT" folder created in your C:\temp folder (C:\temp\SAMPLE_ROUTING_PROJECT\) contains the following folders/files:
- Analysis folder
- Data folder
- Base_Map.mxd (Esri Map Document)
- SampleProject_Toolbox_v3.tbx
- Simplified_Epri_model.xls
- Simplified_Route_Evaluation_spreadsheet.xls
- Take a screenshot that shows evidence you have successfully completed the download. It should look similar to the one below:
- Save your screenshot using the following naming convention:
L7_download_AccessAccountID_LastName
For example, student Elvis Aaron Presley's file would be named "L7_download_eap1_presley"—this naming convention is important, as it will help me make sure I match each submission up with the right student!
2. Installing transmission line siting exercise for use on a Penn State computer lab computer
If you plan to use a Penn State Computer Lab, follow this link to Additional Instructions for Penn State Computer Labs
Having Problems?
If you are having problems, please consult the FAQ for answers to some of the most frequently asked questions. If that doesn't help, post your questions to the Lesson 7 Discussion Forum.
Submitting Your Work
Upload your screenshot to the "Lesson 7 - Download Screenshot" drop box by the due date indicated on our calendar.
Grading Criteria
The grading for this is slightly different from other assignments. Successful and timely completion of this activity will be reflected in your Lesson 9 grade. The grading will be as follows:
- Completed on time (by end of Lesson 7, see Calendar for details): You will receive two (2) extra points for your Lesson 9 activity. This is the equivalent of half a letter grade for the Lesson 9 activity.
- Completed one (1) to three (3) days late: You will lose 2 points which is the equivalent of half a letter grade for the Lesson 9 activity.
- Completed four (4) or more days late: You will lose 4 points which is the equivalent of a whole letter grade for the Lesson 9 activity.