One of the most challenging aspects of moving to a cloud deployment is transferring data from your local (on-premises) environment onto the cloud. In this section of the lesson, we'll look at special problems that arise in data transfer scenarios. We'll also discuss ways data can be moved to Amazon EC2, and you'll copy some GIS data to your own instance in preparation for publishing a web service.
Challenges of data transfer
For your data to go from your machine to commercial cloud services such as Amazon EC2 or Amazon S3, it must go "across the wire", meaning it is transferred through the Internet onto the cloud-based server. This can pose the following issues:
- Your datasets may be so large that they are not feasible to transfer across the Internet in a reasonable amount of time.
- A slow Internet connection or low bandwidth makes it impossible to transfer your data in a reasonable amount of time.
- Your data may be sensitive enough that transferring it across the Internet would require extra security measures or is not an option altogether.
Let's examine these problems one at a time.
Large datasets
GIS data collections can be very large: up to terabytes in size. This is often the case when imagery is involved, but even vector datasets with a broad amount of coverage or detail can prove unwieldy for an Internet transfer.
When moving large datasets to the cloud, you have to plan for enough time to move the dataset and, if possible, increase your bandwidth. After doing a test transfer of a few hours or days, you should be able to get an idea of the rate of data transfer, and you can thereby extrapolate how long it would take to transfer the entire dataset.
If this amount of time is unreasonable (say, months) you may consider shipping the data directly to the cloud provider on a piece of hard media. The cloud provider can then load the data directly onto the cloud much faster than you could send it over the Internet. Amazon provides such a service called AWS Snowball. You load up your data on a ruggedized secure device called a "Snowball" and ship it to Amazon. In the old days of computing this technique was called "sneakernet", since you could sometimes put your data on a floppy disk and walk it across the office to another computer faster than you could send it electronically.
Internet connection limitations
Cloud-based data centers like Amazon's are built to handle high levels of data traffic coming in and out. However, your connection going out to the cloud may be limited by a slow connection or lack of available bandwidth. Some IT departments and internet service providers (ISPs) throttle or cap the amount of data that can be transferred from any one machine or node in the network. These types of policies are sometimes put in place to prevent the use of streaming sites such as BitTorrent that violate company policy or simply monopolize the organization's available bandwidth. However, sometimes these policies can negatively affect legitimate business needs such as transferring data to the cloud. If you find yourself in a situation with low bandwidth, it might be helpful to visit with your IT department to understand if your machines are being throttled and could be granted an exception. If an exception is not possible due to other bandwidth needs within the company you might explore whether your data transfer could occur during off-hours such as nights or weekends.
Sensitive data
Confidential or proprietary datasets, such as health records, may require extra security measures for transfer to the cloud. When dealing with sensitive data, the first question to answer is whether it is legal or feasible for the data to be hosted in the cloud in the first place. For example, some government organizations responsible for national security may possess classified or secret data that could never be uploaded to Amazon's data centers no matter the measures taken to ensure secure data transfer. Also, some organizations may not have the desire or permission to host datasets on servers that are physically located in a different country.
Other types of datasets may be okay to host on the cloud but must be encrypted during transfer, to prevent a malicious party from using any data that may be stolen en route to the cloud server. Secure socket layer (SSL) connections (HTTPS) and secure FTP are two techniques for encrypting data for Internet transfer.
Techniques for data transfer
Sometimes the ability for one computer to directly "see" or communicate with another computer is hindered by firewalls or network architectures. For example, your computer at work is probably allowed to only access the file systems of other computers on your internal network. You could potentially open up a folder on your Amazon EC2 instance for access by anyone but this opens a security risk that malicious parties could find the folder and copy items into it.
There are a number of strategies that people use to get around these limitations when transferring data into Amazon EC2 and other cloud environments, these include:
- Copy and paste through Windows Remote Desktop. This is the technique we'll use in this course because it's convenient. However, it may not be appropriate for highly sensitive data.
- Use of a "digital locker" type of site like Dropbox.com, where you are allowed to upload a certain amount of data onto the site (for example, 2 GB). You can then log into your instance and download the data onto whatever drive you choose. You could even use your allotted Penn State PASS storage for this technique. Upload the data to your PASS space using your local computer, then log in to your instance and download the data from your PASS space.
- A secure FTP (file transfer protocol) connection configured by your IT department. FTP is an Internet protocol designed for transfer of files, but if the data is sensitive, you should encrypt it before you send it this way.
The ArcGIS Server on Amazon EC2 help has an overview of data transfer techniques. Please take some time right now to read Strategies for data transfer to Amazon Web Services.
Copying the Appalachian Trail data to your EC2 instance
In this part of the lesson, you'll copy some data to your EC2 instance in preparation for publishing a web service. Before you attempt these steps, you should be logged in to your EC2 instance through Windows Remote Desktop Connection. If you followed the steps earlier in the lesson for connecting via Remote Desktop then your local disk drives should be available to the instance.
- Download and unzip the Appalachian Trail data to a location on your local computer (not your EC2 instance).
This is National Park Service data obtained from the Pennsylvania Spatial Data Access (PASDA) website. In this exercise, we'll pretend this is a dataset that you've been using for years at work that you now want to transfer to the cloud. - Open Remote Desktop Connection to your EC2 instance and then open Windows Explorer.
You should see something like the following, where you have a set of drives listed for your instance and a set of drives listed for your local computer. The drives on the local computer will be followed by the computer name. For example, in image 2.2, below, the local computer is named EED-RSLT053, and the C drive is available from it. There is also one drive available on the EC2 instance, which is also C.
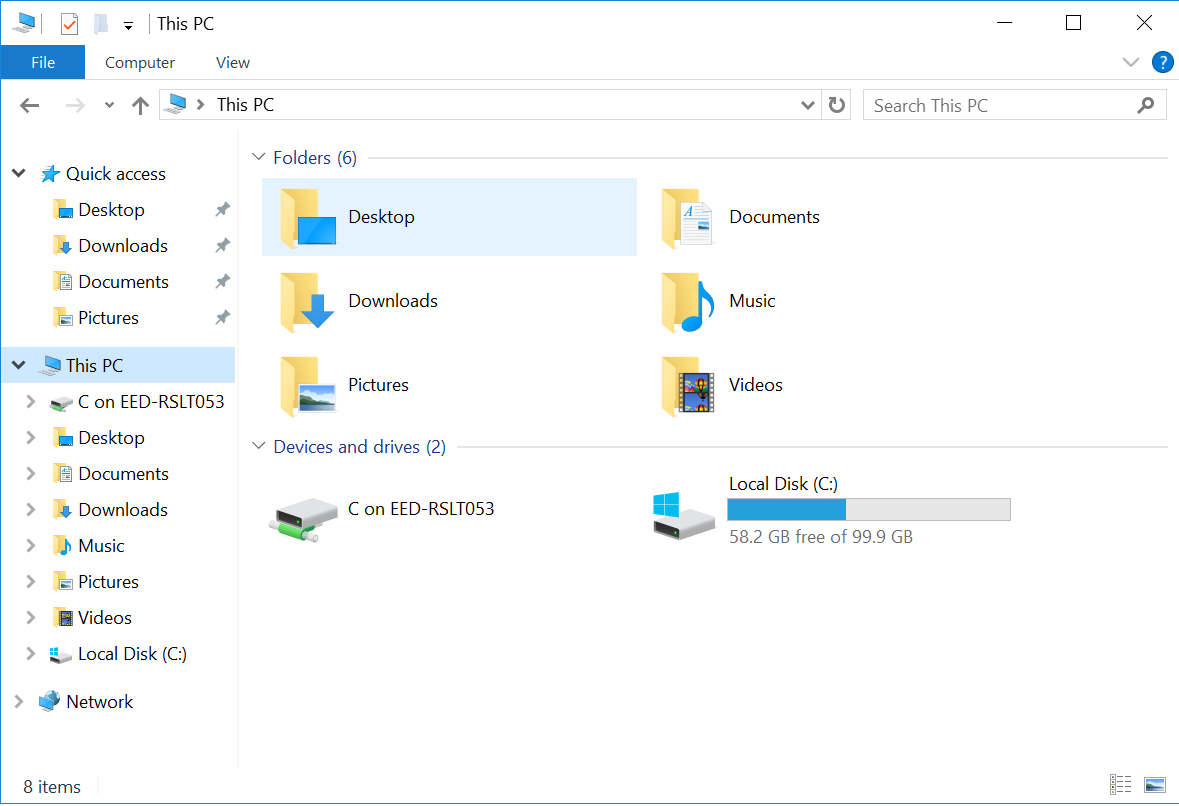 Figure 2.2: Available drives
 - Browse to the folder on your local computer where you downloaded the Appalachian Trail data, right-click the folder, and click Copy.
- Browse to the C: drive on your instance, and create a new folder called, data.
- Navigate into the C:\data folder, right-click, and click Paste. This should put your data at C:\data\AppalachianTrail.
- Open and explore the AppalachianTrail folder. It contains a map document displaying the Appalachian Trail and shelters along the trail. The trail and shelter datasets are feature classes in an Esri file geodatabase. You will publish this map as a web service in the next part of the lesson.
Registering your data with ArcGIS Server
For simplicity in this course, you'll follow the workflow of transferring all data to your EC2 instance, working with ArcGIS Desktop on your EC2 instance, and publishing to ArcGIS Server on your EC2 instance. Theoretically, you could do most of the desktop work on your own computer and then publish up to the server when you were ready. However, any time you introduce separate computers into the architecture, especially on different networks (in the case of your home computer and your EC2 instance), things can get more complicated. Because you have a limited time available to learn about ArcGIS Server, I want you to spend the time experimenting with the capabilities of the server, not worrying about network issues or which machine contains the data.
However, in large organizations, these challenges of distributed architectures are inevitable. Some GIS shops might have a GIS server administrator who controls access to ArcGIS Server, and a number of cartographers and desktop GIS users who just prepare the maps for publishing. This latter group of "publishers" work on machines that are separate from the server and may even reside on a different subnet than the server. In some cases, the publisher machines and the server machines use different copies of the data that are kept in sync by an automated process, and the paths to the data used by the publishers may be different than the paths used by the publishers.
To help manage these scenarios, ArcGIS has the ability to "register" a data location, meaning that you provide ArcGIS Server with a list of data locations you typically use. If the publishers use a different path to the data than the server uses, you can provide both the paths. Then, when you publish a service, the map is copied to the server and all the paths in the map are switched to use the server's path instead of the publisher's path.
This can be a difficult concept to conceptualize with just a verbal explanation, so please take a few minutes to read the help topic registering data on ArcGIS Server. This has some diagrams of different situations where data registration can be particularly useful. It is one of the most important help topics for ArcGIS Server.
Please note that if you try to publish a service and ArcGIS Server does not find any of the data paths in your map in its list of registered folders and databases, the data will be packaged up and copied to the server at the time you publish. The copying ensures that no data paths will be broken in the published service. This automatic data copying is an interesting feature in some scenarios where the publishers do not have the rights to log in to the server machine, but it is not an appropriate workflow for managing large amounts of data. The best approach is to make sure you set up workable data locations on the publisher's machine and the server machines, and then carefully register those locations with ArcGIS Server. In some cases, like ours, the publisher's machine and the server machine will be viewing the same path to the data.
Follow the steps below to register your C:\data folder with ArcGIS Server:
- On your EC2 instance, open a web browser and connect to your ArcGIS Server Manager, as you did earlier.
- Click the Site tab, and open the GIS Server section.
- Click on the Data Store link along the left to see a list of the registered data locations.
- You'll see a button to the right where you can Register. Change the dropdown list to Folder, since we will be registering a folder on your server.
- In the Register Folder dialog, enter a name for your folder such as, "C Drive Data."
- Enter C:\data in the Publisher Folder Path box.
- Type your machine's name in the Publisher Folder Hostname box; it will look something like EC2AMAZ-NMPERYP. You can find your machine's name by opening the Server Manager from the Windows Start Menu and looking for the Computer Name under Local Server.
- Check the box to set the Server Folder Path to be the same as your Publisher Folder Path.
- You should now see your C Drive appear in the list of registered locations, and you can confirm that it's valid by clicking the Validate button and seeing a green check mark.
Now you're ready to publish a map web service using your Appalachian Trail dataset that you placed in C:\data. You'll do this in the next section of the lesson.