To "null" the fringes is to adjust the pitch and roll of your sample so it is parallel to the plan of the interference fringes, which is perpendicular to the Z-scan axis.
Textured surfaces are very similar to flat surfaces, though it can be harder to see the trend in the tilt of the sample. The goal is to null the overall sample tilt to minimize the scan length.
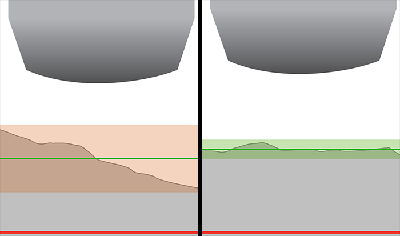
On Textured or Rough Flat Part the fringes are in smaller isolated areas. Center the fringes and adjust the focus between the high and low fringes. The distinct lines that were seen for smooth surface are broken up with the varying topography of a rough or textured surface. Nulling the fringes involves adjusting the fringes so they enter and leave the field of view without any discernible trend in X or Y tilt.
Below is a video showing the actual field of view (right) and a cartoon (left) depicting what is happening on a tilted textured or rough part as the instrument is moved up in Z with the joystick. Notice how the fringes travel across the field of view from lower right to upper left. The fringes indicate that not only is the sample tilted, the direction of travel describes how it's tilted. The fringe travel indicates, in this example, that the back left corner of the stage is higher.
Nulling the stage for a textured or rough part also gets the sample surface and the Z-travel perpendicular, which means the surface is parallel to the fringes now. As the instrument is moved up in Z now,fringes enter and leave the field of view without any discernible trend in X or Y tilt.