GEOSC 10
Geology of the National Parks

Virtual Field Trips

PrintPrint

Join Dr. Alley and his team as they take you on "virtual tours" of National Parks and other locations that illustrate some of the key ideas and concepts being covered in Unit 3.

TECH NOTE

Click on the first thumbnail below to begin the slideshow. To proceed to the next image, move the mouse over the picture until the "next" and "previous" buttons appear ON the image or simply use the arrow keys.

Virtual Field Trip #1: Crater Lake

Arial view of Crater Lake
Crater Lake, which is about 6 miles across, is the big blue circle in the middle of this satellite photograph, at the end of the black arrow. A catastrophic eruption from a towering, snow-capped volcano called Mt. Mazama blasted a recognizable layer as far as Nebraska. The remnants of the volcano then collapsed into the hole left behind. As the hole cooled and water collected, Crater Lake formed. This NASA photograph is from the USGS archives. Because logging and other uses continue outside the park but not in, careful examination will show you the outline of the park--three light blue lines are added to help you see it.
Paul Rockwood’s reconstruction (painting) of the cataclysmic eruption at Crater Lake
Here is artist Paul Rockwood’s reconstruction of how the peak might have appeared 6600 years ago, early in the cataclysmic eruption. Notice the glaciers flowing down the sides. The USGS hosts this image courtesy of the Crater Lake Natural History Association.
Oblique aerial view of lake and a view showing the U shaped valley
After the eruption, this USGS photo by W.E. Scott shows the lake in an oblique aerial view (out the window of a plane). On the right, a close-up view (USGS photo by Ed Klimasauskas) shows the “U”-shaped valley of a former glacier,which flowed down from the peak that is no longer there (the outline flying in the sky emphasizes the “U” shape). Later in the semester, we’ll learn why glaciers make “U”s while rivers make “V”s.
Valleys that once carried glaciers from Mt. Mazama
Now, we begin some pictures by Prof. Alley. Here is a view looking up one of the valleys that once carried glaciers down from the peak of Mt. Mazama. If we had stood in the same place before the eruption, this whole picture would have been filled by a massive, snow-capped volcano, with a glacier flowing down the valley towards you and to your right, following the magenta arrow.
Crater Lake from rim of crater - water is so clear it looks like sky.
This is Crater Lake from the rim of the crater. That isn’t sky; it's water. Crater Lake probably has the cleanest water of any major lake in the country.
Trees against water of Crater Lake
Another shot of trees against the crystal water of Crater Lake. There are no rivers to carry mud into the lake; the rivers all drain away down the sides of the volcano. Rain and snowmelt evaporate from the lake, or leak through the rocks to emerge as springs on the side of the volcano.
A man skiing down Crater Lake
Crater Lake gets lots of snow, which melts to fill the lake, and contributes to the fun at the park.
Crater Lake with Wizard Island
Crater Lake with Wizard Island. After the cataclysmic eruption, additional volcanism began building Wizard Island, which rises about half a mile above the bottom of the lake.
Wizard Island in the Lake.
A wide-angle, USGS view of Wizard Island in the lake. Photo by Lyn Topinka.
Crater left by the little vaolcano that built Wizard Island
Zooming in, you can see the crater left by the “little” volcano that built Wizard Island. Although Wizard Island looks small in Crater Lake, and this crater is just a small part of Wizard Island, notice how big the crater is compared to the trees growing on it. How big something looks can sometimes be misleading!
Steep volcanoes of the Cascades and Ring of Fire are known as stratovolcanoes
We call these big, steep volcanoes of the Cascades and the Ring of Fire “stratovolcanoes,” and say that they are made of layers of lava flows and pyroclastic pieces thrown in eruptions. But how do we know what a big volcano is made of inside? Drilling holes is expensive and provides a narrow window. Geophysicists can learn some things, and geologists can watch volcanoes growing or look where streams have eroded volcanoes. But here at Crater Lake, the insides of the volcano are laid bare. This picture is a telephoto shot of a piece of the cliff above the lake, showing lava flows and pyroclastic layers stacked a couple of hundred feet high. These are strata, and this is a stratovolcano.
White pumice (arrow) and Llao Rock (black outline)
Not too long before the cataclysmic eruption, a small eruption threw white pumice that covered the floor of a valley running down from the peak. Then, a big lava flow from the peak filled the valley, giving us what is now known as Llao Rock. The white arrow is pointing to the pumice, with Llao Rock outlined in black. Notice the wonderful layering in the volcanic rocks below the pumice, beside the big red “L”. The next picture is the same view, without the labels.
Llao Rock
This is the same picture of Llao Rock as in the previous slide, but this time without the labels so you can see what the labels were covering up.
Lava flows that make up Mt. Mazama.
Here’s one of the lava flows that make up Mt. Mazama, from before the cataclysmic eruption. You can see this one in a road cut on the southeast side of the lake, where the Rim Drive crosses Dutton Ridge. The thick, viscous lava didn’t flow easily, and some parts flowed faster than others, making the interesting folds that you see in the rock. The arrow points to the main fold—let your eye follow the layers at the end of the arrow, and you’ll see that the layers bend around. Looking carefully, you may see wiggles within the wiggles in the layering. We will see later that folds such as this are also found in metamorphic rocks, but the minerals and other things are quite different.
Water depths at Crater Lake
Water depths at Crater Lake. Everything above the water is gray-white, all below is garishly colored, with red the shallowest water, then orange, yellow, green, blue, and on to purple/violet in the deepest water (to 1949 feet deep). Minor volcanic activity after the main eruption produced features, including Wizard Island (marked with a “W”), which sticks above the water. A later eruption produced lava flows (the Central Platform, “C”) coming from a small volcanic dome (at the end of the arrow). Another volcanic peak in the crater is evident below the water (Merriam Cone, marked “M”). From the USGS at http://craterlake.wr.usgs.gov/bathy_images.html
View from Crater Lake looking along the Cascades Range
Dr. Alley's view from Crater Lake, looking along the Cascades Range of similarly explosive volcanoes.
History of eruptions of the main Cascades volcanoes
The history of eruptions of the main Cascades volcanoes of Washington, Oregon, and northern California over the last 4000 years, as compiled by the USGS. Each volcano icon indicates an eruption or closely spaced series of many eruptions. The record of written observations is especially good to the right of the red line on the far right, but use of tree-ring dating and other techniques makes all of this highly reliable.
Lassen Peak in Lassen Volcanic National Park of northern California
Lassen Peak, in Lassen Volcanic National Park of northern California. Lassen, shown here reflecting a beautiful sunset, erupted about a century ago. Lassen is quite similar to the other Cascades peaks, and remains capable of eruptions.
Lassen Peak covered in snow
Another view of Lassen Peak.
Dr. Alley's car driving towards Lassen Peak
This rather dates Professor Alley; the 1980 Chevette, seen here at Lassen, was good for 10,000 miles on a seven-week national-parks honeymoon. And we're still happily married.
Bumpass Hell at Lassen Volcanic National Park
Bumpass Hell at Lassen Volcanic National Park. This Yellowstone-like, hot-spring-and-sulfur site attests to the volcanic heritage of Lassen.
Mt. Ruapehu, New Zealand
Mt. Ruapehu, New Zealand. If this peak looks like those of the Cascades that haven't blown up to make a lake, you're getting it. Ruapehu is part of the Pacific Ring of Fire, and has the same basic origin as the Cascades.

Virtual Field Trip #1
Click Here for Text Alternative of Virtual Field Trip #1

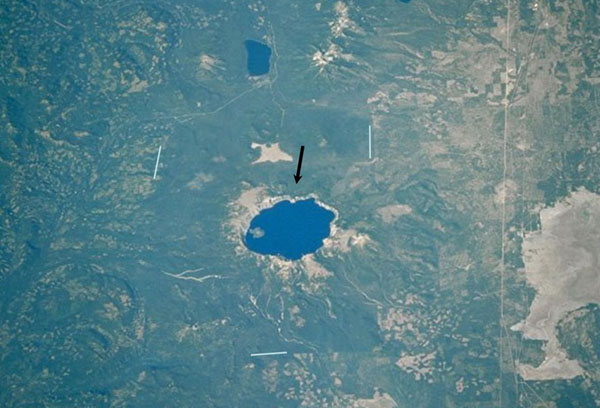
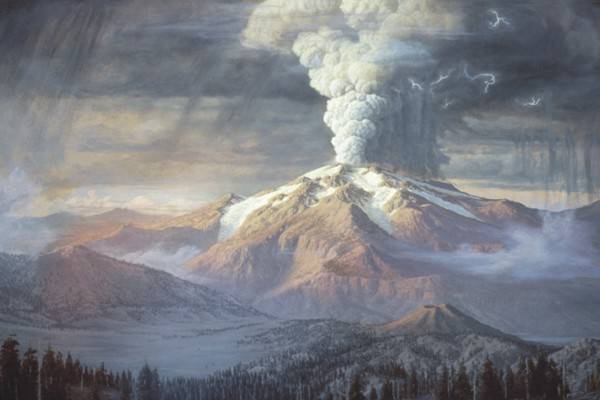
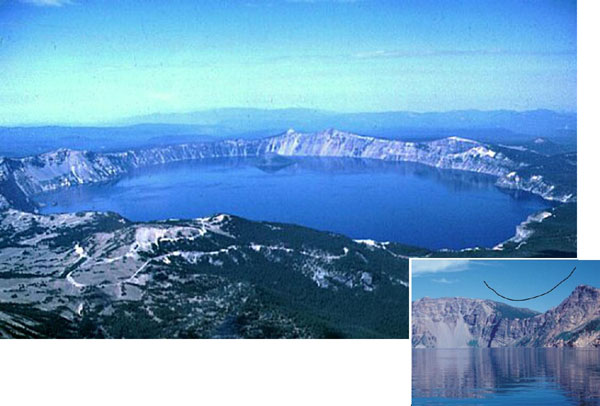
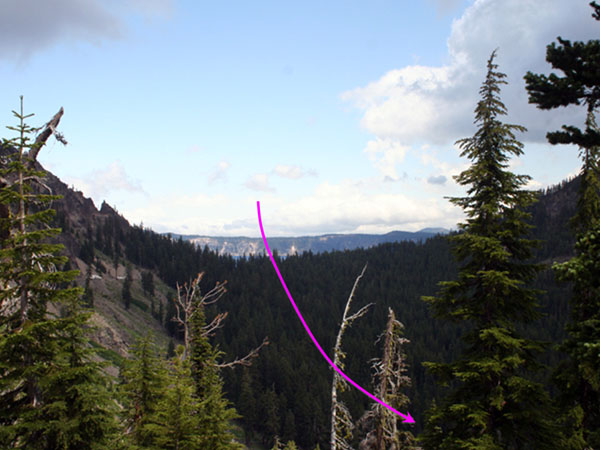
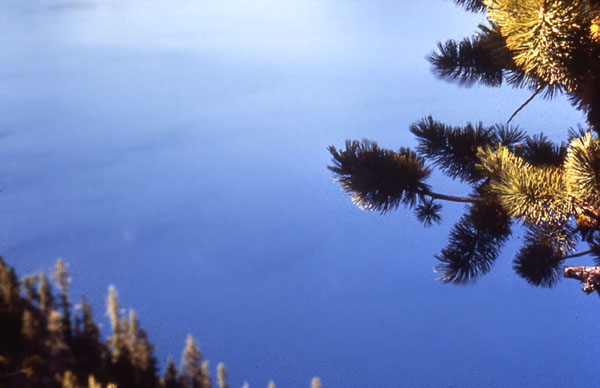
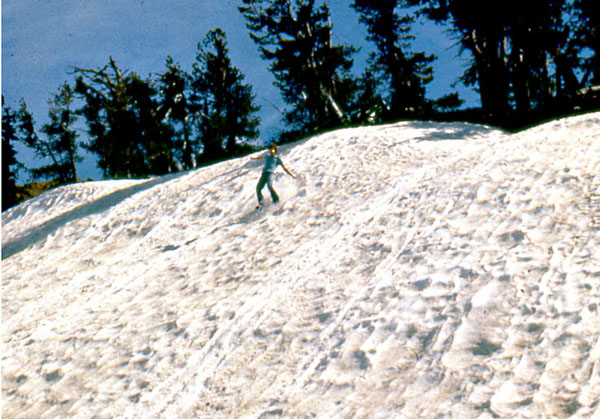
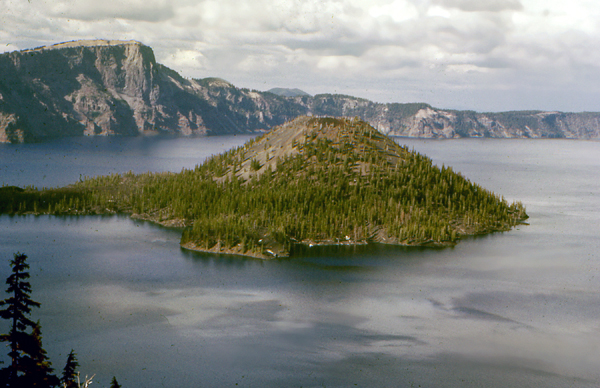
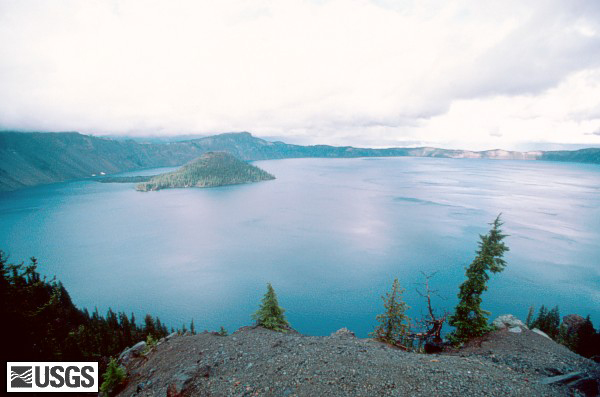
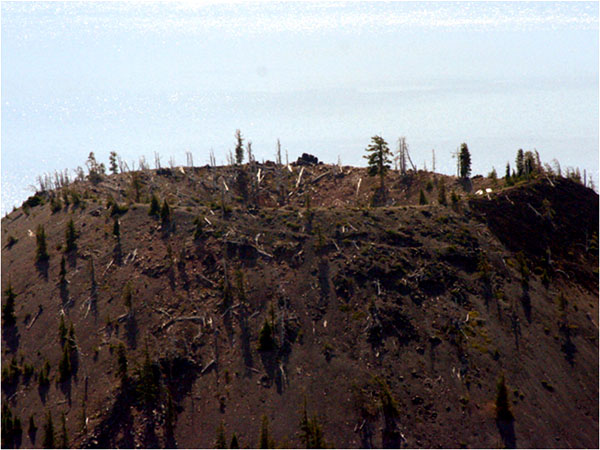
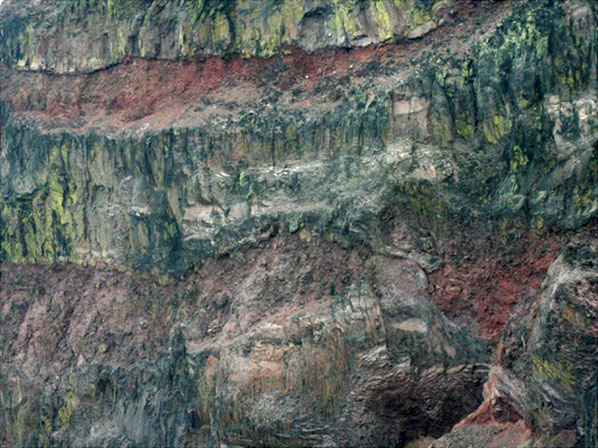
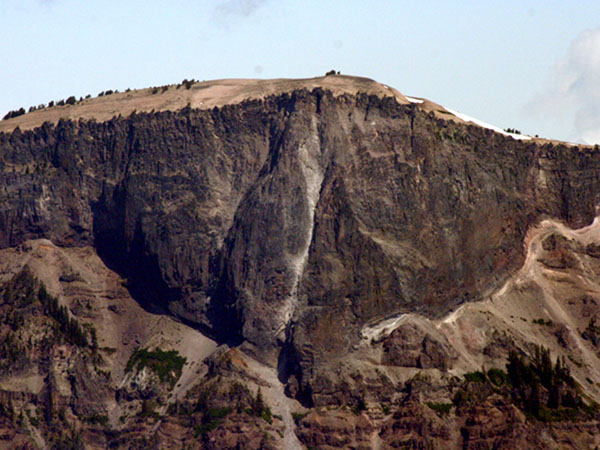
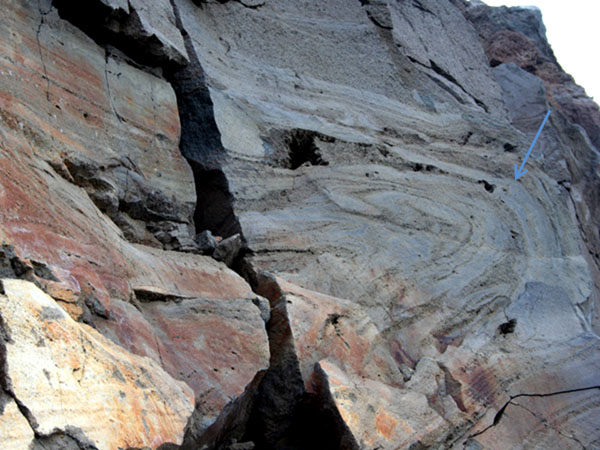
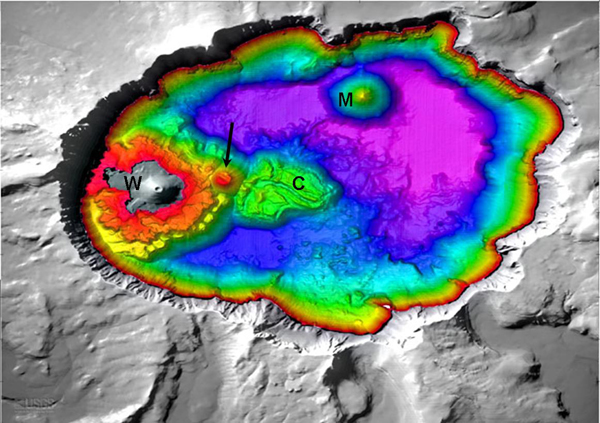
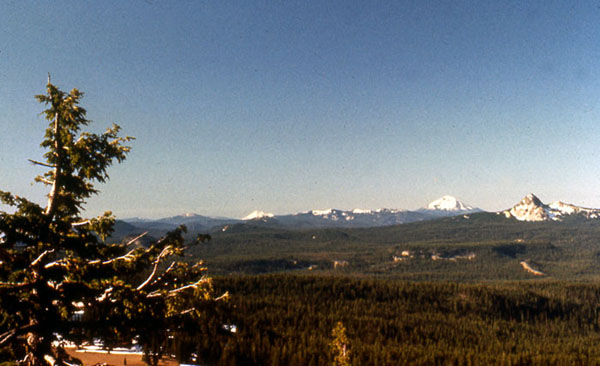
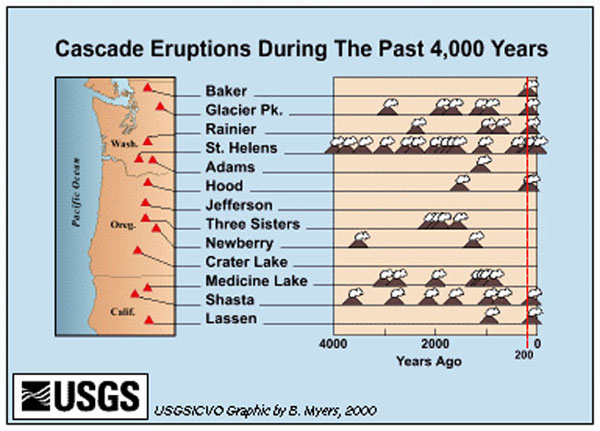
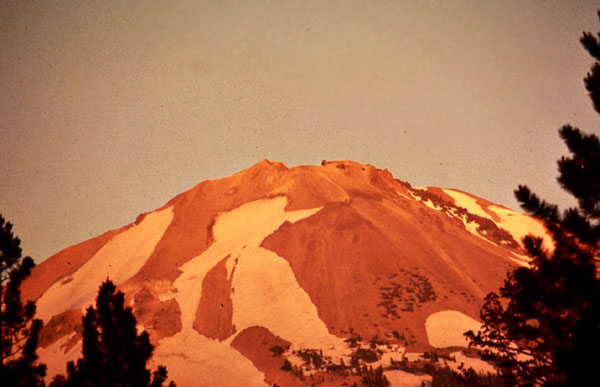
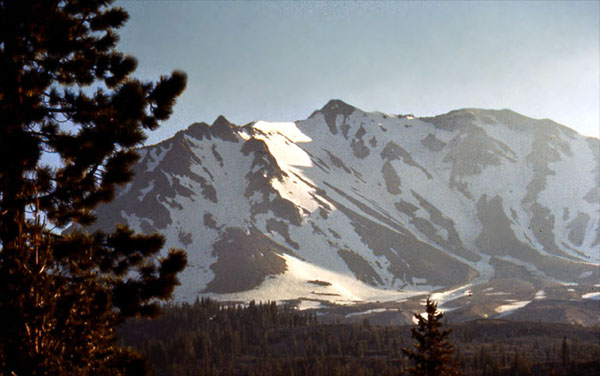
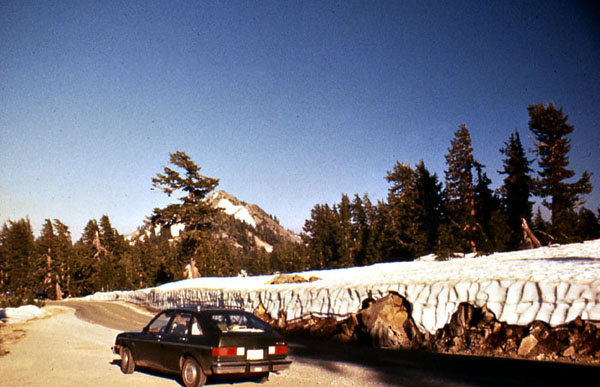
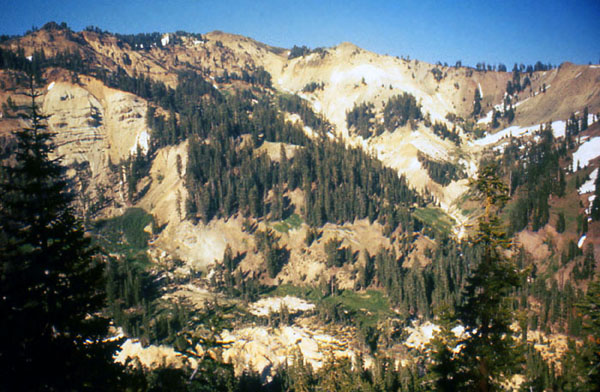
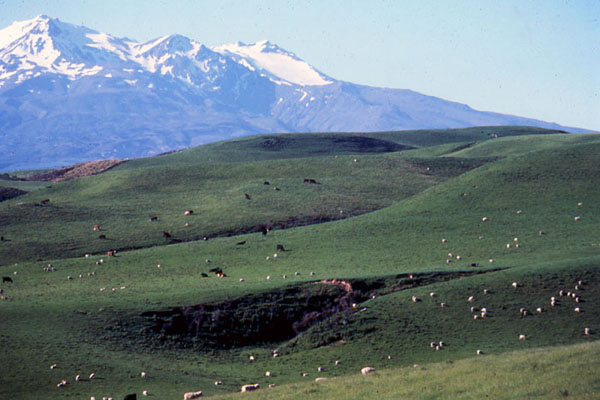
Image 1: A view of Crater Lake from the sky. Crater Lake, which is about 6 miles across, is the big blue circle in the middle of this satellite photograph. A catastrophic eruption from a towering, snow-capped volcano called Mt. Mazama blasted a recognizable layer as far as Nebraska. The remnants of the volcano then collapsed into the hole left behind. As the hole cooled and water collected, Crater Lake formed. This NASA photograph is from the USGS archives. Because logging and other uses continue outside the park but not in, careful examination will show you the outline of the park.

Image 2: Paul Rockwood’s painting of the cataclysmic eruption. Here is artist Paul Rockwood’s reconstruction of how the peak might have appeared 6600 years ago, early in the cataclysmic eruption. Notice the glaciers flowing down the sides. The USGS hosts this image courtesy of the Crater Lake Natural History Association.

Image 3: Two images. Top, an oblique aerial view of lake. Bottom, a close-up view of the lake. After the eruption, this USGS photo by W.E. Scott shows the lake in an oblique aerial view (out the window of a plane). On the right, a close-up view (USGS photo by Ed Klimasauskas) shows the “U”-shaped valley of a former glacier, which flowed down from the peak that is no longer there (the outline flying in the sky emphasizes the “U” shape). Later in the semester, we’ll learn why glaciers make “U”s while rivers make “V”s.

Image 4: Now, we begin some pictures by Prof. Alley. Here is a view looking up one of the valleys that once carried glaciers down from the peak of Mt. Mazama. If we had stood in the same place before the eruption, this whole picture would have been filled by a massive, snow-capped volcano, with a glacier flowing down the valley towards you and to your right, following the magenta arrow.

Image 5: This is Crater Lake from the rim of the crater. The trees are silhouetted against the water, it’s not sky! Crater Lake probably has the cleanest water of any major lake in the country.

Image 6: Another shot of trees against the crystal water of Crater Lake. There are no rivers to carry mud into the lake; the rivers all drain away down the sides of the volcano. Rain and snowmelt evaporate from the lake, or leak through the rocks to emerge as springs on the side of the volcano.

Image 7: A person sliding down a hill of snow at Crater Lake. Crater Lake gets lots of snow, which melts to fill the lake, and contributes to the fun at the park.

Image 8: Crater Lake with Wizard Island in the middle. After the cataclysmic eruption, additional volcanism began building Wizard Island, which rises about half a mile above the bottom of the lake.

Image 9: A wide angle view of Wizard Island in the Lake. Photo by Lyn Topinka.

Image 10: Top of Wizard Island showing the crater left by the “little” volcano that built the island. Zooming in, you can see the crater left by the “little” volcano that built Wizard Island. Although Wizard Island looks small in Crater Lake, and this crater is just a small part of Wizard Island, notice how big the crater is compared to the trees growing on it. How big something looks can sometimes be misleading!

Image 11: Layers of lava from Crater Lake. We call these big, steep volcanoes of the Cascades and the Ring of Fire “stratovolcanoes”, and say that they are made of layers of lava flows and pyroclastic pieces thrown in eruptions. But how do we know what a big volcano is made of inside? Drilling holes is expensive and provides a narrow window. Geophysicists can learn some things, and geologists can watch volcanoes growing or look where streams have eroded volcanoes. But here at Crater Lake, the insides of the volcano are laid bare. This picture is a telephoto shot of a piece of the cliff above the lake, showing lava flows and pyroclastic layers stacked a couple of hundred feet high. These are strata, and this is a stratovolcano.

Image 12: Llao Rock. Not too long before the cataclysmic eruption, a small eruption threw white pumice that covered the floor of a valley running down from the peak. Then, a big lava flow from the peak filled the valley, giving us what is now known as Llao Rock. The white arrow is pointing to the pumice, with Llao Rock outlined in black. Notice the wonderful layering in the volcanic rocks below the pumice, beside the big red “L”. The next picture is the same view, without the labels.

Image 13: Another picture of Llao Rock.

Image 14: Main lava fold visible in a road cut. Here’s one of the lava flows that make up Mt. Mazama, from before the cataclysmic eruption. You can see this one in a road cut on the southeast side of the lake, where the Rim Drive crosses Dutton Ridge. The thick, viscous lava didn’t flow easily, and some parts flowed faster than others, making the interesting folds that you see in the rock. The arrow points to the main fold—let your eye follow the layers at the end of the arrow, and you’ll see that the layers bend around. Looking carefully, you may see wiggles within the wiggles in the layering. We will see later that folds such as this are also found in metamorphic rocks, but the minerals and other things are quite different.

Image 15: Water depths at Crater Lake. Everything above the water is gray-white, all below is garishly colored, with red the shallowest water, then orange, yellow, green, blue, and on to purple/violet in the deepest water (to 1949 feet deep). Minor volcanic activity after the main eruption produced features, including Wizard Island (marked with a “W”), which sticks above the water. A later eruption produced lava flows (the Central Platform, “C”) coming from a small volcanic dome (at the end of the arrow). Another volcanic peak in the crater is evident below the water (Merriam Cone, marked “M”). From the USGS at http://craterlake.wr.usgs.gov/bathy_images.html

Image 16: Dr. Alley's view from Crater Lake, looking along the Cascades Range of similarly explosive volcanoes.

Image 17: The history of eruptions of the main Cascades volcanoes of Washington, Oregon, and northern California over the last 4000 years, as compiled by the USGS. Each volcano icon indicates an eruption or closely spaced series of many eruptions. The record of written observations is especially good to the right of the red line on the far right, but use of tree-ring dating and other techniques makes all of this highly reliable.

Image 18: Lassen Peak, in Lassen Volcanic National Park of northern California. Lassen, shown here reflecting a beautiful sunset, erupted about a century ago. Lassen is quite similar to the other Cascades peaks, and remains capable of eruptions.

Image 19: Another view of Lassen Peak

Image 20: Yet another view of Lassen Peak

Image 21: Bumpass Hell at Lassen Volcanic National Park. This Yellowstone-like, hot-spring-and-sulfur site attests to the volcanic heritage of Lassen.

Image 22: Mt. Ruapehu, New Zealand. If this peak looks like those of the Cascades that haven't blown up to make a lake, you're getting it. Ruapehu is part of the Pacific Ring of Fire, and has the same basic origin as the Cacades.

Virtual Field Trip #2: Olympic National Park

Map of Olympic National Park
Welcome to your Olympic National Park tour! Jutting out into the Pacific Ocean, just west of Seattle in Washington, is this extraordinarily picturesque park, where the Pacific's moisture-laden winds dump rain and snow more rapidly than anywhere else in the lower-48 states. It’s also home to some of the country's greatest old-growth forests (with trees towering up to 300 ft), crystalline streams, cascading waterfalls, rugged coastlines replete with basking sea lions, tidal pools filled with urchins and starfish, and high peaks that sport active glaciers. Known more for its biology than its geology, Olympic is also the home for the largest subspecies of elk in the country, the Roosevelt Elk, which the park exists to preserve (thanks to, you guessed it, the Roosevelts). Photos by Richard & Cindy Alley, map by USGS.
Seagulls sitting on rock near Kalaloch at the SW edge of Olympic National Park
The Olympic Peninsula features beaches on three sides. Gulls and starfish grace the Pacific Coast near Kalaloch at the southwest edge of the national park, shown here.
Fog along the coast of Olympic National Park
Cool waters offshore favor the formation of fog, which reduces evaporation from the trees. Combined with a general lack of hurricanes, tornadoes, and ice storms, this probably contributes to the ability of west-coast temperate-rain-forest trees to grow roughly twice as tall as their east-coast equivalents. Cutting of trees may increase wind flow and reduce fog, making it difficult for tall forests to re-establish themselves in some places, a problem raised with cutting of redwoods to the south.
Coast of Olympic National Park with rocks jutting out of the water.
The young, rocky coast is attacked by the waves of the Pacific, which exploit cracks and layers in the rocks to carve out interesting shapes.
Sea Cave
A strong rock between cracks may be left standing in the waves as the rocks along the cracks are worn away. Continued attack by waves sometimes cuts through the remaining rock to make a sea cave, such as is seen here.
Rainforest growth found inland at Olympic National Park.
Inland, the abundant rain and cool temperatures favor rainforest growth, such as seen here.
Epiphytes – plants growing on plants found inland
One hallmark of rainforests is the lush growth of epiphytes, plants growing on plants. This is a very difficult niche in which to live in climates with droughts, because lack of soil leads to lack of water-holding capacity; this difficulty is much smaller in a rainforest.
Sol Duc Falls.
The abundant rainfall feeds beautiful streams, some of which host important salmon runs. Sol Duc Falls is shown here.
Marymere Falls
Marymere Falls, shown here, is almost ninety feet high. Don’t try to memorize these details—but take the pictures along if you’re going to visit so you know what to see. Instead, look for the big-picture geology, coming soon.
Higher peaks of the park  host glaciers
The higher peaks in the park host glaciers. Peaks of similar elevation farther to the east do not have glaciers, however; the high snowfall, frequent cloudiness (blocking the sun) and cool summer temperatures cause glaciation to reach to low elevations at Olympic National Park. Melting of glaciers contributes to summertime stream flow, and the glaciers erode valleys more rapidly than rivers do.
Mule deer in the forest
When your professor visited Olympic, he wasn't fortunate to see the famed Roosevelt Elk, but this mule deer was napping the day away, and looking remarkably inconspicuous.
Dark sand beaches in Olympic
The beaches of Olympic typically have dark sand, eroded from the sea-floor rocks exposed along the coast. Many common dark minerals break down more rapidly than do light-colored minerals, so "old" beaches, such as those of the east coast where the sea has had a long time to interact with the sand, are dominated by light colors, but "new" beaches such as this are dark-colored. The young ladies enjoyed their visit!
Layered rocks jutting out of the beach called Turbidites
The layered rocks in the center of the picture are a special type, called turbidites, shown and discussed in the next slide. The layers seen here were almost horizontal when they formed. But, the layers are now tipped up on edge, the result of deformation as the rocks were scraped off the conveyor-belt of the Pacific floor into the Olympic grocery check-out lane.
Close up of the Turbidites.  The light gray rock is sandstone and the darker gray rock is siltstone and claystone
A close-up of the rocks from the previous picture, with a pocket knife at the bottom for scale. Sediment eroded from the Peninsula is moved by streams to the sea, and then taken farther out beneath the sea by waves. When an earthquake occurs (and sometimes for other reasons), a landslide or flow sometimes develops, carrying the sediment down into the offshore trench. Sand settles out of such a "turbidity current" first, followed by smaller pieces (silt and clay). Just above the knife, the light-gray rock is sandstone, grading up into the darker siltstone and claystone. The next flow tore up the top of the clay, so there is mixing between the new, light-colored sand and the old, dark-colored silt and clay, followed by another sand layer and then another clay layer. These rocks were then scraped off the downgoing slab and brought to the beach for you to see.
Pacific sunset in Olympic National Park
And, a beautiful Pacific sunset to finish a quick visit to Olympic National Park.

Virtual Field Trip #2
Click Here for Text Alternative of Virtual Field Trip #2

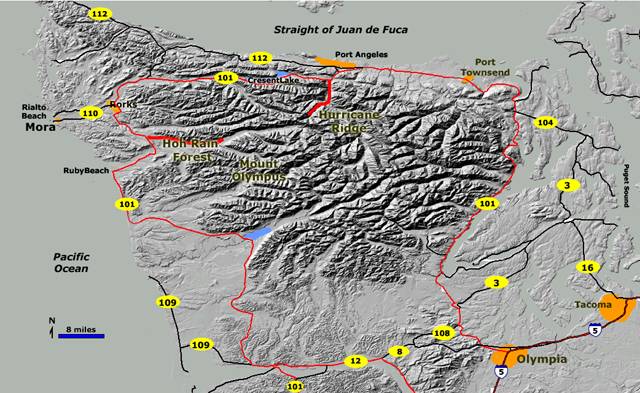
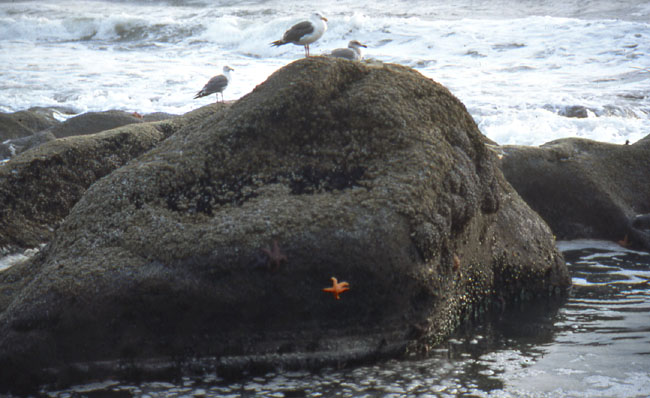
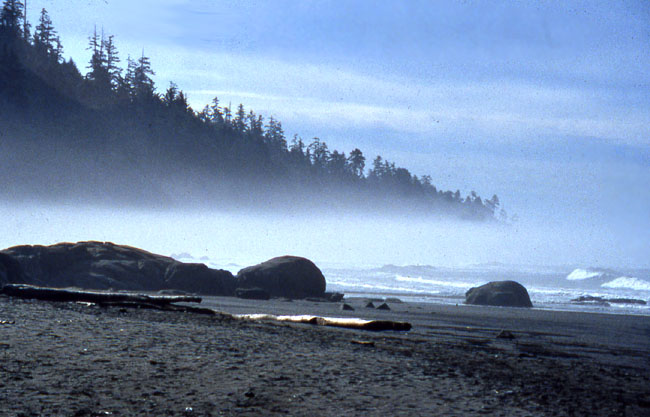
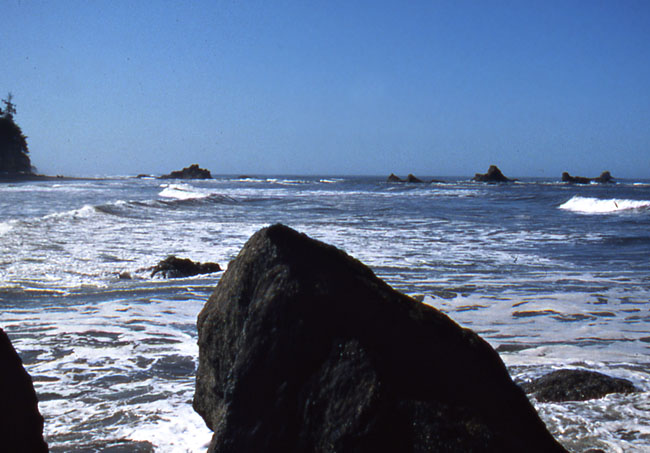
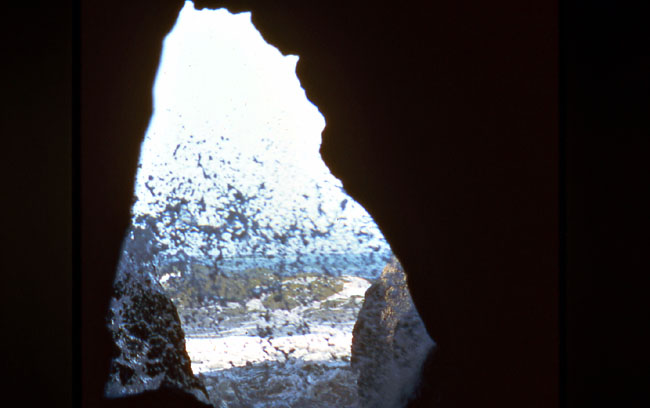
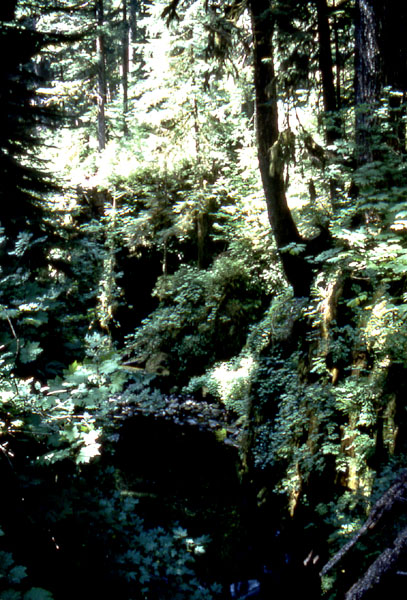
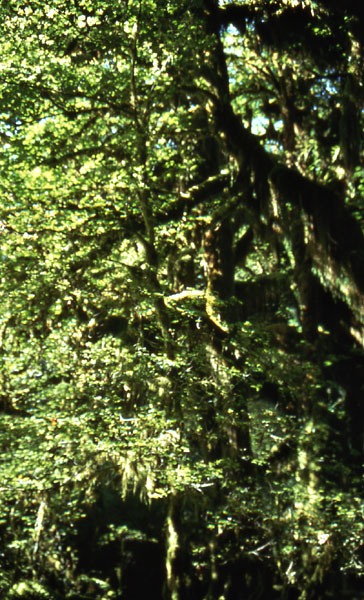
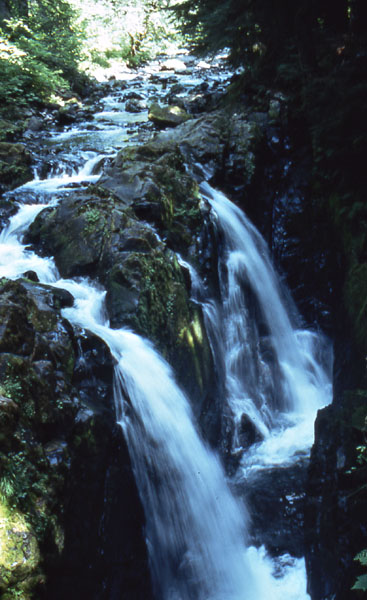
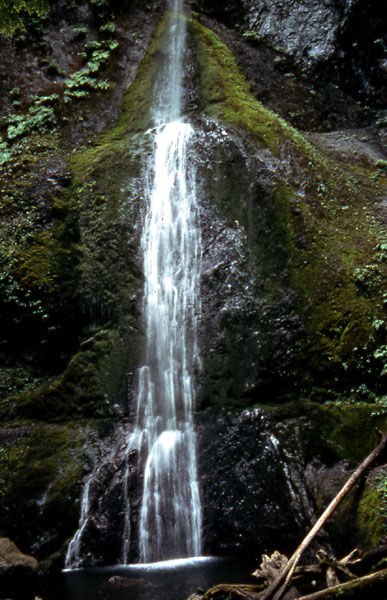
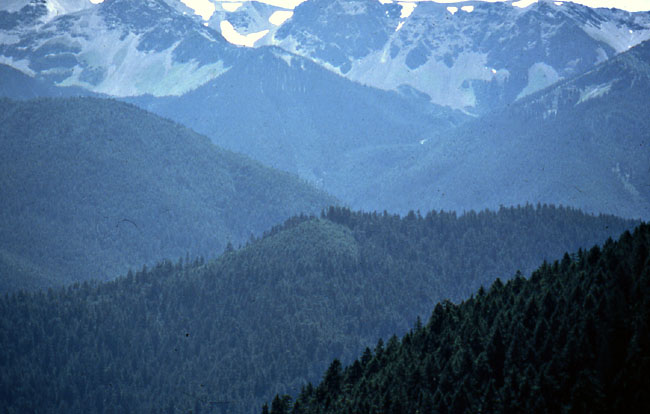
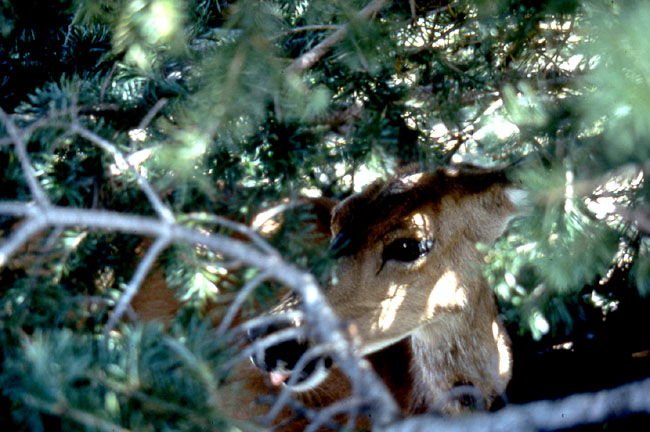
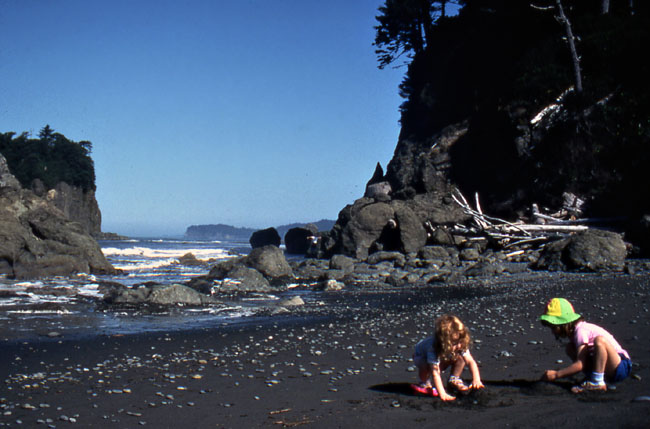
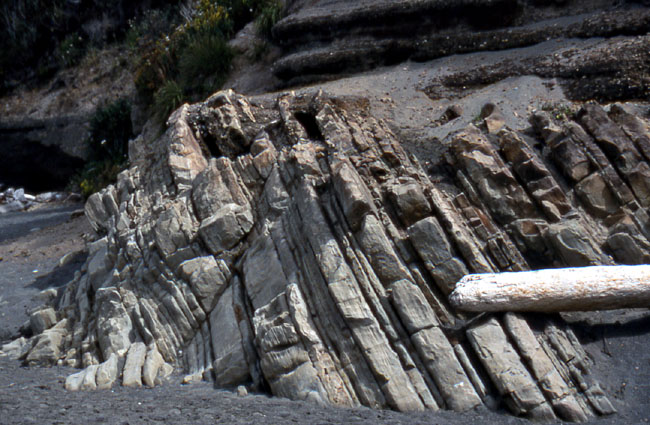
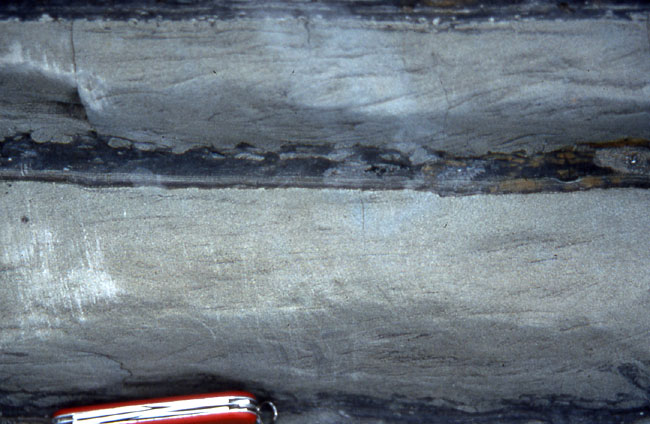
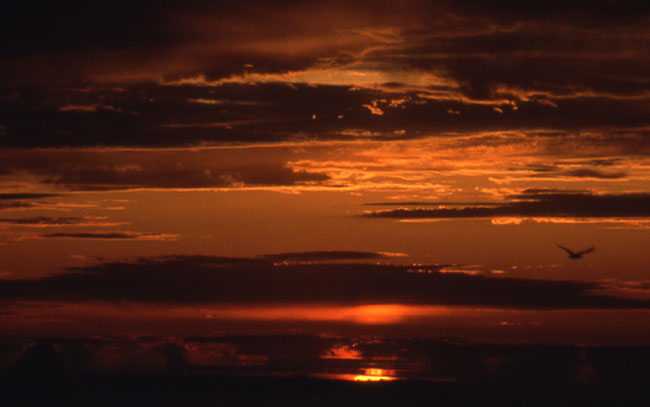
Image 1: Map of Olympic National Park. Welcome to your Olympic National Park tour! Jutting out into the Pacific Ocean, just west of Seattle in Washington, is this extraordinarily picturesque park, where the Pacific's moisture-laden winds dump rain and snow more rapidly than anywhere else in the lower-48 states. It’s also home to some of the country's greatest old-growth forests (with trees towering up to 300 ft), crystalline streams, cascading waterfalls, rugged coastlines replete with basking sea lions, tidal pools filled with urchins and starfish, and high peaks that sport active glaciers. Known more for its biology than its geology, Olympic is also the home for the largest subspecies of elk in the country, the Roosevelt Elk, which the park exists to preserve (thanks to, you guessed it, the Roosevelt’s). Photos by Richard & Cindy Alley, map by USGS.

Image 2: Seagulls sitting on rock near Kalaloch at the SW edge of Olympic National Park. The Olympic Peninsula features beaches on three sides. Gulls and starfish grace the Pacific Coast near Kalaloch at the southwest edge of the national park, shown here.

Image 3: Fog along the coast of Olympic National Park. Cool waters offshore favor the formation of fog, which reduces evaporation from the trees. Combined with a general lack of hurricanes, tornadoes, and ice storms, this probably contributes to the ability of west-coast temperate-rain-forest trees to grow roughly twice as tall as their east-coast equivalents. Cutting of trees may increase wind flow and reduce fog, making it difficult for tall forests to re-establish themselves in some places, a problem raised with cutting of redwoods to the south.

Image 4: Coast of Olympic National Park with rocks jutting out of the water. The young, rocky coast is attacked by the waves of the Pacific, which exploit cracks and layers in the rocks to carve out interesting shapes.

Image 5: Sea Cave. A strong rock between cracks may be left standing in the waves as the rocks along the cracks are worn away. Continued attack by waves sometimes cuts through the remaining rock to make a sea cave, such as is seen here.

Image 6: Rainforest growth found inland at Olympic National Park.

Image 7: Epiphytes – plants growing on plants found inland. One hallmark of rainforests is the lush growth of epiphytes. This is a very difficult niche in which to live in climates with droughts, because lack of soil leads to lack of water-holding capacity; this difficulty is much smaller in a rainforest.

Image 8: Sol Duc Falls. The abundant rainfall feeds beautiful streams, some of which host important salmon runs. Sol Duc Falls is shown here.

Image 9: Marymere Falls, shown here, is almost ninety feet high. Don’t try to memorize these details--but take the pictures along if you’re going to visit so you know what to see. Instead, look for the big-picture geology, coming soon.

Image 10: The higher peaks in the park host glaciers. Peaks of similar elevation farther to the east do not have glaciers, however; the high snowfall, frequent cloudiness (blocking the sun) and cool summer temperatures cause glaciations to reach to low elevations at Olympic National Park. Melting of glaciers contributes to summertime stream flow, and the glaciers erode valleys more rapidly than rivers do.

Image 11: Mule deer in the forest. When your professor visited Olympic, he wasn't fortunate to see the famed Roosevelt Elk, but this mule deer was napping the day away, and looking remarkably inconspicuous.

Image 12: Two children playing on the dark sand beaches in Olympic. The beaches of Olympic typically have dark sand, eroded from the sea-floor rocks exposed along the coast. Many common dark minerals break down more rapidly than do light-colored minerals, so “old” beaches, such as those of the east coast where the sea has had a long time to interact with the sand, are dominated by light colors, but “new” beaches such as this are dark-colored. The young ladies enjoyed their visit!

Image 13: Layered rocks jutting out of the beach called Turbidites. The layered rocks in the center of the picture are a special type, called turbidites, shown and discussed in the next slide. The layers seen here were almost horizontal when they formed. But, the layers are now tipped up on edge, the result of deformation as the rocks were scraped off the conveyor-belt of the Pacific floor into the Olympic grocery check-out lane.

Image 14: Close up of the Turbidites, with a pocket knife at the bottom for scale. Sediment eroded from the Peninsula is moved by streams to the sea, and then taken farther out beneath the sea by waves. When an earthquake occurs (and sometimes for other reasons), a landslide or flow sometimes develops, carrying the sediment down into the offshore trench. Sand settles out of such a ”turbidity current” first, followed by smaller pieces (silt and clay). Just above the knife, the light-gray rock is sandstone, grading up into the darker siltstone and claystone. The next flow tore up the top of the clay, so there is mixing between the new, light-colored sand and the old, dark-colored silt and clay, followed by another sand layer and then another clay layer. These rocks were then scraped off the downgoing slab and brought to the beach for you to see.

Image 15: Pacific sunset in Olympic National Park

Virtual Field Trip #3: Mount St. Helens

ash from the Mt. St. Helens explosion.
Mt. St. Helens: A Volcano Blows its Top
Mt. St. Helens, before 1980.
Before 1980, Mt. St. Helens was the queen of the Cascades, snow-capped, symmetric, and beautiful. But, geologists knew that the peak had also been the most active of the Cascades over many centuries.
Mt. St. Helens on April 10, 1980.
In winter and spring of 1980, magma moved upwards beneath the volcano. (Magma is melted rock underground.) Small eruptions started, covering much of the snow with volcanic ash, as seen here. Mt. Adams, another Cascades peak, is visible behind and just to the left of Mt. St. Helens. This USGS picture was taken by Donald A. Swanson on April 10, 1980. No need to memorize numbers or dates here, but appreciate the power.
Mt. St. Helens on April 27, 1980 shows a bulge developing on the N. side.
A "bulge" developed on the north side of Mount St. Helens as magma pushed up within the peak. Repeated measurement of the distance to the bulge (as shown here) found growth of up to five feet (1.5 meters) per day. By May 17, part of the volcano's north side had been pushed upwards and outwards over 450 feet (135 meters). You might not be surprised to learn that such a huge blister will tend to rupture and fall down. The view is from the northeast in this April 27, 1980 photo by Peter Lipman.
Mt. St. Helens erupting on May 18, 1980.
On May 18, 1980, at 8:32 a.m. Pacific Daylight Time, a magnitude 5.1 earthquake shook the peak, and the bulge and surrounding area slid away. The pressure release triggered a major eruption, as the magma bubbled and blew apart to create ash carried aloft by poison gas. The landslide from the bulge buried 24 square miles (62 square kilometers) of valley. Before going up as shown in these photos, the blast first went sideways, gravely damaging 250 square miles (650 square kilometers). Fifty-seven people were killed or are still missing. USGS photos by Austin Post (left) and Robert Krimmel (right).
Plume of ash erupting from the mountain.
For more than nine hours a vigorous plume of ash erupted, eventually reaching 12 to 15 miles (20-25 kilometers) above sea level. The plume was blown eastward at an average speed of 60 miles per hour (95 kilometers/hour), with ash reaching Idaho by noon. By early May 19, the devastating eruption was over. This May 18 USGS photo of the ash plume is by Donald A. Swanson.
Map of the area affected by the May 18, 1980 eruption.
Map of the area affected by the May 18, 1980 eruption. North is to the top, and the little scale bar at the bottom is five miles--this was a big deal. The blast knocked over trees across most of the yellow area. Much of the bulge ended up in the black-lined debris-avalanche deposits, while melted snow and ice plus water pushed out of lakes made the brown mudflow deposits. Thick layers of hot ash fell to make the red pyroclastic flow deposits.
After eruption, Mt. St. Helens elevation dropped 1300 feet.
After the May 18, 1980 eruption, Mount St. Helens' elevation was over 1300 feet lower than before, and the volcano had a one-mile-wide, horseshoe-shaped crater. This photo by Tom Casadevall of the USGS was taken four months after the eruption, on September 16, 1980. The yellow arrow points to a helicopter.
Volcanic ash covering the landscape around the volcano.  A helicopter is hovering near the ground.
For weeks, volcanic ash covered the landscape around the volcano and for several hundred miles downwind to the east. Noticeable ash fell in eleven states. The total volume of ash (before its compaction by rainfall) was approximately 0.26 cubic mile (1.01 cubic kilometers), or, enough ash to cover a football field to a depth of 150 miles (240 kilometers). In this USGS photograph by Lyn Topinka from August 22, 1980, three months after the eruption, a helicopter stirs up ash while trying to land in the devastated area.
Mount St. Helens on May 17, 1980, one day before the devastating eruption. The view is from Johnston's Ridge, six miles (10 kilometers) northwest of the volcano. USGS photo by Harry Glicken. The next photo is from nearly the same place, four months later. Try looking at it, then flipping back to this one.
Mount St. Helens on May 17, 1980, one day before the devastating eruption. The view is from Johnston's Ridge, six miles (10 kilometers) northwest of the volcano. USGS photo by Harry Glicken. The next photo is from nearly the same place, four months later. Try looking at it, then flipping back to this one."
Mount St. Helens soon after the May 18, 1980 eruption, as viewed from a similar location as the previous photo, at Johnston's Ridge. USGS photo by Harry Glicken on Sept. 10, 1980.
Mt. St. Helens before the explosion -  top of the mountain still intact. The mountain after the explosion showing the resulting crater.
BEFORE (top image) and AFTER (bottom image) Another before-and-after pair. The blast lowered the peak by more than 1300 feet. These USGS (bottom) and US Forest Service (top) pictures are not exactly from the same place, but they're close.
Left image is a stand of trees.  Second image is taken from the same place but shows the mountain with a crater after the eruption.
Difficult as it may be to believe, these photos are from the same place, looking in the same direction! The trees on the left were obscuring a view of the beautiful snow-capped peak, which has been blown away, along with the trees, in the photo on the right. US Forest Service photos: http://www.fs.fed.us/gpnf/mshnvm/digital-gallery/25yearsofrecoverybefore...
Knocked over coniferous trees.  They were knocked over by the eruption.
These were towering coniferous trees before the eruption, but now are knocked over like matchsticks. Trees in the upper left weren't knocked over, but were burned to death. USGS photo on Aug. 22, 1980 by Lyn Topinka.
A destroyed logging camp including huge pile of logs and multiple full sized logging trucks.  Destruction by a flood created by a landslide
The eruption melted glaciers, and the landslide pushed water out of Spirit Lake, together making a huge flood that destroyed many things including this logging camp on the South Fork Toutle River. Those yellow things in the upper-right are full-sized logging trucks destroyed by the flood (the arrow points at one). USGS photo taken on May 19, 1980, by Phil Carpenter.
A car buried in lava approximately 10 miles from Mount St. Helens.
Reid Blackburn's car, located approximately 10 miles from Mount St. Helens. Reid was a photographer for National Geographic as well as the Vancouver Columbian newspaper. Unfortunately, Reid did not make it out alive. A scholarship is now given by The National Press Photographers Association in Reid Blackburn's honor. USGS Photograph taken on May 31, 1980, by Dan Dzurisin.
Mudflow created by the melting of the glaciers.
As noted for previous slides, the Mt. St. Helens eruption melted the glaciers on the peak, and also dumped immense amounts of rock material into Spirit Lake. The water displaced from the lake, and melted from the glaciers, mixed with volcanic ash and mud to make a giant mudflow that raced down the Toutle and Cowlitz Rivers, causing great destruction. This image and the next two, by Dr. Alley and his wife Cindy, show the situation miles downstream.
Damage caused by the mudflow that raced down the Toutle and Cowlitz Rivers.
Another view of the damage caused by the immense mudflow that raced down the Toutle and Cowlitz Rivers. The broken trees attest to the power of the mud-filled flood.
Another view of the mudflow.
Another view of the mudflow. In this one, a much younger Dr. Alley (this was 1980, remember) is visible in the lower-left of the picture, dwarfed by the high-mud mark on the tree. The tourists on the right are looking at the foundation of what had been a house.
Many logs scattered across the landscape 10 years after the eruption.  Some bark remains on the trees.
In this picture taken about 10 years after the eruption, trees knocked over by the blast are scattered across the landscape. Some bark remains on these; they were slightly shielded by a hill and were not as strongly blasted as some.
10 years after the eruption students walking through a stand of dead trees that were largely shielded from the blast.
In this image taken about 10 years after the eruption, members of a geological field trip attended by Dr. Alley take a walk through some standing former trees that were greatly shielded from the blast, which came over the hill from diagonally behind the camera position. Notice the green vegetation flourishing on the far hillside; salmonberry, fireweed, and others moved back in quickly.
Part of the mountain with no dead trees.  Many trees were salvage-logged.
This third picture of Mt. St. Helens a decade after the blast shows deep gullying in a region without dead trees. Many dead trees were salvage-logged because of the value of the lumber, but such actions do have consequences for the landscape—without dead trees to dam the flow, rains feed little streams that rapidly wash away the loose soil, making it harder for new plants to grow.
Two women collecting vials of ash.
Mt. St. Helens was a media star. T-shirts, coffee mugs, and vials of ash were among souvenirs sold to enthusiastic tourists. These ladies realized that people standing ankle-deep in Mt. St. Helens ash were spending $5 for a little vial of Mt. St. Helens ash, and so the ladies decided to gather some of their own. The colorful garb is possibly reflective of the era.
Some additional links about the Mt. St. Helens story.
Some additional links about the Mt. St. Helens story

Virtual Field Trip #3
Click Here for Text Alternative for Virtual Field Trip #3

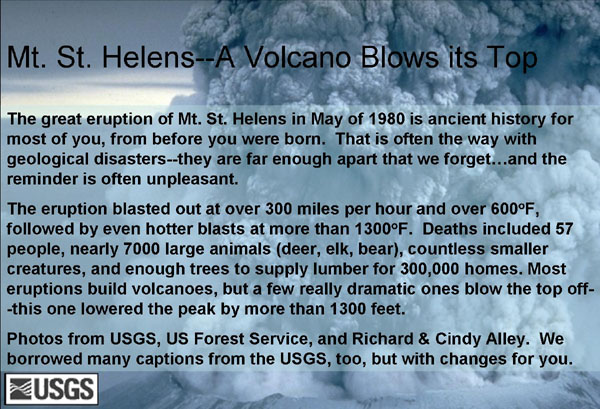
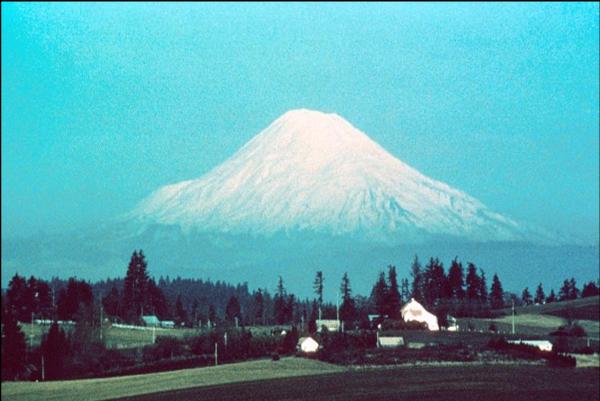
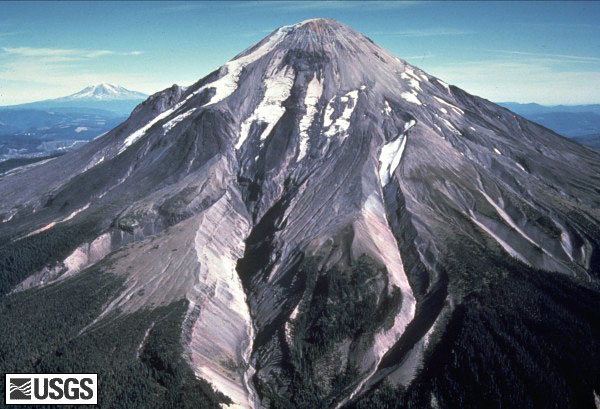
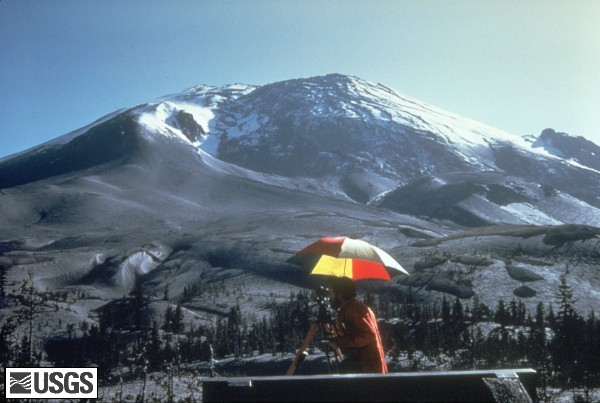
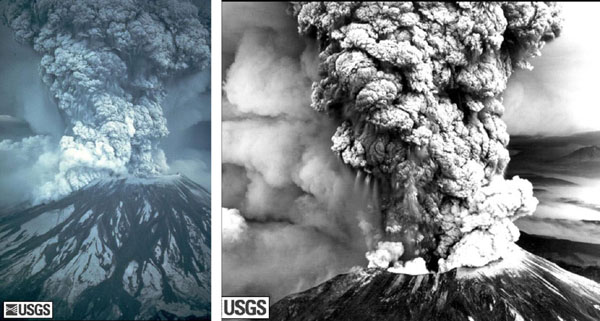
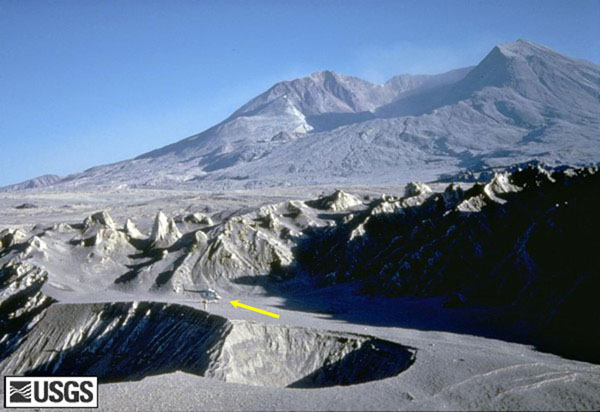
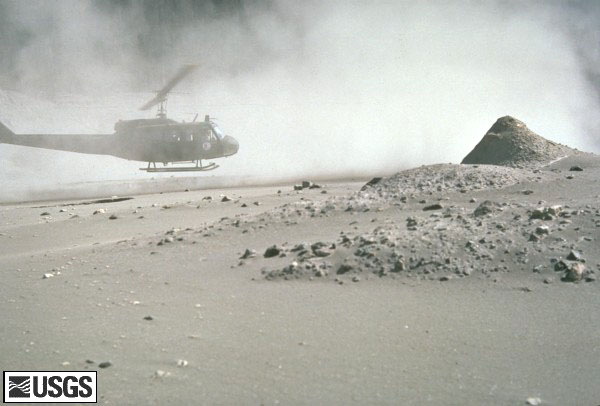
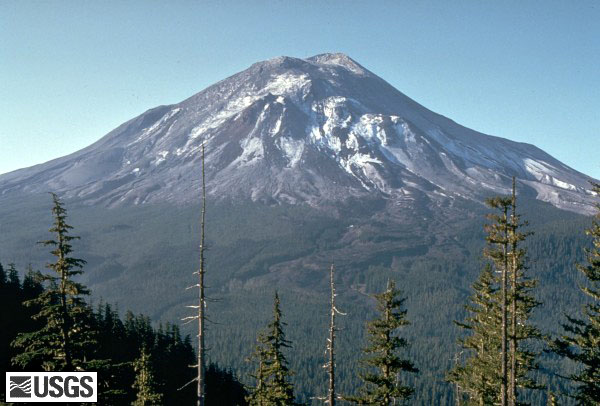
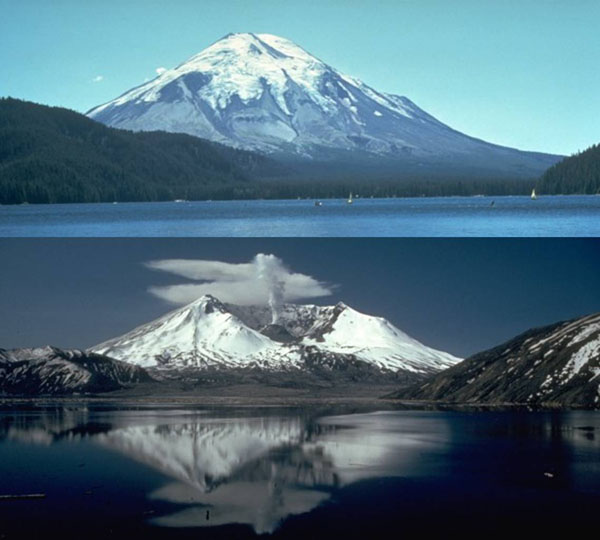
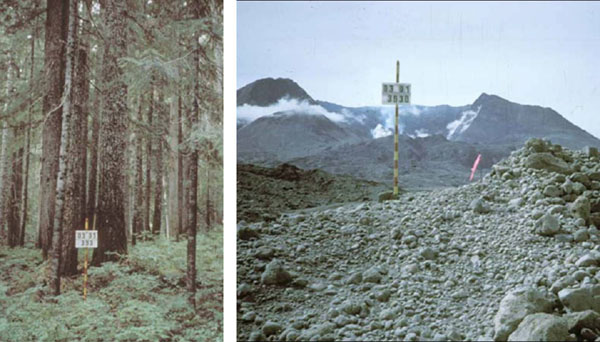
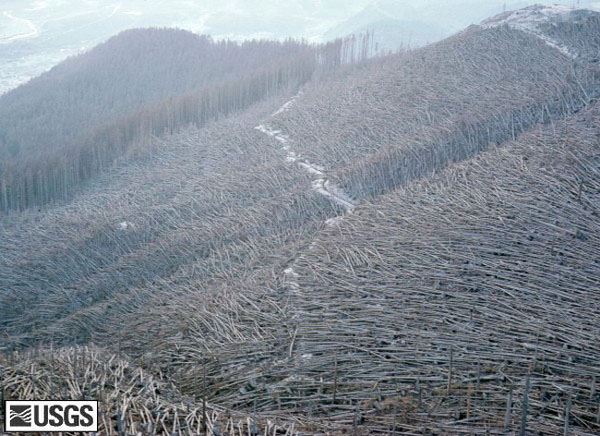
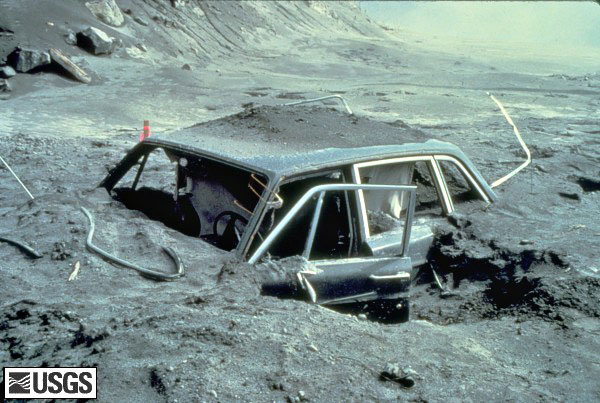
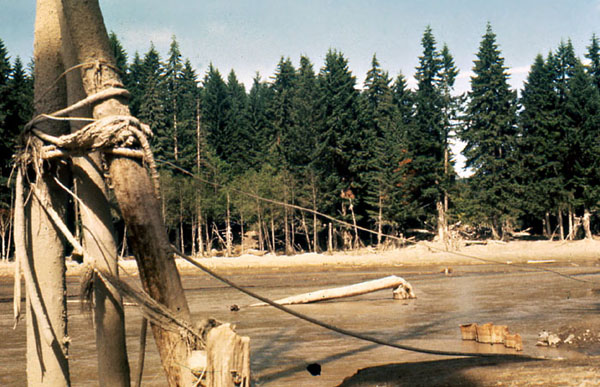
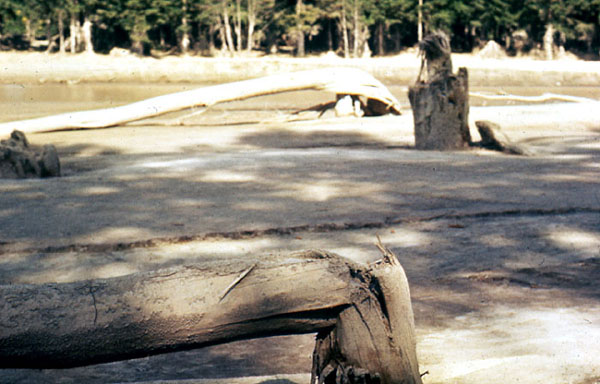
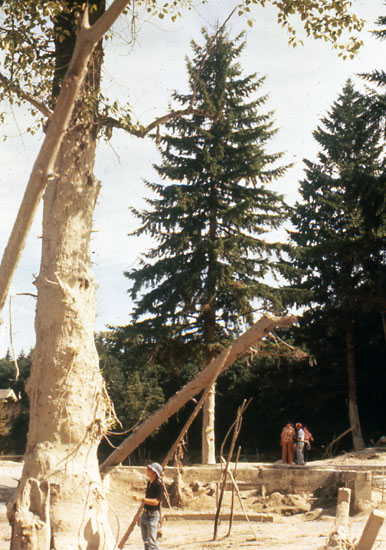
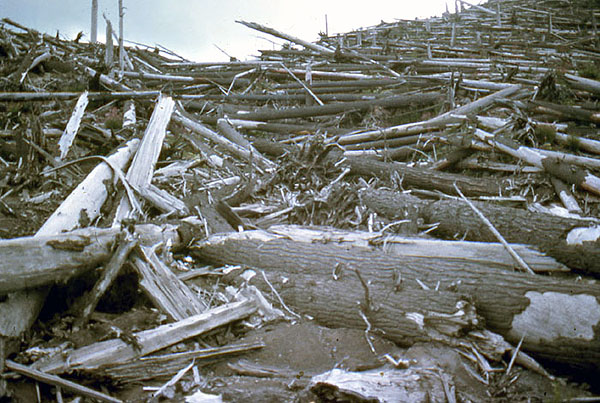
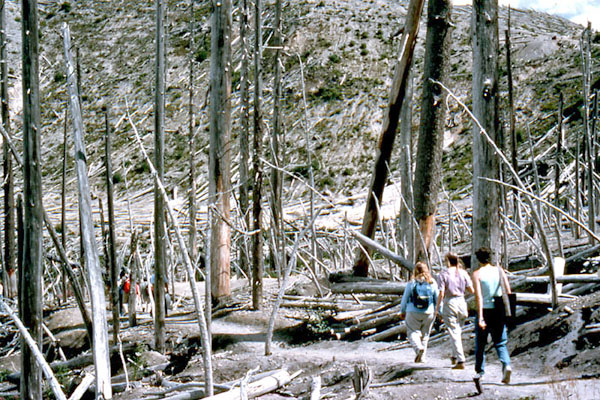
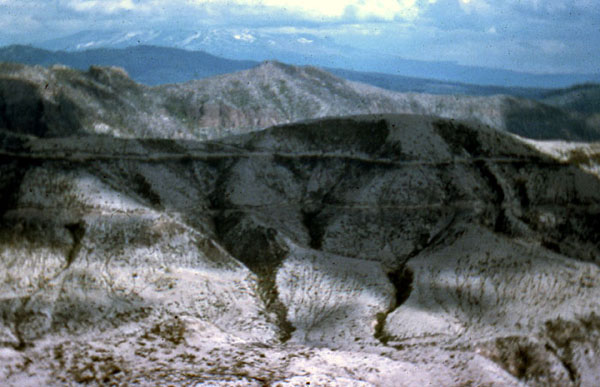
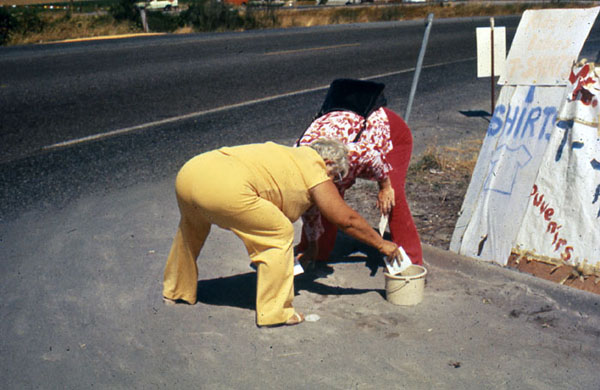
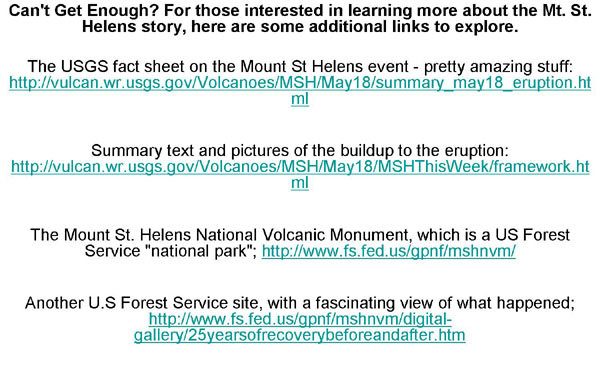
Image 1: Picture of ash in the sky from Mr. St. Helens. The great eruption of Mt. St. Helens in May of 1980 is ancient history for most of you, from before you were born. That is often the way with geological disasters – they are far enough apart that we forget… and the reminder is often unpleasant.

The eruption blasted out at over 300 miles per hour and over 600 degrees F, followed by even hotter blasts at more than 1300 degrees F. Deaths included 57 people, nearly 7000 large animals (deer, elk, bear), countless smaller creatures, and enough trees to supply lumber for 300,000 homes. Most eruptions build volcanoes, but a few really dramatic ones blow the top off—this one lowered the peak by more than 1300 feet.

Photos from USGS, US Forest Service, and Richard & Cindy Alley. We borrowed many captions from the USGS , too, but with changes for you.

Image 2: Mt. St. Helens, before 1980. Before 1980, Mt. St. Helens was the queen of the Cascades, snow-capped, symmetric, and beautiful. But, geologists knew that the peak had also been the most active of the Cascades over many centuries.

Image 3: Mt. St. Helens on April 10, 1980. In winter and spring of 1980, magma moved upwards beneath the volcano. (Magma is melted rock underground.) Small eruptions started, covering much of the snow with volcanic ash, as seen here. Mt. Adams, another Cascades peak, is visible behind and just to the left of Mt. St. Helens. This USGS picture was taken by Donald A. Swanson on April 10, 1980. No need to memorize numbers or dates here, but appreciate the power.

Image 4: Mt. St. Helens on April 27, 1980 shows a ‘bulge’ developing on the N. side. A “bulge” developed on the north side of Mount St. Helens as magma pushed up within the peak. Repeated measurement of the distance to the bulge (as shown here) found growth of up to five feet (1.5 meters) per day. By May 17, part of the volcano's north side had been pushed upwards and outwards over 450 feet (135 meters). You might not be surprised to learn that such a huge blister will tend to rupture and fall down. The view is from the northeast in this April 27, 1980 photo by Peter Lipman.

Image 5: Mt. St. Helens erupting on May 18, 1980. On May 18, 1980, at 8:32 a.m. Pacific Daylight Time, a magnitude 5.1 earthquake shook the peak, and the bulge and surrounding area slid away. The pressure release triggered a major eruption, as the magma bubbled and blew apart to create ash carried aloft by poison gas. The landslide from the bulge buried 24 square miles (62 square kilometers) of valley. Before going up as shown in these photos, the blast first went sideways, gravely damaging 250 square miles (650 square kilometers). Fifty-seven people were killed or are still missing. USGS photos by Austin Post (left) and Robert Krimmel (right).

Image 6: Plume of ash erupting from the mountain. For more than nine hours a vigorous plume of ash erupted, eventually reaching 12 to 15 miles (20-25 kilometers) above sea level. The plume was blown eastward at an average speed of 60 miles per hour (95 kilometers/hour), with ash reaching Idaho by noon. By early May 19, the devastating eruption was over. This May 18 USGS photo of the ash plume is by Donald A. Swanson.

Image 7: Map of the area affected by the May 18, 1980 eruption. Map of the area affected by the May 18, 1980 eruption. North is to the top, and the little scale bar at the bottom is five miles--this was a big deal. The blast knocked over trees across most of the yellow area. Much of the bulge ended up in the black-lined debris-avalanche deposits, while melted snow and ice plus water pushed out of lakes made the brown mudflow deposits. Thick layers of hot ash fell to make the red pyroclastic flow deposits.

Image 8: After the May 18, 1980 eruption, Mount St. Helens' elevation was over 1300 feet lower than before, and the volcano had a one-mile-wide, horseshoe-shaped crater. This photo by Tom Casadevall of the USGS was taken four months after the eruption, on September 16, 1980.

Image 9: Volcanic ash covering the landscape around the volcano. A helicopter is hovering near the ground. For weeks, volcanic ash covered the landscape around the volcano and for several hundred miles downwind to the east. Noticeable ash fell in eleven states. The total volume of ash (before its compaction by rainfall) was approximately 0.26 cubic mile (1.01 cubic kilometers), or, enough ash to cover a football field to a depth of 150 miles (240 kilometers). In this USGS photograph by Lyn Topinka from August 22, 1980, three months after the eruption, a helicopter stirs up ash while trying to land in the devastated area.

Image 10: Mount St. Helens on May 17, 1980, one day before the devastating eruption. The view is from Johnston's Ridge, six miles (10 kilometers) northwest of the volcano. USGS photo by Harry Glicken. The next photo is from nearly the same place, four months later.

Image 11: Mount St. Helens soon after the May 18, 1980 eruption, as viewed from a similar location as the previous photo, at Johnston's Ridge. USGS photo by Harry Glicken on Sept. 10, 1980

Image 12: Mt. St. Helens before the explosion - top of the mountain still intact. The mountain after the explosion showing the resulting crater. The blast lowered the peak by more than 1300 feet. These USGS (bottom) and US Forest Service (top) pictures are not exactly from the same place, but they’re close.

Image 13: Left image is a stand of trees. Second image is taken from the same place but shows no trees, piles of ash and the mountain with a crater after the eruption. Difficult as it may be to believe, these photos are from the same place, looking in the same direction! The trees on the left were obscuring a view of the beautiful snow-capped peak, which has been blown away, along with the trees, in the photo on the right. US Forest Service photos: http://www.fs.fed.us/gpnf/mshnvm/digital-gallery/25yearsofrecoverybefore...

Image 14: Knocked over coniferous trees. They were knocked over by the eruption. These were towering coniferous trees before the eruption, but now are knocked over like matchsticks. Trees in the upper left weren’t knocked over, but were burned to death. USGS photo on Aug. 22, 1980 by Lyn Topinka.

Image 15: A destroyed logging camp including huge pile of logs and multiple full sized logging trucks. Destruction by a flood created by a landslide. The eruption melted glaciers, and the landslide pushed water out of Spirit Lake, together making a huge flood that destroyed many things including this logging camp on the South Fork Toutle River. Those yellow things in the upper-right are full-sized logging trucks destroyed by the flood (the arrow points at one). USGS photo taken on May 19, 1980, by Phil Carpenter.

Image 16: A car buried in lava approximately 10 miles from Mount St. Helens. Reid Blackburn's car, located approximately 10 miles from Mount St. Helens. Reid was a photographer for National Geographic as well as the Vancouver Columbian newspaper. Unfortunately, Reid did not make it out alive. A scholarship is now given by The National Press Photographers Association in Reid Blackburn’s honor. USGS Photograph taken on May 31, 1980, by Dan Dzurisin.

Image 17: Mudflow created by the melting of the glaciers. As noted for previous slides, the Mt. St. Helens eruption melted the glaciers on the peak, and also dumped immense amounts of rock material into Spirit Lake. The water displaced from the lake, and melted from the glaciers, mixed with volcanic ash and mud to make a giant mudflow that raced down the Toutle and Cowlitz Rivers, causing great destruction. This image and the next two, by Dr. Alley and his wife Cindy, show the situation miles downstream.

Image 18: Damage caused by the mudflow that raced down the Toutle and Cowlitz Rivers include a tree broken off a few feet from the ground. Another view of the damage caused by the immense mudflow that raced down the Toutle and Cowlitz Rivers. The broken trees attest to the power of the mud-filled flood.

Image 19: Another view of the mudflow. In this one, a much younger Dr. Alley (this was 1980, remember) is visible in the lower-left of the picture, dwarfed by the high-mud mark on the tree. The tourists on the right are looking at the foundation of what had been a house.

Image 20: Many logs scattered across the landscape 10 years after the eruption. Some bark remains on the trees. In this picture taken about 10 years after the eruption, trees knocked over by the blast are scattered across the landscape. Some bark remains on these; they were slightly shielded by a hill and were not as strongly blasted as some.

Image 21: 10 years after the eruption students walking through a stand of dead trees that were largely shielded from the blast. In this image taken about 10 years after the eruption, members of a geological field trip attended by Dr. Alley take a walk through some standing former trees that were greatly shielded from the blast, which came over the hill from diagonally behind the camera position. Notice the green vegetation flourishing on the far hillside; salmonberry, fireweed and others moved back in quickly.

Image 22: Part of the mountain with no dead trees. Many trees were salvage-logged. This third picture of Mt. St. Helens a decade after the blast shows deep gullying in a region without dead trees. Many dead trees were salvage-logged because of the value of the lumber, but such actions do have consequences for the landscape--without dead trees to dam the flow, rains feed little streams that rapidly wash away the loose soil, making it harder for new plants to grow.

Image 23: Two women collecting vials of ash. Mt. St. Helens was a media star. T-shirts, coffee mugs, and vials of ash were among souvenirs sold to enthusiastic tourists. These ladies realized that people standing ankle-deep in Mt. St. Helens ash were spending $5 for a little vial of Mt. St. Helens ash, and so the ladies decided to gather some of their own. The colorful garb is possibly reflective of the era.

Image 24: Some additional links about the Mt. St. Helens story.

Virtual Field Trip #4: Hawaii Volcanoes National Park

Mauna Loa
Mauna Loa (13,679 feet above sea level); Hawaii’s peaks start from 18,000 to 19,000 feet below sea level, making them the tallest mountains on Earth. Mauna Kea (peak at 13,796 feet above sea level, is out of picture to left)
Hot-spot volcanoes of Hawaii are much more approachable during eruption than steep stratovolcanoes
The hot-spot volcanoes of Hawaii are vigorous enough to kill the unwary, but are much more approachable during eruption than are the steep, explosive stratovolcanoes of the Ring of Fire and elsewhere, such as Mt. Lassen. This slide show gives you an up-close-and-personal visit to this “nicer” Hawaiian lava.
Chain of Craters Road, Hawaii Volcanoes National Park
Chain of Craters Road, Hawaii Volcanoes National Park. Older flows, now vegetated, are green. Darker flows are either gray pahoehoe (pronounced pa ho ee ho ee; ropy lava from hotter flows) or black aa (pronounced ah ah; broken-up lava from cooler-but-still-really-hot flows). Note car on road in middle of black aa, for scale.
Close up of lava Pahoehoe (sloid) and aa (looks crumbly)
Pahoehoe and aa.
View of ocean with steam rising out of the water.  The steam shows where lava is entering ocean.
Steam shows where lava is entering the ocean, beneath the red arrows. We will be hiking to the one on the right.
Janet and Karen Alley on the continuation of Chain of Craters Road
Janet (left) and Karen Alley, on what used to be the continuation of Chain of Craters Road, now lost beneath lava flows from the East Rift of Kilauea volcano. The hike to the active lava from here is just enough adventure to be exciting.
Chain of Craters Road engulfed by lava
Chain of Craters Road was lost, along with almost 200 houses and other buildings, when engulfed by lava.
Karen (left) and Cindy Alley along the former Chain of Craters Road.  A ‘no parking’ sign is buried in the lava.
Karen (left) and Cindy Alley, together with the world’s most superfluous “No Parking” sign along the former Chain of Craters road. The ropy pahoehoe lava is a strange surface for hiking, but can be traversed safely by careful hikers.
The trail to the active lava showing Pahoehoe.
The “trail” to the active lava is shown below. Hot lava is still flowing down the hill in the far upper right of this picture, as you will see in later photos.
Lava flowing out of tubes in the rock into the sea
Lava flows out of tubes into the sea. We didn’t get down to measure, but the higher “lava fall” probably is more than 30 feet tall.
Closer view of lava flowing into the sea from a large rock outcropping.
Closer view of lava flowing into the sea.
Lava flowing from East Rift of Kilauea.
Mile-wide view of lava flowing from the East Rift of Kilauea. On a sunny day, the hillside looks black, but as darkness falls, the glow of the molten lava shows.
Glowing lava.
Slightly closer view of glowing lava. People in lower center are much closer to the camera than is the lava behind them.
Glowing lava, approx. 30 feet (lower left) to approx. 100 feet across (others).
Closer views of glowing lava; pictures ~30 feet (lower left) to ~100 feet across (others).
Glowing lava, approx. 20 feet across
Close-up view of glowing lava; picture ~20 feet across.
Glowing lava; approx. 200 feet across.
Close-up view of glowing lava; picture ~200 feet across.
Lava surface chills rapidly in the air, forming a glassy shell which breaks as lava moves beneath
At roughly 2000 degrees F, the lava glows in the night. The lava surface chills rapidly in the air, forming a glassy shell, which then crackles and breaks as the sizzling lava moves beneath. You can sometimes watch a new crack appear as you hear the breaking glass. The red arrow points to a tongue of lava that will harden to look like the pahoehoe tongues shown in the next slide.
Hardened lava tongues (pahoehoe).  Four pictures showing different flow patterns.
Hardened lava tongues (pahoehoe). Boot toe for scale, lower right and upper left.
Lava Falls.  Lava flowing out of rock tubes into the ocean.
“Lava Falls”, ~30 feet high, 2000 degrees F, into ocean.
Karen and Janet Alley with hot lava flowing in the background.
Karen (left) and Janet Alley, and hot lava.

Virtual Field Trip #4
Click Here for Text Alternative for Virtual Field Trip #4

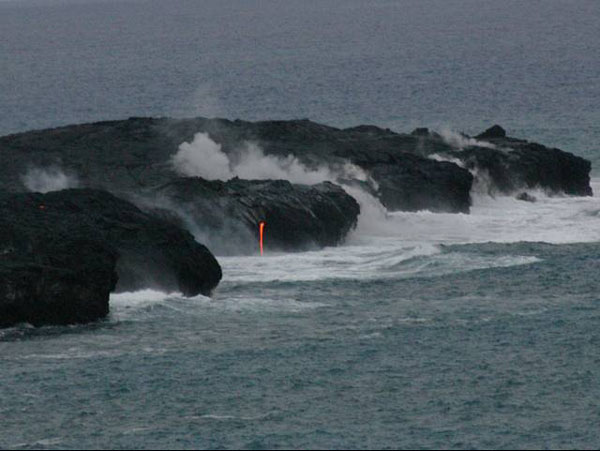
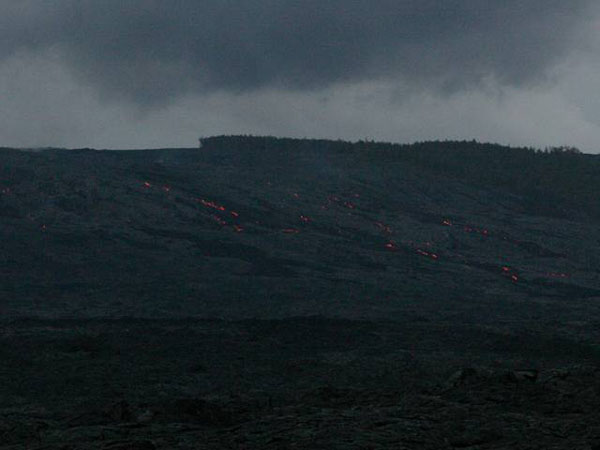
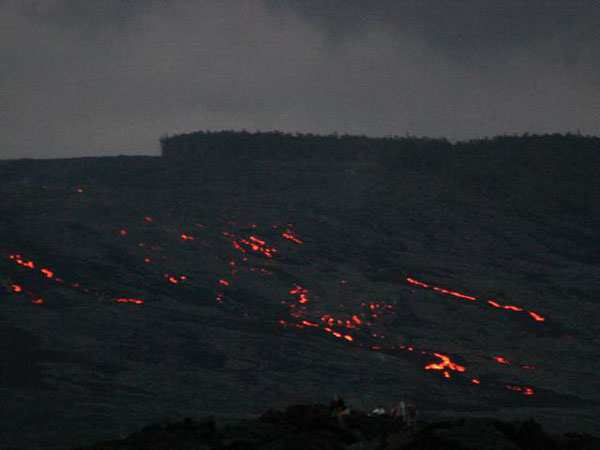
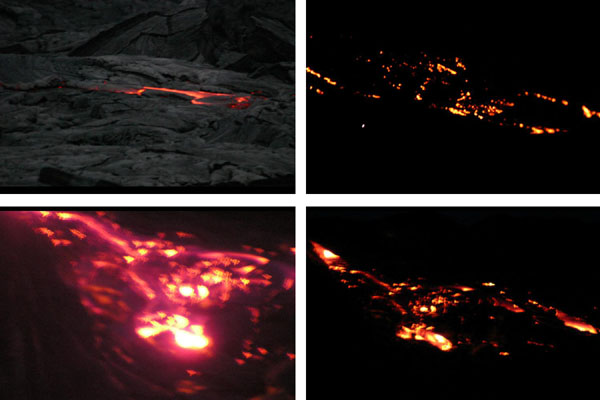
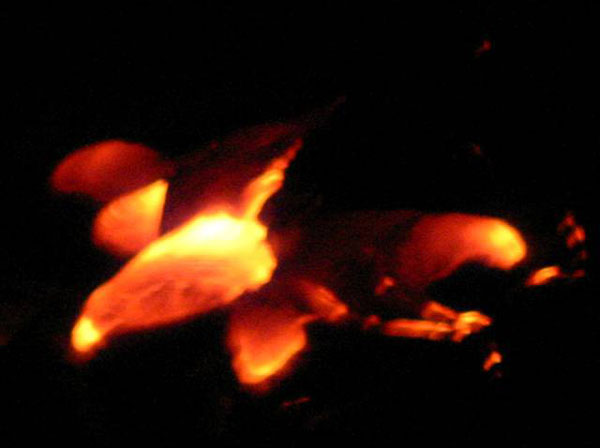
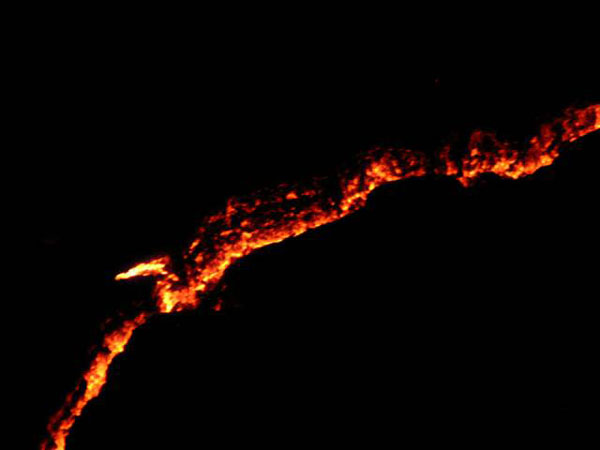
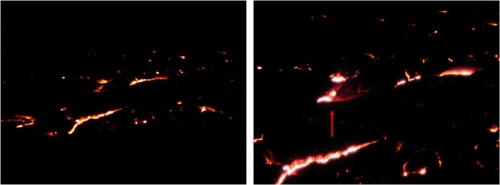
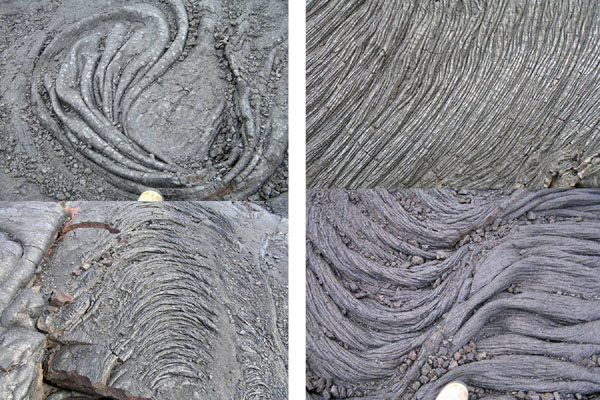
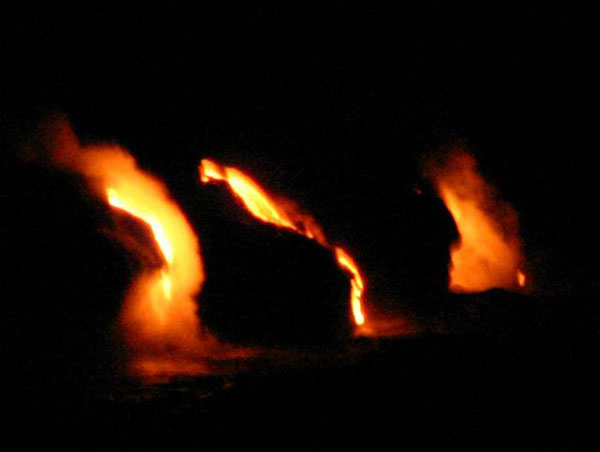
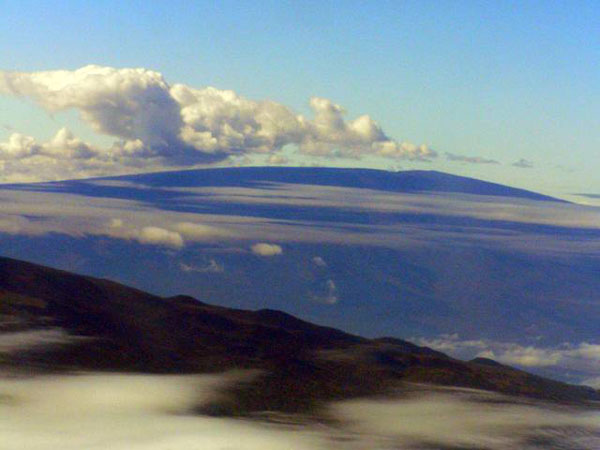
Image 1: Mauna Loa mountain. Mauna Loa (13,679 feet above sea level); Hawaii’s peaks start from 18,000 to 19,000 feet below sea level, making them the tallest mountains on Earth. Mauna Kea (peak at 13,796 feet above sea level, is out of picture to left)

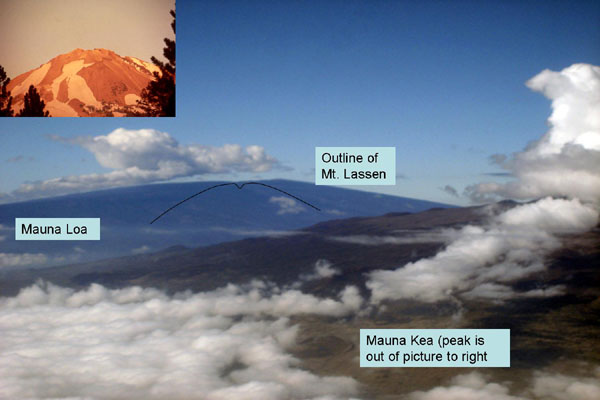
Image 2: Mauna Loa on the left of the picture, Mt. Lassen in the middle and Mauna Kea is off the picture to the right. The hot-spot volcanoes of Hawaii are vigorous enough to kill the unwary, but are much more approachable during eruption than are the steep, explosive stratovolcanoes of the Ring of Fire and elsewhere, such as Mt. Lassen. This slide show gives you an up-close-and-personal visit to this “nicer” Hawaiian lava.

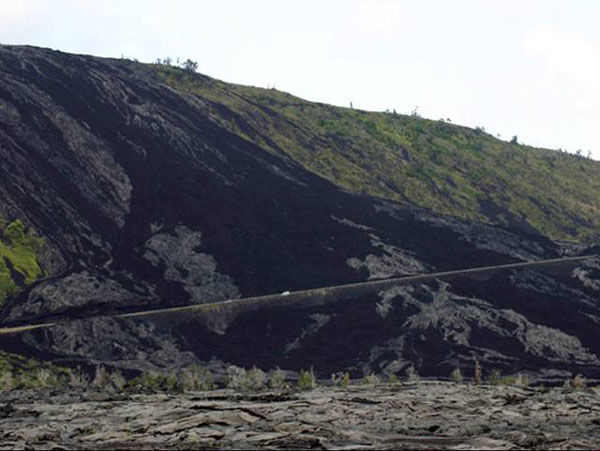
Image 3: Chain of Craters Road, Hawaii Volcanoes National Park. Older flows, now vegetated, are green. Darker flows are either gray pahoehoe (pronounced pa ho ee ho ee; ropy lava from hotter flows) or black aa (pronounced ah ah; broken-up lava from cooler-but-still-really-hot flows).

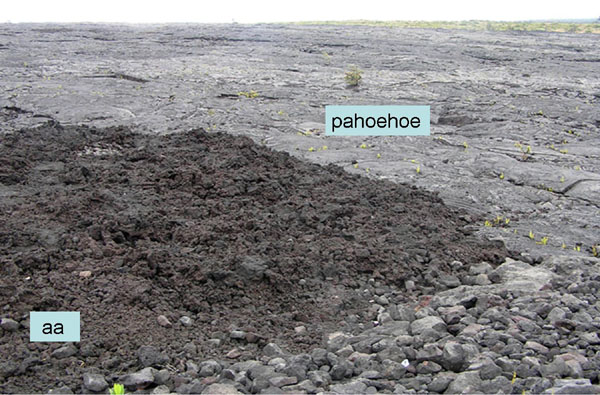
Image 4: Close up of lava Pahoehoe (sloid) and aa (looks crumbly)

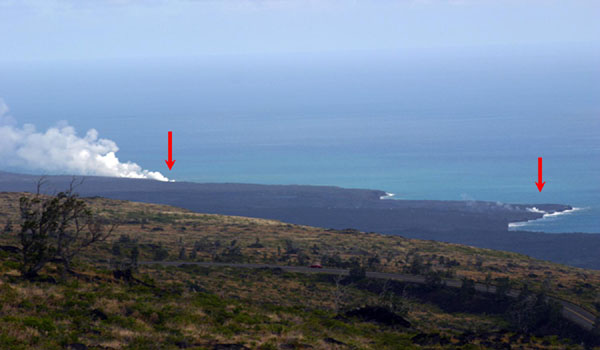
Image 5: View of ocean with steam rising out of the water. The steam shows where lava is entering ocean.

Image 6: Janet and Karen Alley, on what used to be the continuation of Chain of Craters Road, now lost beneath lava flows from the East Rift of Kilauea volcano. The hike to the active lava from here is just enough adventure to be exciting.

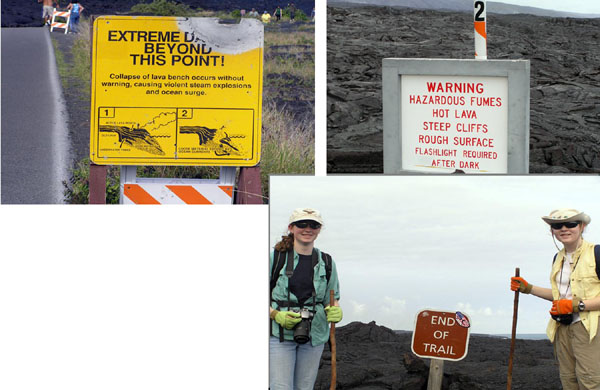
Image 7: Chain of Craters Road was lost, along with almost 200 houses and other buildings, when engulfed by lava.

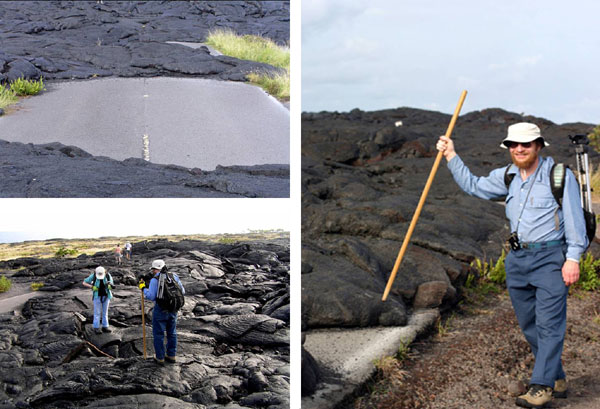
Image 8: Two pictures. Left, Karen and Cindy Alley along the former Chain of Craters Road. Right, a ‘no parking’ sign buried in the lava. The ropy pahoehoe lava is a strange surface for hiking, but can be traversed safely by careful hikers.

Image 9: The “trail” to the active lava showing Pahoehoe. Hot lava is still flowing down the hill in the far upper right of this picture, as you will see in later photos.

Image 10: Lava flows out of tubes in the rock into the sea. You can see the red lava flowing into the sea and the steam rising out of the ocean where the lava enters. We didn’t get down to measure, but the higher “lava fall” probably is more than 30 feet tall.

Image 11: Closer view of lava flowing into the sea from a large rock outcropping.

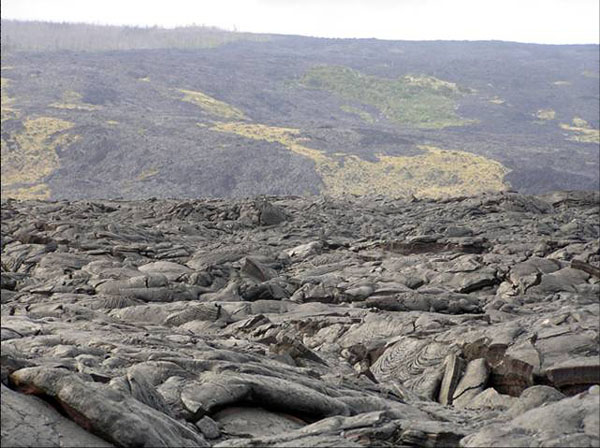
Image 12: Mile-wide view of lava flowing from the East Rift of Kilauea. On a sunny day, the hillside looks black, but as darkness falls, the glow of the molten lava shows.

Image 13: Slightly closer view of glowing lava

Image 14: Glowing lava.

Image 15: Glowing lava.

Image 16: Glowing lava.

Image 17: At roughly 2000 degrees F, the lava glows in the night. The lava surface chills rapidly in the air, forming a glassy shell, which then crackles and breaks as the sizzling lava moves beneath. You can sometimes watch a new crack appear as you hear the breaking glass. The red arrow points to a tongue of lava that will harden to look like the pahoehoe tongues shown in the next slide.

Image 18: Hardened lava tongues (pahoehoe). Four pictures showing different flow patterns.

Image 19: “Lava Falls”

Image 20: Karen and Janet Alley with hot lava flowing in the background.

Want to see more?

Here are some optional vTrips you might also want to explore! (No, these won't be on the quiz!)

Hawaii Volcanoes National Park and a second Crater Lake Slideshow
(Provided by Dr. Alley)

Hawaii
(Provided by USGS)

Crater Lake National Park
(Provided by UCGS)

Crater Lake National Park - 3D version
(Provided by UCGS - red/cyan stereo viewing glasses required)

Mount St. Helens National Volcanic Monument
(Provided by UCGS)

Olympic National Park
(Provided by UCGS)

Word Document of Unit 3 V-trips